Sunlu Terminator T3 Dual Z-Axis Upgrade
prusaprinters
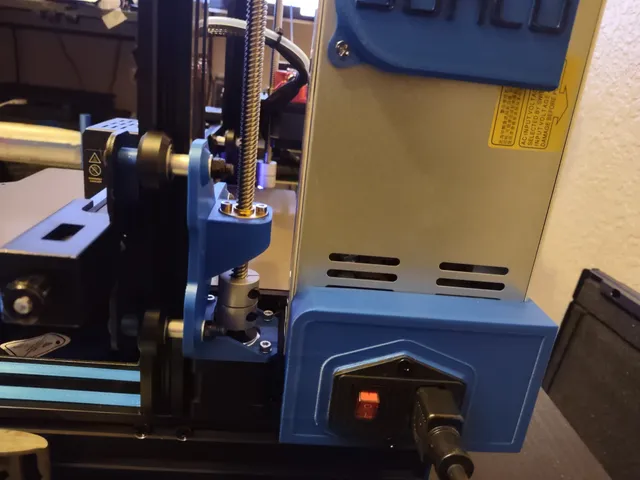
Before using any of this kit for converting the Sunlu T3 to a dual Z-axis lead screw machine, consider the following:The Sunlu T3 uses an 8mm lead screw with a 4mm lead, 2mm thread pitch and two starts. 99% of Cartesian style FDM printers use an 8mm lead screw with an 8mm lead and 4 starts. If you want to maintain the T3's Z-axis resolution, you'll need to buy a more difficult to find lead screw and brass nut that are 8x4. If you'd rather use the much more common parts, you'll need to come up with two lead screws and two brass nuts. I used what I had available which were a spare lead screw for an Ender 3 and a spare lead screw for a Tronxy XY-2 Pro. Yes, the Tronxy lead screw tops out about 4cm above my gantry. :) Also, if you do as I did, using 8x8mm lead screws, don't forget to change your “Z Steps/mm” from 800 to 400, otherwise your layers won't stick together and the print will be stretched to twice the models height on the Z-axis.Lastly, and perhaps most importantly, this dual lead screw design REQUIRES that you drill out the threaded hole that the inside POM wheel attaches to on the front carrier plate. This alteration is one that can't be easily undone and is more likely than not to void any warranty you may have on your Sunlu T3. Sunlu's design in its single lead screw state is, IMO, better than the Creality design. If your X-axis remains parallel and your Sunlu T3 doesn't need a second Z-axis lead screw, I'd recommend skipping this modification. If you don't have handy a metric drill index, a 9/32" bit can be used in place of an 8mm drill bit.I honestly cannot say how well the X axis stays parallel on the Sunlu T3 as I fabricated and installed this modification during the assembly process. I've just had so many prints fail in the past where the root cause was an uneven X axis on single lead screw machines. When I'm buying a new machine, if it happens to be a Cartesian style printer with a single lead screw on the Z axis, I automatically factor the cost of the additional hardware to, in my mind, make it right.If you intend to use this kit keeping the original lead screw with the 4mm lead and 2mm thread pitch, you'll have to source a 365mm long 8mm screw with 4mm lead and two starts. If you're using this kit but want to use more standard FDM printer hardware, you'll have to acquire a pair of 365mm long 8mm with 8mm lead and matching brass nuts. The opening on the carrier bracket from this kit where the brass nut mounts is sized to fit the 4 hole round Anet A8 style brass nut. That same style nut will fit the normally driven side of the Z-Axis.Other hardware you'll need: A Nema17 stepper motor size 42-34. The one I used with this kit is a SIMAX32 42 Stepper Motor 34mm high 1.8 degree… https://www.amazon.com/dp/B09CYGLSCY?ref=ppx_yo2ov_dt_b_product_details&th=1The motor came with a cable that can be connected directly to the unused second Z axis plug on the Sunlu mainboard.You'll need three M5x45mm screws. Two for the outside POM wheel assemblies, and one for the inside spacer. I used, and would recommend the use of flat M5 washers wherever a nut contacts the plastic printed parts, so I'd suggest three of those as well.You'll need a coupler that will connect a 5mm shaft to an 8mm lead screw.You may notice from the many photo's I posted that the inside roller with the newly relocated cam nut is only connected to the steel plate and not the plastic plate from this kit. This is because anchoring both ends of an axle that's adjustable via a cam nut is a rather awful design flaw that appears in all the aftermarket 2nd lead screw kits I've seen. If you anchor both ends of the axle and turn the cam nut to move the POM wheel in or out, you're also tweaking the angle of the axle so that the roller is not parallel to the v-slot opening. Yes, the other side is wrong also, but a fix for that is not in the scope of this kit. :(You'll need one 8mm tall M5 spacer for the outside POM wheels. The other spacer is swapped from the inside POM wheel who's spacer is replaced with a cam nut.Lastly, you'll need to relocate the PSU to add a second lead screw. I use a modified version of jodoll's “Ender 3 Pro Power Supply Holder” which has holes on the bottom side to use 5mm screws and T-nuts. My remix of jodoll's PSU holder is at: https://www.printables.com/model/746283-ender-3-pro-power-supply-holder-remix
With this file you will be able to print Sunlu Terminator T3 Dual Z-Axis Upgrade with your 3D printer. Click on the button and save the file on your computer to work, edit or customize your design. You can also find more 3D designs for printers on Sunlu Terminator T3 Dual Z-Axis Upgrade.
