Sunblaser 14,000
prusaprinters
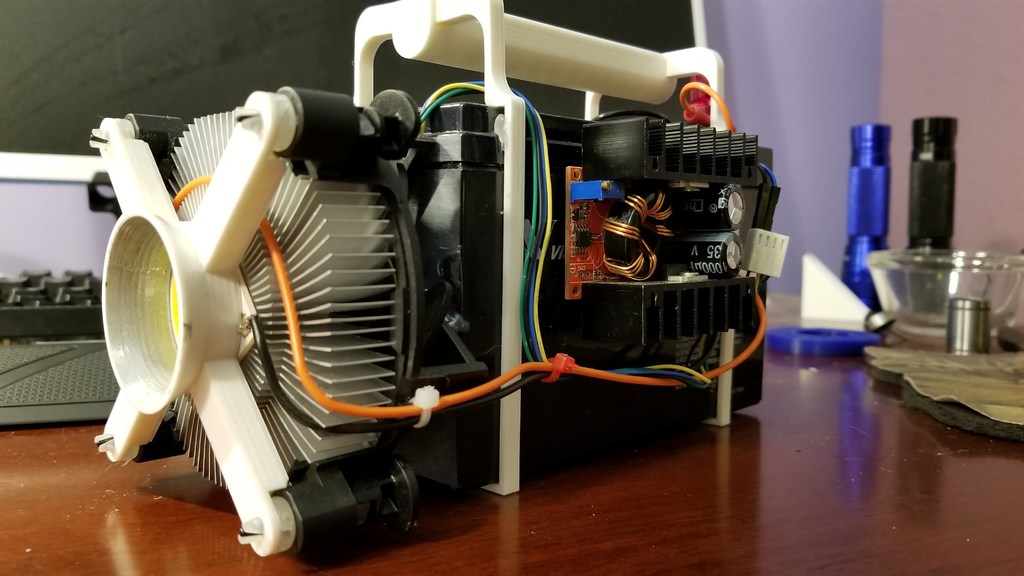
<p>UPDATE 9-20-2018:<br/> I have now upgraded to a boost converter that includes a current limiting supply on the output, in order to maintain the life of the LED. The links have been updated to reflect this. There is also a successor to this device, set to arrive very shortly...</p> <p>This 14,000 lumen light source is ready for all your stupid ideas. Light up your whole backyard, get some wicked high speed photography shots, or something else. This blinding-amount-of-light Sunblaster is ready for it!</p> <p>I used a 12v sealed lead acid battery, mostly because it was available and reasonably durable. You may want to swap this out, but I suspect it works well enough for most. As you would with pretty much any battery type, you need a voltage readout to make sure you don't over-discharge the battery.</p> <p>DISCLAIMER:<br/> This thing is VERY bright. It is powerful enough to light paper on fire when up against it. BE EXTREMELY CAREFUL! This should go without saying, but don't look into it, and don't aim it at other people!</p> <p>If you have any questions, feel free to comment.<br/> If you make one, please post a make.<br/> If you really like my work, I would very much appreciate you sharing it, or if you feel very inclined, you can throw some money at me with the tip button. Thank you!</p> <h3> Print Settings</h3> <p><strong>Printer Brand:</strong></p> <p>Printrbot</p> <p><strong>Printer:</strong></p> <p>Printrbot Simple Metal</p> <p><strong>Rafts:</strong></p> <p>Doesn't Matter</p> <p><strong>Supports:</strong></p> <p>Yes</p> <p><strong>Resolution:</strong></p> <p>0.1-0.2</p> <p><strong>Infill:</strong></p> <p>10-20</p> <p><strong>Notes:</strong></p> <p>I HIGHLY reccomend you print parts out of ABS, PETG, or some other high temp plastic.rnFor print orientations, here are my recommendations:rnSling: Face down, no supports, print 2. This needs to be stiff, so high infill and shellsrnrnHandle: Flat side down, supports on, print 1. This needs to be stiff, so high infill and shellsrnrnClamp Reflector combo: Flat side down, supports on, print 1. Doesn't need to be support strong, so less infill is OK for this part</p> <h3> Parts List</h3> <p><strong>These are the parts I used. Feel free to swap things out if you want. (Things like wires and connectors are not listed here)</strong></p> <p>Cree LED: <a href="https://www.arrow.com/en/products/cxb3590-0000-000n0bdb50e/creernrnLead">https://www.arrow.com/en/products/cxb3590-0000-000n0bdb50e/creernrnLead</a> Acid Battery: https://www.amazon.com/ExpertPower-EXP1272-12V-Rechargeable-Battery/dp/B00FNXBTMC/ref=sr\_1\_6?ie=UTF8&qid=1526783885&sr=8-6&keywords=12v+7.2ah+lead+acid+batteryrnrnBoost Converter: https://www.amazon.com/gp/product/B00Q16YB9I/ref=ox\_sc\_act\_title\_1?smid=A2PMIWMSUTAYGS&psc=1rnrnHeatsink: https://www.amazon.com/Connector-Aluminum-Heatsink-Desktop-Computer/dp/B00NXZN0HYrnrnThermal Compound: https://www.amazon.com/Arctic-Silver-AS5-3-5G-Thermal-Paste/dp/B0087X728K/ref=sr\_1\_4?ie=UTF8&qid=1526783624&sr=8-4&keywords=thermal+compoundrnrnChrome Finish Spray Paint: https://www.amazon.com/Rust-Oleum-7718830-Bright-Metallic-11-Ounce/dp/B000Z8DGXK?th=1rnrnToggle Switch (Cannot confirm any switches. As long as they are rated for 5A @ 12v, they will work. If you want it to fit in the divot on the battery, it needs to be 14mm x 24.5mm.): https://www.amazon.com/Lighted-Toggle-Switch-Rocker-Truck/dp/B00WJAYLH2/ref=sr\_1\_17?ie=UTF8&qid=1526784402&sr=8-17&keywords=20a+12v+switchrnrnVoltage Readout: https://www.amazon.com/4-0-30v-Digital-Display-Voltage-Voltmeter/dp/B00B689UGA/ref=sr\_1\_8?ie=UTF8&qid=1526786052&sr=8-8&keywords=voltmeterrn</p> <h3> Assembly</h3> <p><strong>Again, this is how I did it, but feel free to do what you want.</strong></p> <p>Step 1: Paint the Reflector. If you want the reflector to perform optimally, it needs to be shiny. To achieve that, I taped off everything but the actual reflector. Give it a few coats, and DON'T CLEAR COAT IT! I did this, and it totally screws up the chrome finish.rnStep 2: Mount the LED. Once the paint on the reflector has dried, grab the heatsink, LED, and reflector. If your cooler didn't come with it pre-applied, add some thermal compound onto the mating surface of the heatsink. Place the LED in the center of the heatsink, and then the reflector on top of it. Align the holes in the reflector with the heatsink pins, then put the pins in. Once all 4 are in, pull the reflector towards the heatsink and push on the pins until they click.rnStep 3: Add the mounts to the battery. Slide the 2 battery slings onto the battery, and connect them with the handle. Pull up on the handle to lock them together. You may add glue to hold them together, but it really isn't necesary.rnStep 4. Mount the heatsink to the battery. You may want to do this differently, but here's how I did it. Place the battery with handle on a flat surface, and place the fan-side of the heatsink up against the battery, on the opposite side of the terminals. Make sure it is centered horizontally and touching the surface, so it sits flat. Mark it, then add some epoxy to hold the 2 together. Clamp it, and give it time to set up.rnStep 5. Secure the boost converter. Before you do this step, make sure you wire everything up. I have provided a schematic. Now that you have everything connected, you can attach the boost converter to the battery. In my case, I chose epoxy, but you can do what you want. Center it on 1 side of the battery, mark it, add epoxy, and clamp until set.rnStep 6. Secure switch. In my case, I chose to mount the behind the handle, for 2 reasons. 1, it is very hard to accidentally hit it when carrying, which is a good safety feature, and 2, the divot in the sealed lead aicid battery fits it perfectly. Before you actually glue it on there, I would connect the wires to the switch. Once you have done that, epoxy the switch into the divot and clamp until set.rnAssembly complete! Give it a test!</p> Category: Electronics
With this file you will be able to print Sunblaser 14,000 with your 3D printer. Click on the button and save the file on your computer to work, edit or customize your design. You can also find more 3D designs for printers on Sunblaser 14,000.