SUMO XL Nameplate with Editable Text
prusaprinters
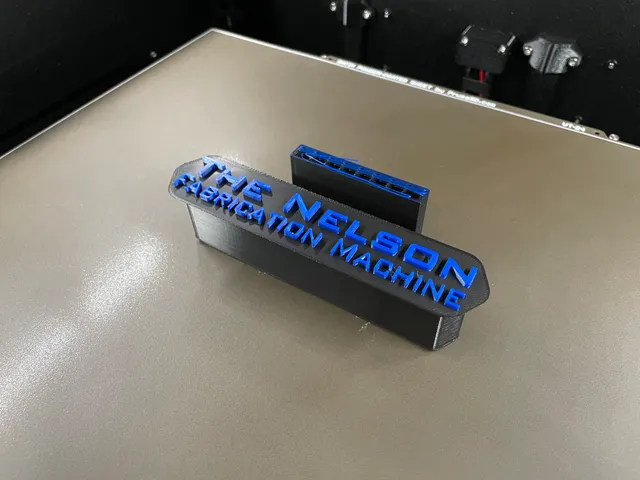
My OpenSCAD files read the original SUMO XL enclosure file "SUMO NAMEPLATE PLAIN [x1].stl" which was produced by 3D Sourcerer , @3DSourcerer .The photos show the printed nameplate. I used two colors in my XL5 with a 4mm nozzle and PrusaSlicer 2.7.2. The main body of the nameplate is in Extruder 1 (black) and the raised text is in Extruder 3 (blue). The text is not embedded into the top layer so for XL1 users, pause the model to change colors.Since the nameplate is flipped over from the original SUMO nameplate, there are two options in how to handle the back: filled and vaulted. Vaulted is needed to support the top of the nameplate since the back is open.project4e.3mf is the filled nameplate (not open on the back) and was created from SUMO_nameplate-filled.stl (which was exported from SUMO_nameplate-filled.scad)project4e2.3mf is the vaulted nameplate (open on the back) and was created from SUMO_nameplate-vaulted.stl (which was exported from SUMO_nameplate-vaulted.scad)The text in the two *.3mf files is editable using PrusaSlicer. The first-row is BankGothic (and select Bold in PruceSlicer). The second-row is BankGothicCondensed (non bold).The text is raised up by 0.01 mm or so, such that the text is not embedded in the top layer of the base material. Use the Slice-view mode to confirm. This preserves the clean diagonal printing pattern of the base section. The letters adhere strongly and there was no need to embed the letters in the top layer.On a couple of attempts, bed adhesion was an issue. I would recommend a glue stick.For black filament, I used Protopasta 3D Printer Filament | PLA Filament 1.75mm | Black Opaque HT PLA | 1kg SpoolFor blue filament, I used Protopasta 3D Printer Filament | PLA Filament 1.75mm | Blue Opaque HT PLA | 1kg SpoolI set the printing mode to 0.07mm ULTRADETAIL. I would have liked to set the base to be a lower resolution and reserve the ULTRADETAIL mode for just the text. But I didn't investigate how to do that. It would have made the model print much faster.For the first-row BankGothic text, I had PrusaSlicer make the text bold; 18.7mm, 2.0mm. For the second-row BankGothicCondensed text, I did not select bold, 14.7mm, 2.0mm. This gave a text width of 3 filament lines on the first-row and 2 filemant lines on the second-row. Originally I had the first-row and second-row be the same bold font thickness, but that looked too heavy on the second-row.This was my first time using the PrusaSlicer text tool. To access the PrusaSlicer text tool, select the base part, then press T. The Text Tool appears. Set the font, size, and thickness. To change the text later, right-click on the item in the text pane (on the right-side of PrusaSlicer,) then Edit Text. This makes the Text Tool reappear.
With this file you will be able to print SUMO XL Nameplate with Editable Text with your 3D printer. Click on the button and save the file on your computer to work, edit or customize your design. You can also find more 3D designs for printers on SUMO XL Nameplate with Editable Text.
