Stupid Simple Downward Cooling fan duct
prusaprinters
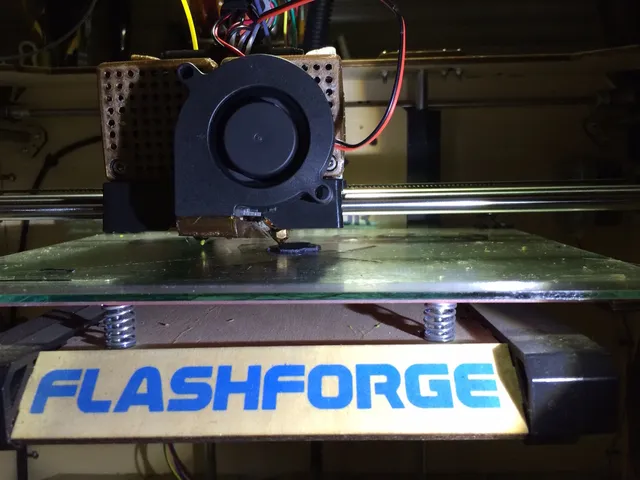
I find downward cooling to be VERY important in achieving high quality results. After years of trying many different approaches to adding downward cooling to Rep1 style machines I decided it was time to do it in a way that meets all of my own requirements. These were: Easy to install and remove VERY quickly to allow for fast access (i.e., no tear down) for clearing the filament path. Use of a radial fan rather then a wimpy box fan. Speed control Basically I use a sturdy hook and loop system to mount the unmodified radial fan directly to the face of the extruder carriage. Note... If you follow the instructions for using this tape you will see you need to give it at least 24 hours for the glue to cure. After that it will hold the fan on reliably and easily. Next I made a variety of duct styles and the best performer for downward cooling was the style which reaches in between the hot blocks and as such it will not last long so I did 2 others. Each is a fast print, making it simple to try each style. I used thin kapton tape on the inner lip of the duct which meets the fan to make the duct install with a pressure fit. If the duct crashes into a lifting print it will pop off easy before anything breaks. Easy to install, easy to remove! YAY! Lastly I power the fan with a 1amp variable voltage universal AC/DC converter. Fan and converter are 12v. I usually put it at around 9v. This approach is VERY effective for downward cooling. Be sure to mount the fan with the carriage all the way forward to ensure it clears the case. This project and many other 3D printing subjects are discussed in detail in the 3D Printing Today Podcast: threedprintingtoday.libsyn.com or threedprintingtoday.com. If you have never listened to the show... Check it out! It's FREE! Here's urls to the main components: http://www.amazon.com/Connector-Cooling-Blower-50mmx15mm-Laptop/dp/B00MJU6JR2/ref=sr_1_3?ie=UTF8&qid=1452571081&sr=8-3&keywords=50mm+radial+fan http://www.amazon.com/3M-Reclosable-Fastener-SJ3560-Clear/dp/B00JHKTDMA/ref=sr_1_2?ie=UTF8&qid=1452571214&sr=8-2&keywords=plastic+hook+and+loop+tape http://www.amazon.com/Universal-Adapter-Polarity-Switchable-1000ma/dp/B009D5X0NW/ref=sr_1_12?ie=UTF8&qid=1452571264&sr=8-12&keywords=universal+Ac+DC+adapter Print Settings Printer Brand: MakerBot Printer: MakerBot Replicator 2 Rafts: No Supports: Yes Resolution: .2mm layer height Infill: 10% Notes: No raft, but i use internal support for a cleaner result. DO NOT USE PLA OR ABS! I used PETG, but i may print again in Nylon. The edge of the duct gets right up against the hot block it WILL soften if not completely melt in time. Category: 3D Printer Extruders
With this file you will be able to print Stupid Simple Downward Cooling fan duct with your 3D printer. Click on the button and save the file on your computer to work, edit or customize your design. You can also find more 3D designs for printers on Stupid Simple Downward Cooling fan duct.