Strativariant eViolin Rev 3
myminifactory
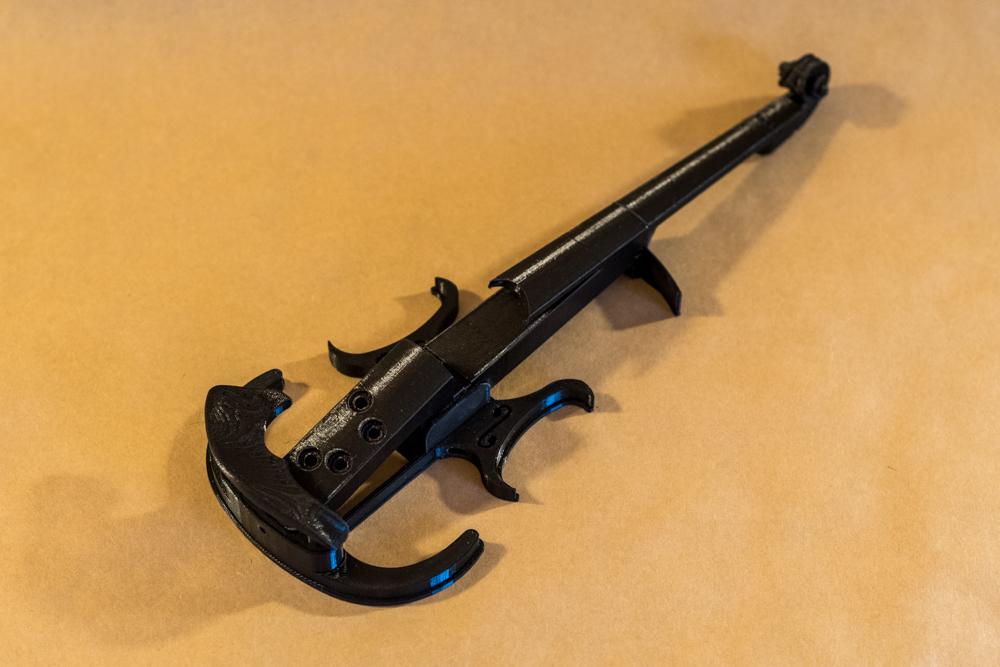
Let me start by thanking the people who inspired me to develop this violin remix. I especially want to thank firecardenal, on Thingiverse, who provided my initial inspiration and showed the variety that could be achieved with his numerous designs. I also wish to thank Stepan83, Jaxelsson on Thingiverse, and bchan on Pinshape who contributed parts used in this remix. I liked the clean styling of the “Easy printing Electric Violin” and the classic look of the “Mina Violin (Electric),” but I wanted to see if I could make an even more traditional look while keeping with the modern style of other 3D printed electric violins. Most of my changes are purely cosmetic, but they're meant to pay tribute to the original work of masters like Stradivarius. Rev 2 corrected errors in Lower Neck and Upper Bout for correct attachment. I added Violin Bridge (Electric), by EngAl, as this bridge appears more properly fitted. V3: removed "Straivariant Body waist with f holes because the cavity below the top layer around the f holes cannot be properly supported. Added body-waist-f-holes-through and eviolin-body-waist-with-f-holes-plus-base to correct this issue, providing two options for the f holes. Print Settings: Infill: 20% Notes: All parts can be printed without supports, except for the chin-rest. Recommended printing parameters are 4 Shell thickness, 3 top down solid thickness, 20% infill, and 0.20mm layer heights. Post-Printing: If you print on ABS filament, use acetone or PVC pipe glue to bind the parties. If you print on PLA, then use a epoxy glue. If you don't want to paint the PLA, be very careful not to sand or file any of the exposed areas; instead, use a small Exacto knife to clean up edges. If you choose to paint, you can use a sanding paper and patching paste for automotive jobs to leave a smooth surface to paint on color of your choice. Don't forget to use a primer paint. Materials List: Printed parts: 10 pieces Body Waist with F Holes, 2 pieces Chin Rest & Shoulder Supports, 2 pieces Neck Parts, 3 pieces Upper & Lower Bouts, 2 pieces Bridge Violin Pickup and Preamp - for under bridge (easy to find on eBay or Amazon) Guitar Tuning Pegs - 4pcs (2 left/2 right) Violin strings – 4 pcs Threaded Metal Rod M8 x 370mm – 1pcs Screws: m4x25 - 9pcs, m4x50 - 1pcs, m4x40 - 2pcs, m3x8 - 4pcs (for tuning pegs), m2x10 - 4pcs (for electronic preamp) Nuts: M4 – 16 pcs, m3 long nut - 4pcs for hot installation in holes (for pegs screws) or you can use M3 Brass Wood Screw Inserts for the tuners - 4pcs (likely need to drill out a bit for a smooth fit, brass is soft and will break if it has much resistance in the plastic) I felt that the scroll work at the top of the neck and the “F” holes in the body are part of that classical look but which were missing. I found the scroll “SLA Violin – Scroll” part of the “Violin” by Stepan83, and moving down the neck, I used “violin_neck_part2_better_pickup_wiring” for the lower fingerboard, “violin_neck_part3” for the tuning peg box, “body_lower_bout_basic2” fpr the lower bout, and the “body_waist_block” from the “Mina Violin (Electric)” by Jaxelsson. I then cut “F” holes into the body waist. Since I wanted to use the chin rest, “EZ2PRINT03” from the “Easy printing Electric Violin”, I cut the chin rest support pegs from the lower bout of “EZ2PRINT02” part of the “Easy printing Electric Violin” and added them to the lower bout from the Mina Violin. I wanted to accessorize as completely as possible, so I included the “SHOULDER_SUPPORT” from “Captain Nemo Electric Violin”, also by firecardenal, and the “BRIDGE” from “Rock Star Electric Violin V-3”, also by firecardenal.
With this file you will be able to print Strativariant eViolin Rev 3 with your 3D printer. Click on the button and save the file on your computer to work, edit or customize your design. You can also find more 3D designs for printers on Strativariant eViolin Rev 3.