Storage Box Generator v1.00
prusaprinters
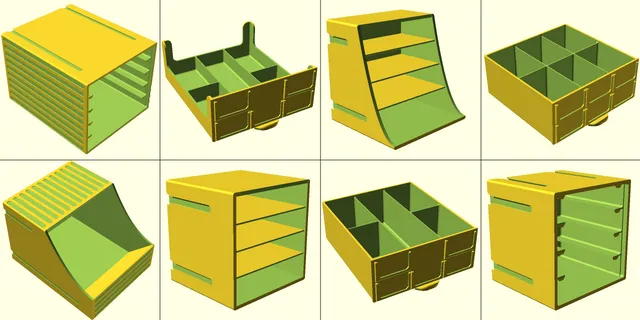
Storage Box Generator v1.00 The Storage Box Generator originated from my need for more options and is mainly inspired by the 'Stackable Resistance Storage Box' by Bram Vaessen and the variations designed by Termlimit. By using their box dimensions and using units, the Storage Box Generator is compatible with these former works, so nothing is lost! For those not knowing about OpenSCADOpenSCAD is the opensource and thus 100% free programmers Solid 3D CAD Modeller. LUCKY YOU! Using the Storage Box Generator requires no programming skills!Download the OpenScad software package and install it. Download the Storage Box Generator. Fire up OpenSCAD, click the green button [Open] and select the StorageBoxGenerator_v1.00.scad file.On the right you should see a window called Customizer. If not, from the pull down menu Window uncheck the last option called ‘Hide Costomizer’.To generate a preview of your design, press [F5]. To obtain a 3d printable model, render your design by pressing [F6]. When ready save the result as an .stl file by pressing [F7]. Load the saved .stl file in your Prusa slicer and off you go.Have fun! Customizer manual Part to createpartHere you simply choose which part to generate. Either a Storage Box, Shelf Box, Drawer or Connector. When selecting a Storage Box or a Shelf Box it is presumed you will print it with the front facing up. Box ConfigurationboxUnitsThe dimensions of the Storage Box / Shelf Box, in units.One unit in width, depth and height (1x1x1) is 73.06mm x 67.20mm x 74.64mm. The size of a Storage Box / Shelf Box is given in units with a quarter interval.You should always set the boxUnits because it's the base for all the other parts as well.Storage Box configuration examples from left to right, a Storage Box of 0.50x1.00x1.00 units, a Storage Box of 1.00x1.00x1.25 units and a Storage Box of 1.25x2.00x2.00 units. drawersThe number of drawers to fit in the specified Storage Box.You have to set the drawers also when creating a drawer itself because the drawer dimensions are partly derived from this Storage Box configuration.Drawer configuration examples from left to right drawers 2, drawers 4 and drawers 7. As for now I limited the total number of drawers to fit in a storage box to 16. slideHeightThe height of the slide that carries the drawer (default 1mm).When creating larger storage boxes in which the drawers have to bear a heavier load you might want to increase the slide height/thickness. You have to set the slideHeight also when creating a drawer because the drawer dimensions are partly derived from the slideHeight.Slide height examples from left to right slideHeight 1.0mm, slideHeight 1.5mm and slideHeight 2.0mm. leftSide, topSide, rightSide and bottomSideSelect which finish to apply for each of the sides of a Storage Box or Shelf Box. Either Flat, Grooved, Long connector, Standard connector (default).Examples of storage boxes and shelf boxes with different finishing combinations. Shelf Box ConfigurationtopDepthThe depth of the top of the Shelf Box, in units.The top depth can be smaller but can also be equal to the bottom depth (boxUnits depth). The difference between the bottom depth and the topDepth will be bridged by a parabolic gradient.Top depth configuration examples from left to right boxUnits 1.00x2.00x2.00 topDepth 2.00, boxUnits 1.00x2.00x2.00 topDepth 1.00, boxUnits 1.00x3.00x1.50 topDepth 1.00 respectively. thresholdThe height of the front bottom panel, the threshold, in units. This value can be zero.When entering a value of zero the rampDepth will be disregarded.Threshold examples from left to right threshold 0.25, threshold 0.50 and threshold 0.75. frontSideCheck this option to fit the front of the threshold with grooves. rampDepthThe depth of the ramp to be placed behind the threshold, in units. This value can be zero.Given the fact that it is assumed that printing is done front facing up you have to take bridging into account when not using a ramp, thus, a value of zero. To avoid bridging and thus supports either use a ramp depth that will result in a 45 degrees angle (equal to the threshold) or less OR set the threshold to zero.Ramp depth examples from left to right rampDepth 0.25, rampDepth 0.50 and rampDepth 1.00. shelvesThe number of shelves to fit in the specified Shelf Box. This value can be zero.Number of shelves examples from left to right shelves 1, shelves 2 and shelves 4. shelfHeightThe height of the shelf (default 1mm).When creating larger shelf boxes in which the shelves have to bear a heavier load you might want to increase the shelf height/thickness.Shelf height/thickness examples from left to right shelfHeight 1.0mm, shelfHeight 1.5mm and shelfHeight 2.0mm. shelfReinforcementThe height of the shelf reinforcement. This value can be zero.When creating larger shelf boxes in which the shelves have to bear a heavier load you might want to use a shelf reinforcement underneath the shelf instead of increasing the shelfHeight.The shelf reinforcements are fitted under an angle to prevent the use of supports.Shelf reinforcement examples from left to right shelfReinforcement 1.0mm, shelfReinforcement 2.0mm and shelfReinforcement 3.0mm. Drawer ConfigurationbottomThicknessThe thickness of the drawer bottom, in mm.When creating larger shelf boxes thus larger drawers, it is most likely that these drawers have to bear a heavier load. For those cases you can increase the thickness of the drawer bottom. The given bottomThickness value is always set to a multiple of the printer settings layerHeight. The actual applied value is reported in the console window.Bottom thickness examples from left to right bottomThickness 1.0mm and bottomThickness 2.0mm. outerWallWidthThe width of the drawers outer walls, in mm.For the same reason as with the bottomThickness, you are able to set the drawers outer wall width. The given outerWallWidth value is always set to a multiple of the printer settings layerWidth. The actual applied value is reported in the console window.Outer wall width examples from left to right outerWallWidth 1.8mm and outerWallWidth 3.2mm. innerWallWidthThe width of the drawers inner walls, in mm.For the same reason as with the bottomThickness and the outerWallWidth, you are able to set the drawers inner wall width. The given innerWallWidth value is always set to a multiple of the printer settings layerWidth with a minimum of two times the layer width. The actual applied value is reported in the console window.Inner wall width examples from left to right innerWallWidth 0.9mm and innerWallWidth 1.8mm. compartmentsTypeSelect with which type of compartments the drawer should be fitted. Either rectangular or cylindrical. compartmentsFinishSelect which compartment finish should be applied. Either squared corners or rounded corners. compartmentArrangementSelect how the compartments should be oriented. Either in columns or in rows. compartmentsThe number of compartments per column/row to your needs.Compartment configuration [1,2,3,2,0,0,0,0,0] as columns, [1,2,3,2,0,0,0,0,0] as rows. Most likely useless but as proof of concept compartment configuration Columns [1,2,3,4,5,6,7,8,9] and Rows [1,2,3,4,5,6,7,0,0]. Special case 1: A drawer with only one compartment [1,0,0,0,0,0,0,0,0] can also be used to fill the drawer with a layout to your needs. Special case 2: A drawer with no compartments [0,0,0,0,0,0,0,0,0] can be used to carve out a layout to your needs. Drawer Configuration - WallsopenWallsCheck this option either for only lowering the compartment walls based on the openWallsBottomHeight or to open up the sides by checking the openWallLeft, openWallBack and or openWallRight one based on the openWallsBottomHeight as well.When openWalls is unchecked all of the other settings within this section are disregarded.openWalls unchecked v.s. openWalls checked but the other open wall switches are unchecked. openWallLeft, openWallBack and openWallRightSelect which walls to open up by checking or unchecking them.From left to right, only openWallLeft is checked, only openWallBack is checked, all open wall options are checked. openWallsBottomHeightThe height from the compartments inner wall and the lower wall part.From left to right, openWallsBottomHeight 10mm, 16mm and 20mm. openWallsCornerWidthWith the openWallsCornerWidth you define the corner width (size) in both directions.From left to right, openWallsCornerWidth 5mm, 12mm and 28mm. openWallsCornerRadiusWith the openWallsCornerRadius you define size (radius) of the rounding of the corner in both directions.From left to right, openWallsCornerRadius 5mm, 10mm and 15mm. Drawer Configuration - LabelslabelArrangementSelect how the labels should be oriented. Either in columns or in rows. labelsThe number of labels per column/row to your needs.Label configuration [2,3,2,0,0,0,0,0,0] as columns, [2,3,2,0,0,0,0,0,0] as rows. smallestCheck the smallest in order to generate all labels the same size which will be the smallest according to the number of labels per column/row.Label configurations as columns, [1,1,1,0,0,0,0,0,0] smallest unchecked, [1,2,1,0,0,0,0,0,0] smallest unchecked and [1,2,1,0,0,0,0,0,0] smallest checked. Special label arrangement: Defining the number of labels as a negative number will act as an empty column/row.Left to right columns [-1,2,1,0,0,0,0,0,0] smallest checked and columns [-1,2,-1,0,0,0,0,0,0]. labelLimitThis option is experimental. With this setting you can limit the width and the height of the label frame as a percentage of the drawer front. gripsNumberSelect either 1 or 2 grips. Drawer Configuration - TolerancesdrawerHorizontalSpaceThe amount of space (mm) on each side of the drawer. drawerVerticalSpaceThe amount of space (mm) on top and bottom of the drawer. drawerBackSpaceThe amount of space (mm) behind the drawer. Horizontal spacing, vertical spacing and back spacing. Connector SettingsconnectorToleranceUse the connectorTolerance to either increase or decrease the width of the connector itself.From left to right, connectorTolerance 0mm (tight fit), connectorTolerance 0.2mm. connectorTypeSelect which connector type (length) to generate. Either Standard depth, Box Depth, Top depth (Shelf Box) or Bottom side (Shelf Box).Standard depth: The connector length is based on one unit of depth.Box Depth: The connector length is based on the depth of the box depth setting.Top Depth: The connector length is based on the top depth of the shelf box depth setting.Bottom side: The connector length is based on the bottom depth of the shelf box, taking the parabolic gradient into account. Printer SettingslayerWidthThe layer width with which you print. This value is used in calculations for some minor adjustments. layerHeightThe layer height with which you print. This value is used in calculations for some minor adjustments. A final wordThere is always room for improvements. I have some other ideas to implement as well as a number of refinements and some cleaning up.But for now, this has to do, this is version 1.00! 🖖
With this file you will be able to print Storage Box Generator v1.00 with your 3D printer. Click on the button and save the file on your computer to work, edit or customize your design. You can also find more 3D designs for printers on Storage Box Generator v1.00.