Stoopid Advance Magnetic Effector DIRECT DRIVE
prusaprinters
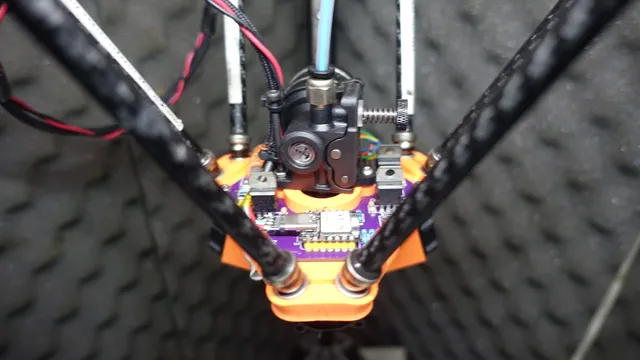
STOOPID MAGNETIC EFFECTOR DIRECT DRIVE, with double magnet give more than double stickyness!!ADV ver. give the effector have CANBUS-like capability.... but this system use USB for data transfer... so no hassle to setup in klipper firmware..for the pcb board design you can find here: https://oshwlab.com/adi.meganlordbalor.megan/smart-effector-v1first gen 0.1 put the stepper driver on top, and still need extra 2 wire power 24v +and-second gen 1.1 use only usb cable (4wire) but the power wire cut off... +and-, left only data-/+ the power wire connected direcly to 24v, and with extra stepdown module drop to 5v to power microcontroller and fan. NOTE!: use 65W usb, because they usualy use thick wire on the power line... and put stepper motor driver on bottom, give posibility have some air from extruder heatsink fan...ADV version use pcb for reinforce rigidity of the effector, result is more rigid than non ADV ver... you could use ADV ver but not using the electronic is good idea... you could cnc some carbon fiber or some part that rigid and straight...with double magnet (ADV and no ADV ver.) give more power to concave magnet... because it's hard to find N52 class concave 12mm magnet, so give n52 12mm round magnet added more power to hold the effector DIRECT DRIVE!! with orbitter v1.5 CABLE BEFORE AND AFTER with ADV mod. CANBUS-likefrom more than 10 connection wire, to only 4wire inside 65W usb charging cableto control:-stepper uart-hotend-fan part-fan coolng-temp-probe bltouch (servo and probe)even you use bowden type the wire still more than 4.… NO its no canbus system….. its like adding extra printer control board with help of rp2040, easier to setup….use double magnet give more than double stickyness….with double magnet (ADV and no ADV ver.) give more power to concave magnet... because it's hard to find N52 class concave 12mm magnet, so give n52 12mm round magnet added more power to hold the effector DIRECT DRIVE!! with orbitter v1.5 EFFECTOR DESIGN the effector have magnet hole on the bottom.... this to attach the printer part fan,use brass insert, to easy maintenance and upgradethe older model that put stepper driver on top, newer model stepper driver on the bottom of the board give more room to stepper motor seat and cooling from heatsink fan… even not much its beter than none….the effector have magnet hole on the bottom.... this to attach the printer part fan,use brass insert, to easy maintenance and upgradeM3 metal (ferro magnetic) screw to attach with effector magnet… easy for dissambly…Part cooling fan i use RC car 30mm fan (usually used for cooling the ESC and motor) the rc fan have big punch on 5v little bit overkill for part cooling fan...also you could use standart 5v fan also working fine.... i just have extra fan.... CANBUS like system, but this only usb system connection…. for klipperthe usb on the xiao rp2040 use breakout board usb C and only use data+/- no need for 5v +/-, because 5v have been supplied by 24v stepdown to 5v…this basic desing Xiao rp2040 control board, that give CANBUS-like advantage on the effector… you can find and if you want order yourself you can find here: https://oshwlab.com/adi.meganlordbalor.megan/smart-effector-v1the first idea was… adding some carbon fiber or something rigid for reinforce the effector…. and realize i have plenty of room to give some component… first idea was….. FR4(pcb) and LED… and then realize why not make it more stoooopid?? you can use stoopid adv with no electronic, just to increase stiffnes of the effector… and future proof if you want upgrade to ADV ver.
With this file you will be able to print Stoopid Advance Magnetic Effector DIRECT DRIVE with your 3D printer. Click on the button and save the file on your computer to work, edit or customize your design. You can also find more 3D designs for printers on Stoopid Advance Magnetic Effector DIRECT DRIVE.