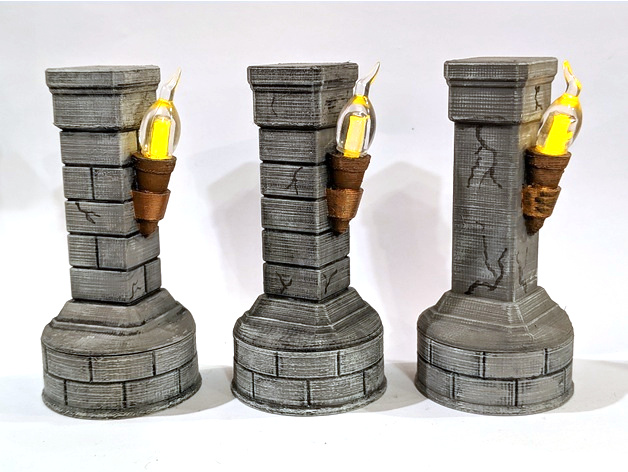
Stone Pillar with Flickering Torch
prusaprinters
<p><strong>Premium version of this model with two kinds of brick patterns available on my <a href="https://gumroad.com/robagon3d">Gumroads Store</a>.</strong></p> <p>Cheer up the gloom with some stone pillars/columns with real flickering torches for all your dungeon adventures. No soldering necessary!</p> <p>The base of a flickering orange tealight and a section of acrylic rod, acting as a light pipe, are used to bring the torches to life. The plastic flame cap for the tea light is also used for the torch flame.</p> <p>The base printed piece is designed to fit the guts of one of the tealights listed below. Any of the three columns can fit on top and be glued or just set on top. There is an alignment notch in the printed base so pay attention when assembling with the tea light.</p> <p>These are scaled up slightly from the original pillars they were remixed from with the base coming in at a little bit larger that 1.5in (38mm).</p> <p>Inspired by GrimfieldGames' <a href="https://www.thingiverse.com/thing:3125618">Gloomhaven Brick Column (hollow, room for LED-light)</a></p> <p>Tea Lights:</p> <ul> <li><a href="https://amzn.to/2PcXGDC">Amazon US Link</a></li> <li><p><a href="http://s.click.aliexpress.com/e/c2No4bXS">Aliexpress Link</a> (haven't ordered but these look right)<br/> 1/8" Dia. Acrylic Rod:</p> </li> <li><p><a href="https://amzn.to/2Q3gfPO">Amazon US Link</a></p> </li> <li><p><a href="http://s.click.aliexpress.com/e/QTtoBhI">Aliexpress Link</a> (enough for ~15 columns)<br/> Links for Germany:<br/> <a href="https://www.amazon.de/dp/B076Q6LY2Q/ref=cm_sw_r_wa_apap_h2MAQKWf5221t?tag=tv-auto-20">https://www.amazon.de/dp/B076Q6LY2Q/ref=cm\_sw\_r\_wa\_apap\_h2MAQKWf5221t</a><br/> <a href="https://www.amazon.de/dp/B01MSN6Z4D/ref=cm_sw_r_wa_apa_-UQgCbVH1G0PC?tag=tv-auto-20">https://www.amazon.de/dp/B01MSN6Z4D/ref=cm\_sw\_r\_wa\_apa\_-UQgCbVH1G0PC</a></p> <p> <figure class="media"> <oembed url="https://www.youtube.com/watch?v=LDsExWCJAvA"></oembed> </figure> </p> </li> </ul> <h3>Print instructions</h3><p><strong>Print Settings:</strong></p> <p>Supports: No<br/> Resolution: 0.15<br/> Infill: 10%-15%</p> <p><strong>Notes:</strong></p> <p>Print in the orientations given</p> <p>After printing, disassemble the tea light. Start by carefully removing the bottom piece of the tealight, it was easiest after removing the battery. Push the tea light base into the column base making sure it is properly aligned. There is an alignment notch and two pins that should all line up. The tea light should click into place and the LED will be left protruding from the top of the base.</p> <p>Cut the acrylic rod to length, slightly less than 2". Test fit in column. The bottom of the rod should just touch the LED when assembled. You will also notice that the rod sticks out at the wrong angle from the torch. After removing the rod, bend the end of the rod using a heat gun to warm it up until it will stick straight out of the torch. After it has cooled sand bent end to disperse light. Insert the rod back into the column and put the plastic torch piece in place. Twist it while pushing down to insert the lower lip into the torch mouth.</p> <p>Use the switch to turn on the light and you should be good to go, enjoy!</p>
With this file you will be able to print Stone Pillar with Flickering Torch with your 3D printer. Click on the button and save the file on your computer to work, edit or customize your design. You can also find more 3D designs for printers on Stone Pillar with Flickering Torch.