Stereo Surround Trim and Visor
thingiverse
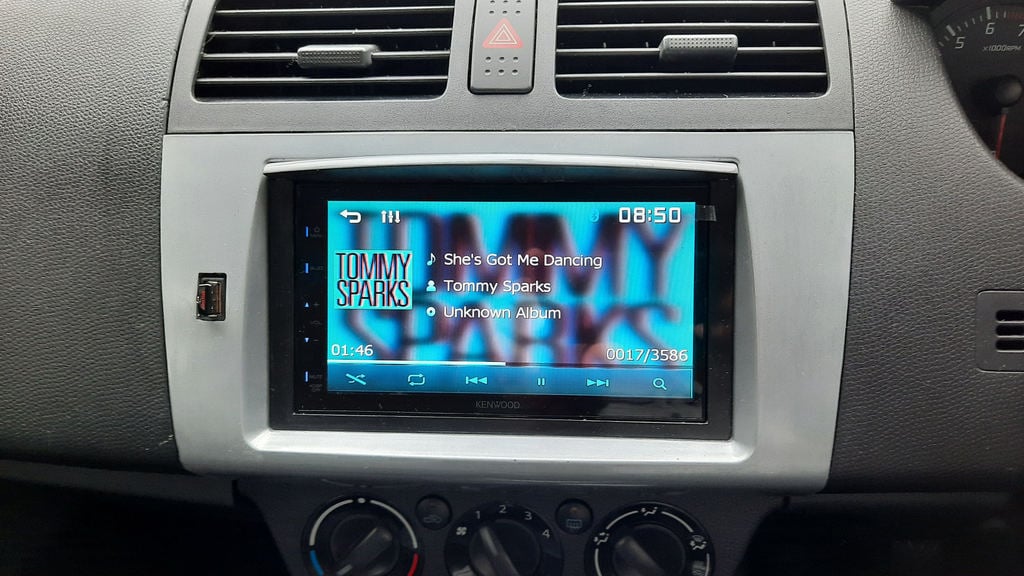
I recently equipped my trusty old car with a sleeker touchscreen head unit. However, my 2009 Suzuki Swift proved to be more challenging than anticipated to upgrade. Modern dashboard designs seamlessly integrate the head unit into the dash, making it an integral part of the overall design. Not only does this look better than older stereos, but it's also created a thriving market for car-specific fascia adaptors that allow standard aftermarket units to perfectly fit unique original manufacturer designs. However, in my case, the fascia adaptor took an unusual approach: The head unit bolts directly to the fascia trim, rather than using the metal cage typically used for installations. In fact, the hole in the trim is slightly too short to accommodate a cage anyway. Why this design choice was made remains unclear, but the result is that the standard trim bezel supplied with most aftermarket head units won't fit into the well for the stereo. This means that the head unit would have to be installed proud of the dash to accommodate it, which wouldn't affect function but would make the stereo look like an afterthought despite a custom fascia plate. It's perfectly possible to mount the head unit deeper into the well, but this requires creating a custom bezel trim to fit the non-standard opening. As someone with a 3D printer, I found it no trouble at all to create a custom trim that fit the unique shape of my car's dashboard. On my previous cheap Chinese head unit, I printed a simple rectangular trim that dropped into place and filled the hole nicely. For my new stereo, I decided to be more adventurous and added a visor to the trim. Not only would this add to the original equipment feel, but it was also a practical solution to a problem I'd encountered with my previous Chinese head unit: Stray sunlight often created irritating reflections on the screen, especially when using the reversing camera. Adding a visor would definitely reduce these opportunities. I originally designed the bezel and trim as a single unit, but this created print support complications. So, I revised the design to separate it into two parts, which were intended to be glued together before installation. However, as often happens, glue proved unnecessary. Given that this item would be a high-visibility feature of the dash, I took some extra time to get the finish right before installing it. I sanded the visible faces to smooth them out as much as possible and then used Scotchbrite and abrasive brass polish (Brasso in the UK) to achieve a high-quality finish. I bought a silver spray paint that was specifically designed for use on plastic, which worked well when applied. However, upon handling it the next day, I found that my fingerprints would leave marks on the surface and wouldn't wipe off. I tried using isopropyl alcohol (IPA) to remove the paint entirely, but fortunately, this only removed a thin layer of paint, leaving a more solid base beneath. A gentle polish with Pledge took care of the remaining finish issues, resulting in a fingerprint-resistant surface. Finally, all that was left to do was install the trim, which went straight into place without any adjustments needed. I was thrilled (and a bit smug) to see how well it fit and tied in beautifully with the overall aesthetic of the dashboard. Some of you may have noticed the handy USB port next to the head unit. For more details on this, check out the full story here: https://www.thingiverse.com/thing:4545018 Happy printing, everyone!
With this file you will be able to print Stereo Surround Trim and Visor with your 3D printer. Click on the button and save the file on your computer to work, edit or customize your design. You can also find more 3D designs for printers on Stereo Surround Trim and Visor .