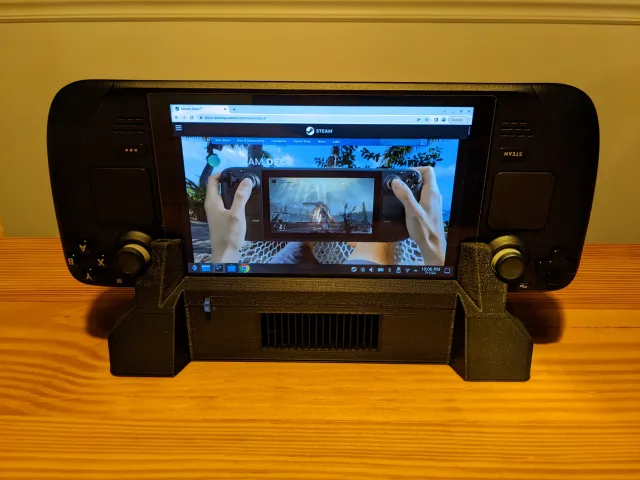
Steam Deck Quick Dock - v2 W/ Power Button
prusaprinters
USB-C hub adapter for easy one handed plug and unplug into the Steam Deck. The Deck drops into the Quick Dock like a Nintendo Switch, and features in the Quick Dock help align the Deck with the USB-C plug. V2: added a Power ButtonV2 now has a power button! There is a hole in the side of the Quick Dock for pinning the power button into the body of the Quick Dock with a stick of 1.75mm filament; i just glued it in place and snipped it flush to the surface. The pressure of the USB-C port seems to be enough to keep the Deck docked while pressing the power button. The Quick Dock also incorporates the charging indicator! But there is a catch: in order to get the light (that is very dim) from the top of the Deck to the front of the Quick Dock I had to make a custom light pipe. I laser cut the light pipe out of 1/8" acrylic and it works awesome, but it works well because the laser cut edges reflect the light very well. I experimented with using off the shelf axial light pipes, hot glue, and chunks of transparent filament but the laser cut acrylic worked best. I included a DXF I used to cut the light pipe out but also included a STL of the geometry incase someone wants to try transparent filament or maybe clear resin. The Light Pipe is the same for V1 and V2. I have used Ponoko to get laser cut parts shipped to me before; the quick quote came to around $20 for 5 of the light pipes, just upload the DXF and make sure to get it cut out of .120" thick CLEAR acrylic and it should work out fine. The vent at the Top of the Deck is ported out the front of the Quick Dock. I did some short tests running Cyberpunk docked and un-docked and the thermals and fan speeds in both orientations seemed within a few percent of each other so I do not believe the Quick Dock is impeding airflow. There is an extra piece, the “Hole Hider”, that is meant to cover the slot that the USB-C plug comes into the Quick Dock, but this piece is optional; It would just be glued in place. It is the same for V1 and V2 Note: for v2 I also moved the Hub over ~0.500" and made the HDMI exit from the side so it can be removed easily. I find myself traveling with this more than I thought so convenience of removal was more important than having the HDMI exit from the back. if i was going for the “Ultimate Dock” I would want to use a different dock entirely to have ethernet (Adapter for the Official Steam one maybe? Not in the near future.) BOM:1qty "Hiearcool" brand USB-C Hub from Amazon1qty ziptie to hold the USB-C wire tight (1qty in v1 | 2qty in v2) #6 x 0.5" self tapping/thread forming screw OR some double sided tape to hold the hub in the base of the print Note on size: This model is 250mm long, but is narrow enough that it can fit on a 235mm square bed like the Ender 3 (and I believe a prusa) when oriented at 45° if you do not use a perimeter.Update 7/4/2022: I added a pre slit in half version for smaller print beds: "…_Split_A" and "…_Split_B" that are ~125mm long each and include keying features that should help with alignment when gluing the halves together. As of this edit I have not printed these models but there should be enough tolerance in the alignment features that they should fit together but if you have issues please let me know so I can update the model. Update 1/23/2023: For V2 I did not make a “split” version of this model. if you need to split up the base to get it to fit on your printer there are tools built into most slicers to split large models without bringing them into CAD, like this tutorial for using PrusaSlicer Note on ZipTie Install:Zip tie install drawn above in a cross section. the "front" of the dock is shown with the arrow for context and i highlighted the area of importance in blue for contrast. Red is the ziptie, yellow is a cross section of the wire. proportions might obviously be messed up since i drew it in panint, but that is the general idea. pull the wire down into the dock, tighten the ziptie and cut the tail of the ziptie flush, then your deck wont pull the wire outi ended up velcroing my deck to the dresser so i can just straight pull it out. Steam Deck: Display Auto-Rotate when DockedIn Desktop Mode you can change the screen orientation for the deck when plugged into a hub with external monitor so that it automatically flips the screen when docked. To do this start not plugged into the Quick Dock and go to System Settings>Display and Monitor>Display Configuration and change the “save display properties” to “for only this specific display arrangement” and hit apply. Then dock your Deck and on that same page switch the Decks display orientation so that it is right side up in the Quick Dock and also switch it to “for only this specific display configuration” and hit apply. Now when you dock and un-dock the screen on your Deck should auto rotate.
With this file you will be able to print Steam Deck Quick Dock - v2 W/ Power Button with your 3D printer. Click on the button and save the file on your computer to work, edit or customize your design. You can also find more 3D designs for printers on Steam Deck Quick Dock - v2 W/ Power Button.
