Starter and Command Box extension for the Toyota 22RE Engine
prusaprinters
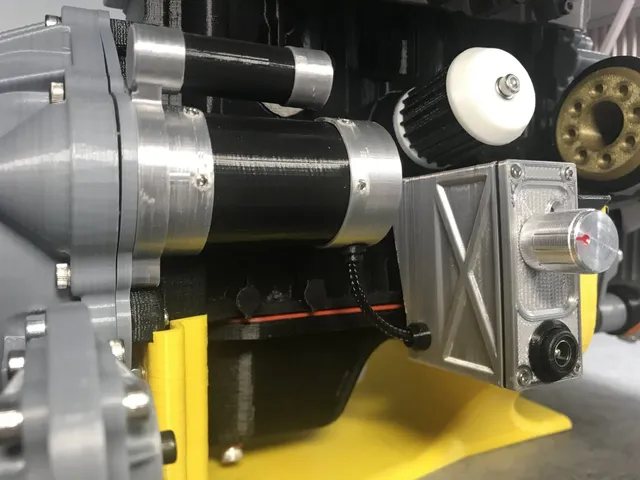
This is a Starter and his Command Box extension for the 22RE Toyota Engine (https://www.thingiverse.com/thing:644933)The video of the finished project : https://www.youtube.com/watch?v=Oly5FVFVWa0 Print instructionsPrinter: Geeetech A10Rafts: NoResolution: 0.15mmFilament: Geeetech PLA Black and Silk SilverPrint Settings1 x StarterBody1 : Layer:0.15mm Raft:no Support:no Infill:100%1 x StarterBody2 : Layer:0.15mm Raft:no Support:no Infill:100%1 x StarterBody3 : Layer:0.15mm Raft:no Support:no Infill:100%1 x StarterSolenoid1 : Layer:0.15mm Raft:no Support:no Infill:100%1 x StarterSolenoid2 : Layer:0.15mm Raft:no Support:no Infill:100%2 x StarterConnector : Layer:0.15mm Raft:no Support:no Infill:100%1 x StarterCommandBody : Layer:0.15mm Raft:no Support:yes Infill:100%1 x StarterCommandDoor : Layer:0.15mm Raft:no Support:yes Infill:100%1 x StarterCommandGasket : Layer:0.15mm Raft:no Support:no Infill:100%1 x StarterCommandHubcap : Layer:0.15mm Raft:no Support:no Infill:100%Accessories2 x m3x5mm SHCS4 x m2x10mm SHCS8 x m2x5mm SHCS4 x m2 jam nut1 x Electric Motor : https://www.amazon.fr/gp/product/B07RRPS7CC/ref=ppx\_yo\_dt\_b\_asin\_title\_o09\_s00?ie=UTF8&psc=11 x Speed Controller : https://www.amazon.fr/gp/product/B07K2S9VRY/ref=ppx\_yo\_dt\_b\_asin\_image\_o05\_s00?ie=UTF8&psc=11 x Braided Sheath : https://www.amazon.fr/gp/product/B07F8YRY3T/ref=ppx\_yo\_dt\_b\_asin\_title\_o03\_s00?ie=UTF8&psc=11 x Female Jack : https://www.amazon.fr/gp/product/B07TNDKY7V/ref=ppx\_yo\_dt\_b\_asin\_image\_o02\_s00?ie=UTF8&psc=1Mounting/!\ Before mounting the starter, the Electric Motor must be fixed on the Electric Drive.I have used this one : https://www.thingiverse.com/thing:2233507Fix the StarterBody1 to the Electric Drive with the m3 screws.Insert the StarterBody2 into the StarterBody1 ; you can glue it or you can fix it with m2x10mm screws (see the pictures ; you must make hole for this).Glue the first StarterConnector on the StarterBody3.Weld the wires on the Electric Motor and run them through the hole of the StarterBody3's StarterConnector.Insert the StarterBody3 on the StarterBody2 ; you can glue it or you can fix it with m2 screws (see the pictures ; you must make hole for this). Be careful not to pull on the wires.Glue the second StarterConnector on the StarterCommandBody (hole on the left side).Fix the StarterCommandBody on the engine block with the m3 screws ; the holes of engine block already exists (look at the picture).Insert the electric wires into the Braided Sheath and insert it into the StarterCommandBody ; then fix them on the Speed Controller. Be careful with the polarity.Connect the Female Jack to the Speed Controller ; once the Female Jack is mounted on the StarterCommandDoor, the wires should be long enough to allow easy opening and closing. Be careful with the polarity.Fix the Speed Controller with the m2x5mm screws and m2 jam nuts into the StarterCommandBody ; it is the most delicate part.Fix the Female Jack on the StarterCommandDoor ; if necessary, glue the StarterCommandHubcap arround the head of Female Jack (look at the picture).Fix the StarterCommandDoor and StarterCommandGasket on the StarterCommandBody with the m2x5mm screws.More add-onshttps://cults3d.com/fr/collections-de-designs/dancan13f/toyota-22re-engine
With this file you will be able to print Starter and Command Box extension for the Toyota 22RE Engine with your 3D printer. Click on the button and save the file on your computer to work, edit or customize your design. You can also find more 3D designs for printers on Starter and Command Box extension for the Toyota 22RE Engine.