Starship Fan Duct for Prusa RepRap
thingiverse
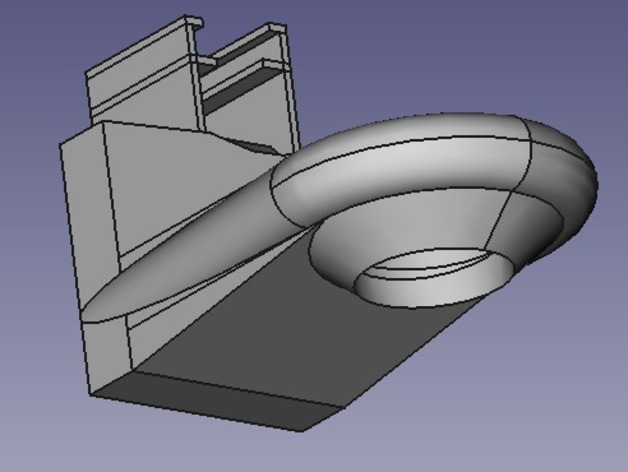
This Starship Fan Duct model's mission is to explore improved 3D prints via enhanced cooling. The original angled bracket design had poor side cooling away from the fan, so this improvement aims for equal cooling from all sides. However, it should be noted that the provided STL has only been tested on a specific reprap setup and may not fit other configurations. It's a fully parametric FreeCAD Python script, though, which can be tweaked to hopefully adapt to different setups. The model is currently marked as work in progress due to duct warping near the nozzle, but it doesn't touch the nozzle itself. Printing with PLA was attempted initially, but ABS might have been better—though more testing and design tweaking are needed to confirm this. For printing, use 0 infill, 0 solid layers, and only 1 perimeter at the thinnest layer height possible. Tricky parts include the middle section of cones (to be removed post-print) and the top of the torus. Holes can be patched with tape temporarily. Post-printing, cut out the middle cone section using a low-speed Dremel with a small paper sanding disc and refine edges with a hobby knife, sandpaper, or jeweller's file. Installation involves fitting the hotend into the duct center, pressing the fan in place, and reattaching the extruder to the x-carriage. For script tweaking, open "FanDuct.py" and "EasyPart.py" using FreeCAD's "Tools -> Macros" menu. Load your carriage STL into FreeCAD for visual fitting before printing and export mesh as STL after selecting the shape and using "Meshes -> Export mesh..." function. Remember that EasyPart.py is a required library for this script to work.
With this file you will be able to print Starship Fan Duct for Prusa RepRap with your 3D printer. Click on the button and save the file on your computer to work, edit or customize your design. You can also find more 3D designs for printers on Starship Fan Duct for Prusa RepRap.