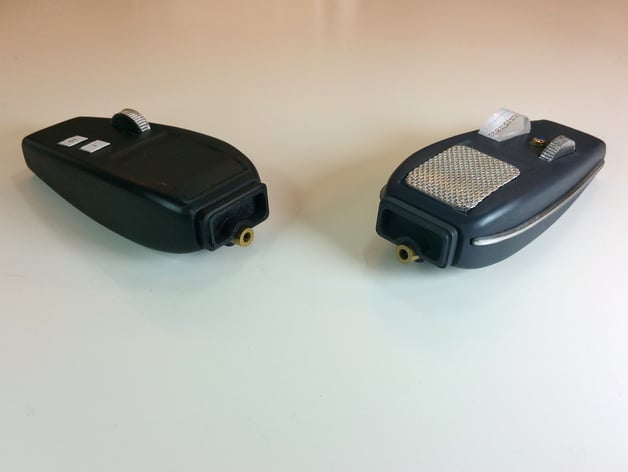
Star Trek Original Series - Hand Phaser Type I - Midgrade
thingiverse
A replica of the Phaser Type I is available for printing. This is the midgrade version; a hero version is also in development, and there are plans to create a Type II body that this will fit into. The early season one version has been detailed enough to be seen in close-up, but no moving parts or electric components are included. For the early version, print "Midgrade P1 Body - Early Season One", "Midgrade P1 Thumbwheel", and "Midgrade P1 Emitter". The Wah Ming Chang screen-friendlier redesign was used throughout the rest of the series. For this later version, print "Midgrade P1 Body", "Midgrade P1 Thumbwheel", "Midgrade P1 Emitter", "Midgrade P1 Crispy", and "Midgrade P1 Rails". The Phaser Type I is a popular item from Star Trek. There are two versions of the phaser available for printing, one with a black body and one with a German grey body. The early version has a solid black color, while the later version varies in color from medium-dark grey to black. To assemble the phaser, start by gluing the thumbwheel into the rectangular depression on top of the phaser using clear epoxy. Next, glue the emitter onto the front of the phaser, in the hemispherical space provided under the front detail. For the later version of the phaser, also glue the rails into the slots on the sides and the "crispy" at the front of the rectangular depression on top. To create the gauges, print out the file "TOS Phaser I Gauges.png" at 600dpi. Coat both sides of the printout with Mod Podge and allow it to dry. Cut out either one "1" square and one "10" square (for the early version) or one graduated gauge. For the earlier phaser, use clear epoxy to affix the "1" label to the front square on the right side of the phaser body, and the "10" label to the rear square. For the later phaser, cut an 8.5mm segment from a 19mm rod. Then cut that almost in half (2mm off of center). Polish all cut edges using successively finer sandpapers. Use clear epoxy to affix the graduated gauge to the flat rectangular edge of the gauge cover. Once that has dried, use clear epoxy to affix the gauge to the top of the phaser body, opposite the thumbwheel. The power indicator is an optional feature that can be added to the later version of the phaser. For this, a jeweled dustproof watch crown refill (4.5mm, Tap 10, Yellow w/ Blue) can be used. This feature did not appear on all phasers, so it is up to the user to decide whether or not to include it. The "trigger" is another optional feature that can be added to the phaser. A cylindrical neodymium magnet (8mm diameter by 3mm high) can be glued into the circular depression on the bottom of the phaser using clear epoxy. This allows the phaser to be affixed to a ferrous or magnetic surface for display. This replica was designed in Blender using reference photos from "The Making of Star Trek" and numerous HD screencaps from trekcore.com.
With this file you will be able to print Star Trek Original Series - Hand Phaser Type I - Midgrade with your 3D printer. Click on the button and save the file on your computer to work, edit or customize your design. You can also find more 3D designs for printers on Star Trek Original Series - Hand Phaser Type I - Midgrade.
