Stanley Shallow Organizer Shallower Cup Small Bin for Small Parts
prusaprinters
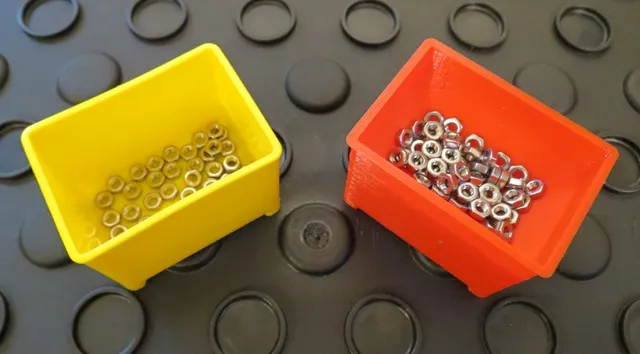
My contribution to the numerous small bin designs for the Stanley 014725R shallow parts organizer. This design brings the contents about halfway up and angles the inside walls. This makes it much easier to see and fish out small parts such as the M3 nuts in the example photo. There are the same number of nuts in my bin on the right and the original on the left. Much easier to get them out of the shallower cup... with the original bin, I often resort to removing it and tipping them out just to get one. I tried to faithfully model the design of the original tapered bin, including its small brim, though I did approximate the feet a little. As seen in the second picture, it fits securely despite not having a flat bottom and seems to hold its contents well when the organizer is tipped. Edit: I added a "NotQuiteSoShallowCup.stl" where the cup starts tapering 15mm below the top instead of 10. I found some more M3 hex nuts and they didn't all fit comfortably in the original :-) Print Settings Printer Brand: Prusa Printer: i3 MK2.5 Rafts: No Supports: No Resolution: 0.2 Filament: a brand I don't trust and am trying to use up on things that don't matter much PLA yes Notes: Flip it UPSIDE DOWN to print without supports. Don't get greedy on the layer height... I tried one in 0.35 "fast" mode and the bridging of the cup floor failed. PREVIEW the gcode to make sure the bridging layer (around 20.2mm in the Shallow Cup 3.stl when upside down) is oriented to cross the short way. If it's going the long way, consider rotating the part 90 degrees on the Z axis. (My [Prusa](https://www.amazon.com/3D-Printer-Prusa/s?k=3D+Printer+Prusa&linkCode=ll2&tag=thingiverse09-20&linkId=28c787aef7c5a20cf2004b821dd161bf&language=en_US&ref_=as_li_ss_tl) Mk 2.5 handled it okay, but it's pretty rough and I got a droopy loop on one of four printed in that orientation.) Your printer will need to be able to bridge about 17.5mm which started to sag a little, but I felt it was good enough. If that's too much for you/your printer, you could reduce that by increasing the angle in the FreeCAD spreadsheet beyond its current 45 degrees. (Printing a steeper overhang is of course its own challenge). Upping that to 50 degrees reduces the width of the bottom of the cup to a bit under 14mm. (I haven't tried printing that; let me know if you need a .stl of that and don't want to use the FreeCAD file.) How I Designed This FreeCAD Part Design: Loft and Fillet (and pad) based on spreadsheet I think I might be starting to get the hand of the newish Body concept in the Parts Designer. This one is mostly using Loft and Fillet, plus a couple of Pads. This time, I started off by putting putting values and calculations into a FreeCAD spreadsheet and naming most of those values. Pretty much everything in the sketches is calculated based on those values, so it is easy to customize and tweak. One caution: For some reason, a direct export to .stl of the Body doesn't slice properly in Prusa Slicer. ~~I had to create meshes from that and export from the mesh instead. I deleted those from the FreeCAD file I uploaded to save on total package size.~~ Edit: Turns out you can export directly from the "tip" of the body -- that is, the last operation within the body, the one that's shown with a color icon and black text instead of grayed out. These are much smaller than the ones created by the mesh tool, so I have uploaded them instead. View of the spreadsheet. Yellow is how FreeCAD indicates the cell has an "alias" for use in constraints/formulas; italics is my convention to indicate that a value is calculated so I don't overwrite it by accident. Category: Organization
With this file you will be able to print Stanley Shallow Organizer Shallower Cup Small Bin for Small Parts with your 3D printer. Click on the button and save the file on your computer to work, edit or customize your design. You can also find more 3D designs for printers on Stanley Shallow Organizer Shallower Cup Small Bin for Small Parts.
