Stand for 70W Worklight v1.1
prusaprinters
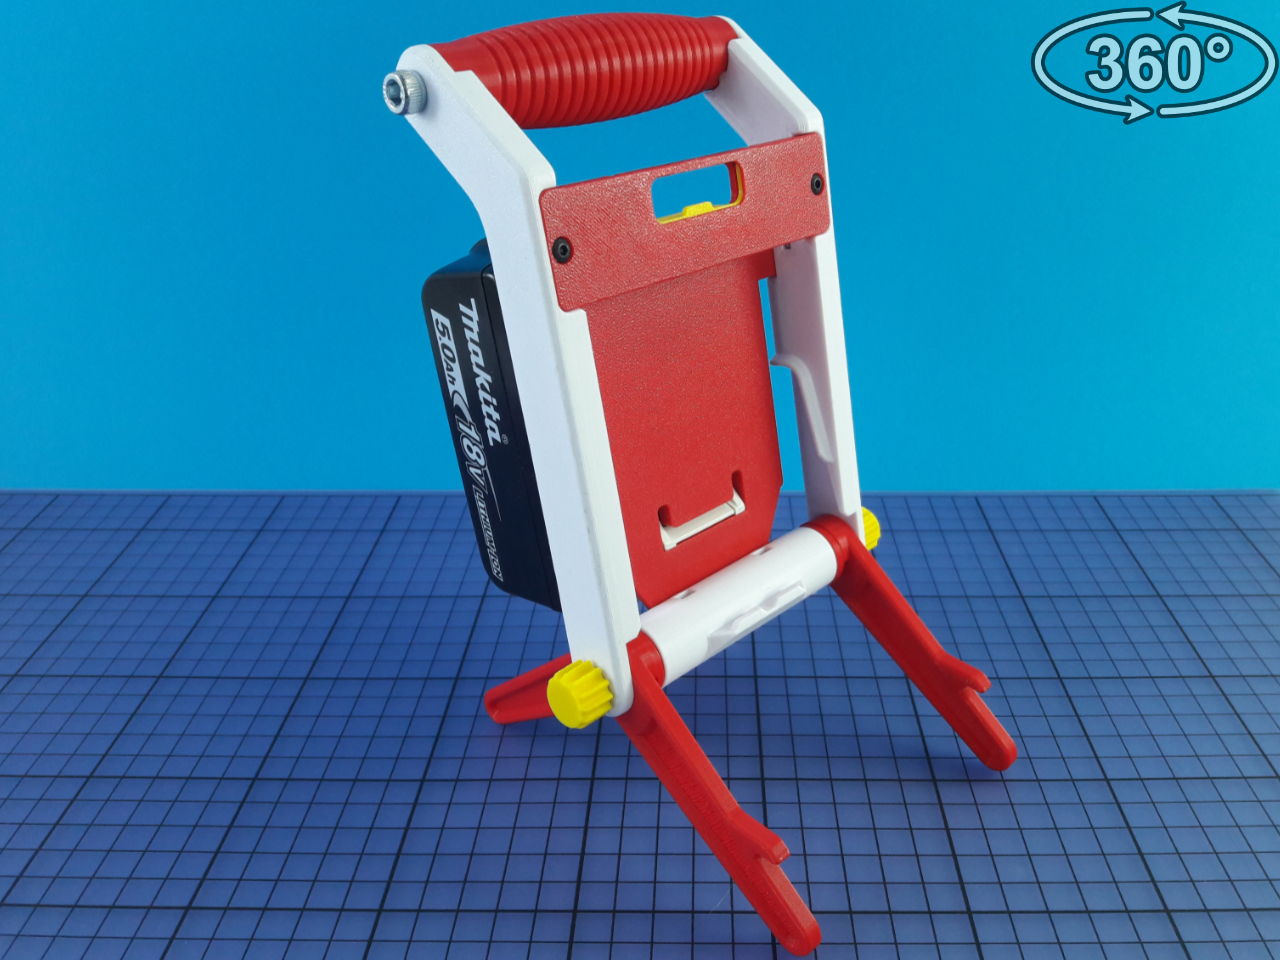
<p><img src="https://lh3.googleusercontent.com/BUpupk0bU5-Cid_lwBpbHCDLC8bMgNv0hBMJ2WKgTC_SjbAc_lusZpDE11222AETlZAjNozJGDJLhql8fYkuFLkFavSubiYOVbbte2Brcu71LYgSUpB250_xcaI_eZm69hk6U8fG2D8TA8SdqVdHvHwtIJbhJ53JY7dXF4bUZBCJx2mg-Aw9y3VD0NsGi3KFJfRL6aCU_vTYp9VXyt4JnXP1QL-jvgHyJiRpQ2c-qUD8HnNpbXp8K6PVTYGEjXTyITlcE_mIOTthHWaOEcnMYchD0TGhhO_pfom-ON4vPozFP9yFMbT0-48nrSHd9CLNSigE2UvllRE46wWcUd2FuMKG2RMHJvLvh4UpCo1XRQjTuclpuuaLLXhuzvb6F6zFAOsXGpFtewTtA41PkCKvL5HyiF_cUxO2ljdXudNEcx5dvBN-sRiI9JULm8dzf6AhoASGLl0L66DujtOcghDglK62Y1DmbsUq8vfby6fVKO7dG91XraHzgLbgigDbrNdoey8a_QiYroYEMM6F5f6f4Hz9GdQRdXcJEakipqul0IIAw_-KpxFaAtOiHgCz48kn-s8ECrdKmsc-qtLlFn1nsUnCiK6PMq6H54JLoc6Y81XheWV7kSNry21Dfrd-ADtOv9XRnMH8OwqOOdt-GE25ECCUiC2FBalWw14eLvbNOCJPHSddkMsXJ0jQEpl7wuKAcvlWkA=w1420-h899-ft"/></p> <p><br/><br/> <br/></p> <p>This is a stand for my <a href="https://www.prusaprinters.org/prints/10929-70w-dimmable-led-worklight">**70 Watt worklight.**</a> It's designed to take Makita batteries, but making an adapter plate for other 18V batteries like Dewalt, Milwaukee, Bosch etc. - is possible. A fusion file is available for a blank plate so you can make one. The Makita plate is based on my other adapters so you can follow the build instructions on that <a href="https://www.prusaprinters.org/prints/19968-makita-battery-adapter-barrel-jack">**here.**</a></p> <p>The stand has a quick release lock that fits on all versions of the light, but it's only held on the back on the first version (unless you glue the top bracket on). Newer versions holds it on the back and bottom (which is the top, since the light is upside down on the stand). The lock uses a small 3mm spring to push the sliding plate into the bracket on the back of the light. This bracket uses the same screw holes that holds the tripod adapter in place. The top plate bracket is screwed on the frame using the top center holes that was added on later versions of the light. This plate makes the light sit more secure on the stand, and centers it.</p> <p>The legs folds up inside the stand frame when not in use. I made the legs longer after I printed my frame so the legs in the pictures do not fold like yours will (see fusion pictures for how it's supposed to look). The short legs I had first was not stable enough. I also made the stand a few millimeters wider, to be more compatible with other brand's batteries, in case they are wider than Makita. The legs have a mechanism that links them together. When you pull on one leg, the other one will follow. They will lock together when the max angle is 106 degrees. This is so the pivot screws doesn't have to hold the weight of the light (which is 1.4kg with a 5Ah battery).</p> <p>Since the stand is quick release, there has to be an external cable that connects the battery to the light. I recommend you get a short angled cable so it doesn't interfere with the handle. I'm waiting for mine so I don't have a picture of it on.</p> <p>Print settings or material is not very important, but I would use at least 4 perimeters so the pivot screws have material to push together. I used PETG for everything.</p> <p>The legs may need a little support since there are some bridging.<br/> Part orientation is as pictured.</p> <ul> <li><strong>Note</strong> When using a battery it's important that you set the under-voltage limit on the converter correctly. It will prevent the battery from being drained too low, which would damage, or break it. I would not set the limit any lower than 15 volts. That seems to be around the time where tools stop working.<br/> The light might start to rapidly flash when close to this limit. That happens because when the load is removed, the battery voltage rises so the converter turns the light back on, voltage drops down again, the light turns off, and this cycle repeats for some time, I don't know how long. You could see this flickering as a low battery warning. Might be bad for anyone with epilepsy though..</li> </ul> <p><strong>Changelog:</strong></p> <p>v1.1</p> <ul> <li>Turns out that even with an angled cable it gets in the way of the stands handle. Therefore I added another Makita adapter that has a direct connection with a wire. It doesn't make much sense to have a barrel jack on both ends anyway. This new adapter has a hole in the bottom where the cable is run through. It can be secured with a zip-tie.</li> <li>Added v.1.1 picture.</li> <li>Also added some small holes in the stands frame so the cable can be secured with zip-ties, if necessary.</li> </ul> <h3>Print instructions</h3><h3>What you need:</h3><p><strong>3mm spring</strong> - For the lock. You can usually find these inside pens. The lock assembly cover plate is glued on.</p> <p><strong>120mm M5 threaded rod and 2 nuts</strong> - For the pivot on the bottom. The threaded rod goes all the way through the bottom, which compresses all joints. There are 2 knobs you can print that goes over the nuts, which enables you to tighten the joint by hand.</p> <p><strong>2x M5 15-50mm screws</strong> (or a threaded rod) - For the handle. They are screwed into the plastic (no need for nuts since it wont be removed).</p> <p><strong>4x M3 10mm pan head screws and 4 square nuts</strong> - For the Makita plate. Should be pan heads so they don't crash into the battery. I'm not sure if cap heads will work. The head should not be over 2mm high.</p> <p><strong>2x M3 10mm pan head screws</strong> - For the lock assembly plate (also just screwed into plastic).</p> <p><strong>2x M3 25mm screws and 2 square nuts</strong> - For the back bracket that attaches to the light's body. (this also locks the tripod adapter in place).</p> <p><strong>2x M3 10mm screws and 2 square nuts</strong> - For the top bracket that attaches to the light's body.</p>
With this file you will be able to print Stand for 70W Worklight v1.1 with your 3D printer. Click on the button and save the file on your computer to work, edit or customize your design. You can also find more 3D designs for printers on Stand for 70W Worklight v1.1.