Stacking Ikea Lack Printer Enclosure
thingiverse
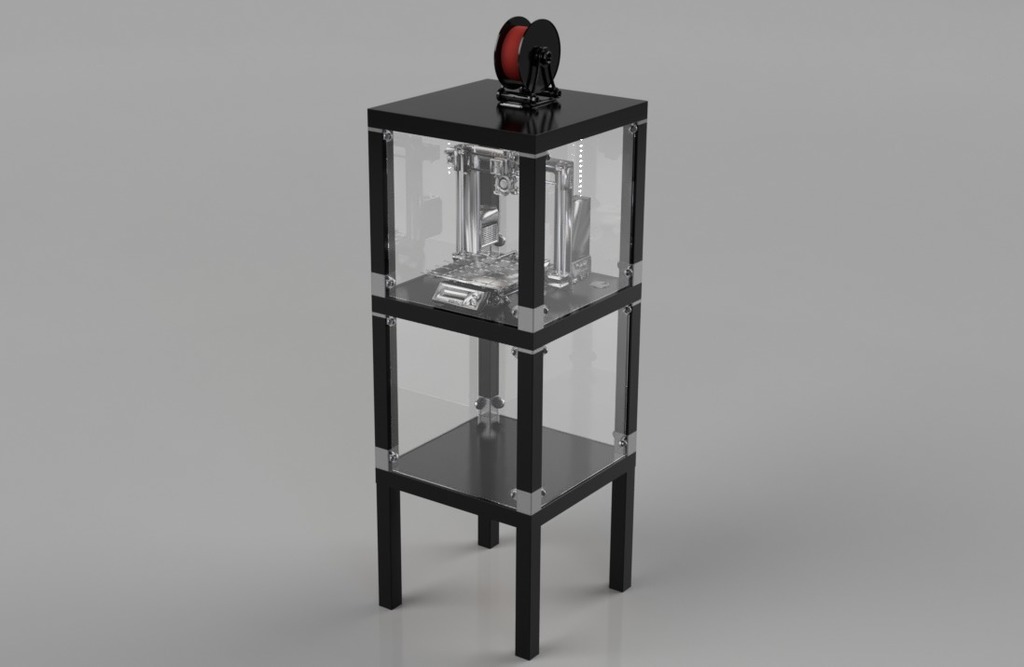
Updated 9/26/2019 Added two more STL's for Magnet Mounts to cover 2mm and 3mm plexiglass. Features: * Stackable design allows easy setup, teardown, and printer access. * Eight Clear Acrylic panels create two enclosed areas for temperature control or storage. * Panels are held on with neodymium magnets for easy removal. * Efficient design is strong yet hollow to save filament. * Designed to allow each section to be lifted off without removing acrylic panels. This is my take on the Ikea Lack Printer enclosure. It's not the first design, and it won't be the last. This version boasts a modular design that lets you easily stack your tables and dismantle with ease. The stackable design also means you can quickly remove the top cover for easy access to your printer. The eight removable acrylic panels are held on with neodymium magnets for easy removal while providing a closed area for better temperature control when printing plastics like ABS. My design allows the acrylic panels to remain in place while lifting off sections, which further simplifies setup and teardown. When searching for a printer enclosure for my new Prusa i3 MK2S, I found the brilliant design by LKM (https://www.thingiverse.com/thing:1843235) that uses super cheap Ikea Lack tables as the main structure. It also used 3D printed parts to extend the legs and provide mounts for clear plastic sides to attach and enclose the printing area. I also found thebeetleuk's clever design (https://www.thingiverse.com/thing:2212749) that allowed the tables to be easily stacked but also removable for easy access to the printer. Like with some of my designs, I started with these two ideas and made some tweaks and modifications to make them my own. Mainly, I wanted the acrylic sheets to sit nicely inside the table legs to give a picture frame appearance while maximizing interior space as much as possible. I designed my own magnetic mounts using standard magnets found at Home Depot. These mounts have small built-in handles for easy grip and removal of panels if needed. Then I hollowed out the nesting leg pieces and optimized the wall thickness to be both solid and strong without needing printer-generated infill. Since most of the interior is open, the biggest benefit was not wasting unneeded plastic to fill in these areas. To finish it off, I found lots of great accessories here on Thingiverse such as: The spool holder - https://www.thingiverse.com/thing:943563 The filament guide - https://www.thingiverse.com/thing:2114888 The feet - https://www.thingiverse.com/thing:2076126 and the cable grommet - https://www.thingiverse.com/thing:2225786 I also sourced some cheap RGBW LED strips (https://www.amazon.com/gp/product/B01HD37U6S/ref=oh_aui_search_detailpage?ie=UTF8&psc=1) to light the build area. I put three 400mm strips above the build area and two 400mm strips down the front legs. To mount these on the legs, I designed some 45-degree mounting strips that snap together in section lengths matching the LED pitch of my 60 LED/m strips. https://www.thingiverse.com/thing:2782466
With this file you will be able to print Stacking Ikea Lack Printer Enclosure with your 3D printer. Click on the button and save the file on your computer to work, edit or customize your design. You can also find more 3D designs for printers on Stacking Ikea Lack Printer Enclosure.