ssd-spacer
thingiverse
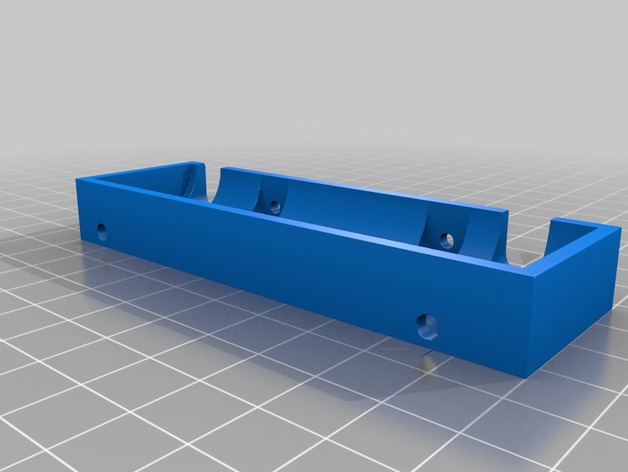
Human: The SSD-spacer sits between an SSD and the side of a 3.5" server drive caddy, boasting a unique design that keeps a 1 or 2 mm layer of plastic from under or next to the SSD. This allows the SATA connector to stay aligned in the bottom right hand corner of the drive bay. This project is largely stable, with prototypes printed and tested in real-world conditions. Measurements are spot on, but some filing of screw holes is necessary. Using Lulzbot's recommended profile for Cura, which sets the layer height to 0.25 mm, a Lulzbot Mini prints this object in about an hour. The SSD-spacer was designed with ImplicitCAD. Parts Needed You will need one or two metal files, one capable of trimming the bottom edge and a round pointy one to fit inside small screw holes. Source Code: git repository Post-Printing Cleaning the Edges If the bottom layers are wider than the middle and top layers, use a metal file to smooth down the long bottom edges that will be in contact with the side of the SSD and caddy. Be careful not to blow plastic bits into your server. Caddy Screw Issues Before screwing the SSD, spacer, and caddy together, try screwing the caddy screws directly into the corresponding screw holes. You may need to slightly increase hole size before you can do this. When the holes are a proper size, it should still require some strength and a large-handled screwdriver to screw them in for the first time. Don't make the holes too big unless you want to use a nut. Otherwise, the screw threads won't grip the plastic well and may fall out. One way to increase the size of the screw holes is by carefully filing the plastic with a pointy metal file. You can also increase the hole size specified as caddyScrewRadius in the .escad file by about 0.05 - 0.2 mm. This may require some experimentation and extra printing. The correct sizes may vary depending on the model of printer used. Another option is to put a nut on the end of a longer screw. The screw head should be small enough so the caddy will fit into the drive bay. If you go this route, you may want to dramatically increase the diameter of these holes (caddyScrewRadius) and the radius of the nut space to fit a larger nut (caddyNutSpaceRadius). The SSD holes don't pose this problem because the threads lie inside the SSD, not the plastic. Other Caveats Frequent screwing and unscrewing of the caddy screws may strip out the threads dug into the plastic created by the first screwing. If you gently turn the screw with mild pressure as it begins to fit into the old thread pattern, you can increase the life of the part. How I Designed This I created this in ImplicitCAD and used blender to view .stl file as I made changes. Each SSD screw head and screw access space were created by a single sigmoidal extrustion.
With this file you will be able to print ssd-spacer with your 3D printer. Click on the button and save the file on your computer to work, edit or customize your design. You can also find more 3D designs for printers on ssd-spacer.