Spring-powered 12lb Whitworth rifle toy
prusaprinters
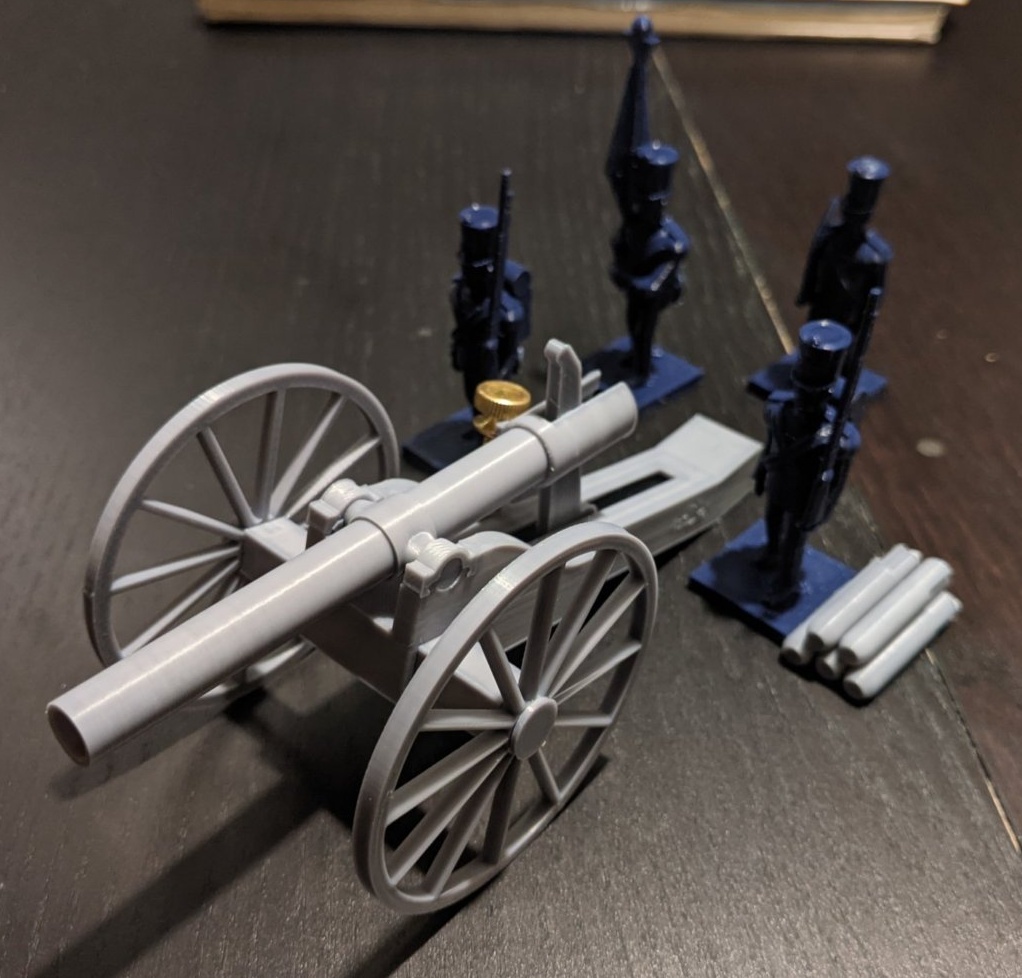
<p>A spring-powered toy cannon, designed in the pattern of the mid-19th-century 12-pounder Whitworth rifle, suitable for playing H. G. Wells' seminal miniatures game Little Wars.</p> <p>See the sections below for more information.</p> <p>(The toy soldiers in the cover photo are from Earsling's Napoleonics set.)</p> <h3>Print Settings</h3> <p><strong>Printer Brand:</strong></p> <p>Creality</p> <p><strong>Printer:</strong></p> <p>Ender 3</p> <p><strong>Rafts:</strong></p> <p>No</p> <p><strong>Supports:</strong></p> <p>Yes</p> <p><strong>Resolution:</strong></p> <p>0.12mm layer height, 0.3mm nozzle</p> <p><strong>Infill:</strong></p> <p>50% cubic</p> <p><strong>Filament:</strong> eSun PLA Pro</p> <p>Gray</p> <p><strong>Notes:</strong></p> <p>I use line supports at a 45 degree angle, 2mm support spacing, and a 0.36mm zigzag support roof in Cura, which makes for a good balance of strength and ease of removal.</p> <p>I printed the test articles with a 0.3mm nozzle, but a 0.4mm nozzle should work fine.</p> <p>See the Cura screenshot in the photos for recommended part orientation, or read on.</p> <p>*<strong>Carriage</strong>: print flat. *<strong>Barrel</strong>: print standing on the breech, like a smokestack. *<strong>Axle</strong> (2): print with axle tip pointing upward. *<strong>Wheels</strong> (2): print flat. *<strong>Wheel Caps</strong> (2): print with opening pointing upward. *<strong>Hammer</strong>: print lying down. *<strong>Trunnion Clips</strong> (2): print on its side, with chamfered surface upward. *<strong>Spring Retainer</strong>: print flat.</p> <p>Some optional parts:</p> <p>*<strong>4mm Barrel and Hammer</strong>: a barrel and hammer scaled for 4mm projectiles. More closely resembles the historical 12lb Whitworth (whose barrel looks quite narrow compared to the carriage), but the smaller projectiles may not knock over toy soldiers as effectively. *<strong>Limber</strong>: an early prototype gun limber. Print it, along with two axles, two wheels, and two wheel caps, and assemble in the same manner as the gun carriage. The carriage trail rests on the hook below the limber's axles. Future developments will include ammunition chests (sized to hold the appropriate shells), a caisson, and perhaps a traveling forge to complete the set.</p> <h3>Post-Printing</h3> <p><strong>Other Materials</strong></p> <ol> <li>2x16mm dowel pin/locator pin</li> </ol> <p>uxcell sells appropriate pins on <a href="https://www.amazon.com?linkCode=ll2&tag=thingiverse09-20&linkId=e4759bff1fa9a55a0f897d801ce2d765&language=en_US&ref_=as_li_ss_tl">Amazon</a>. McMaster-Carr item 91595A031 works too. 2. Leaf spring</p> <p>Should be about 60mm or 2⅜" long and no more than 12mm or ½" wide. 1075 spring steel strips can be cut to length. 0.025" thickness yields a durable cannon with sufficient power for Little Wars. 0.032" seems to crack my carriages with fair regularity, while 0.020" doesn't have sufficient power (although it may be useful for shrinking the game to a smaller footprint). McMaster-Carr item number 9074K33 is a 10-foot length of 0.025" steel. 3. No. 6-32 brass thumbscrew with collar, 1" threaded length</p> <p>McMaster-Carr 92421A153 is the design part. If you can't get the correct screw, any collared screw with a head/collar diameter of 9.5mm or ⅜" will work. In a pinch, an un-collared screw will also suffice, as long as the head is 9.5mm wide. An uncollared screw will only elevate the gun automatically: you'll have to push the barrel down when depressing it to keep the elevation nub on the barrel in contact with the screw. 4. No. 6-32 brass nut, 1/4" across (measured face to face), 3/32" thick (optional)</p> <p>McMaster-Carr 95130A120. Fits into a pocket on the gun carriage, to reinforce the screw hole, but probably isn't necessary given my testing. 5. No. 6-32 tap (optional)</p> <p>You can use the thumbscrew to cut threads into the elevation screw hole, but you'll probably need to turn it with pliers. Using a proper tap on the hole makes it much easier, both to install the screw initially and to turn it when adjusting elevation. 6. 1/16"/1.5mm pin punch</p> <p>Used to remove supports from within pin holes. You can also eliminate supports from inside the holes in your slicer—none of them are large enough to necessitate supports.</p> <p><strong>Assembly</strong></p> <ol> <li>Remove supports.</li> <li>Tap the elevation screw housing, using either the screw itself or an appropriate tap.</li> <li>Install the axles. Press them into the carriage, square side first, until they won't go in any further. Glue if needed, but they're a pretty snug fit without it.</li> <li>Turn the carriage upside-down, and lay the leaf spring in the pocket at the back of the trail, so that it's suspended between the pocket and the hammer braces.</li> <li>Push the spring further into the carriage with your thumb, then slide the spring retainer through the carriage, so that it holds the spring in place, bent toward the top of the carriage.</li> <li>Install the hammer. Place the hammer through the slot in the top of the frame, through the hammer braces, and slide the pin into place. Use the thumbscrew or the punch to push it through. (You may have to run the pin through the hammer a few times before installation, to loosen up the hole.)</li> <li>Cock the hammer by pulling it back about 90 degrees.</li> <li>Install the barrel. Place the barrel trunnions in the cradles at the front end of the carriage, then slide the trunnion clips over the cradles. Use the fat end of the thumbscrew to push the clips flush with the side of the carriage.</li> <li>Tilt the barrel as far forward as it will go, then place the brass nut in the pocket on the carriage.</li> <li>Install the elevation screw, tilting the barrel so that the nub engages the collar on the elevation screw.</li> <li>Install the wheels. Place a wheel cap through the hub of each wheel, then press a cap-and-wheel assembly onto each axle.</li> </ol> <p><strong>Firing</strong></p> <ol> <li>Cock the hammer, pulling it back until it stays in place without force.</li> <li>Load a projectile into the slotted portion of the breech.</li> <li>Adjust your aim by turning the carriage and adjusting the elevation screw (clockwise to elevate the barrel). Note that the force of the hammer will push the barrel downward, so to ensure your elevation is set correctly, push down gently on the front of the barrel until the elevation nub stops it against the screw.</li> <li>Using the tip of a finger, flip the hammer upward.</li> </ol> <h3>How I Designed This</h3> <p>Based off of the mechanism for my 4.7" gun, which is in turn based off of an old patent for Britains Ltd. 4.7" naval guns.</p> <p>Drawn in FreeCAD.</p> <h3>Changelog</h3> <p><strong>2/12/21</strong></p> <ul> <li>Chamfer trunnion clip: for easier press-fitting</li> <li>Bulk up carriage: needed more thickness under the spring retainer</li> <li>Axles a separate part: lets them print vertically, which means no support needed in the recess; glue into carriage pockets</li> </ul> <p><strong>2/13/21</strong></p> <ul> <li>Instructions.</li> <li>Reduce clearances: wheel cap to axle, elevation screw hole inner diameter (allows wobble), very slightly elevation nub to elevation screw collar</li> </ul> <p><strong>2/17/21</strong></p> <ul> <li>Add reduced-caliber barrel and hammer</li> <li>Add prototype limber</li> </ul> <p><strong>3/8/21</strong></p> <ul> <li>Updated axle and wheel cap: wheel cap now has thicker walls, to make it a bit more drop-resistant, and chamfers to make it easier to push into place</li> <li>Future revisions may include a slightly thicker-walled carriage for durability reasons</li> </ul> <p><strong>3/15/21</strong></p> <ul> <li>Updated cannon shell to print better with a skirt.</li> </ul> Category: Mechanical Toys
With this file you will be able to print Spring-powered 12lb Whitworth rifle toy with your 3D printer. Click on the button and save the file on your computer to work, edit or customize your design. You can also find more 3D designs for printers on Spring-powered 12lb Whitworth rifle toy.