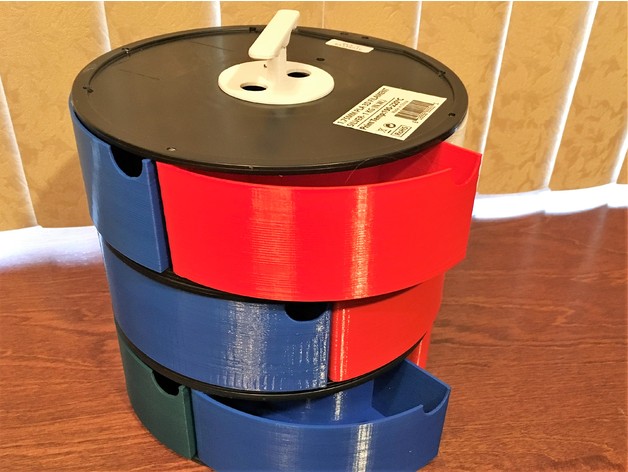
Spool Storage Boxes
thingiverse
Are you fed up with tossing away empty filament spools? This innovative project enables you to repurpose them instead of recycling. It is specifically designed for Inland filament spools from Micro Center. A goal of my project was not only to create boxes that fit snugly on the spools, but also to design a storage system that is both stackable and portable. I aimed to make drilling the holes for the hinges easy and repeatable as well. The files included here are: 1) 'Reel Box' - you will need four of these per spool; 2) 'Joiners' - two parts, one for the top of the hole in one reel and the bottom of the hole in the other; 3) 'Handle' - two parts, an adapter and the handle; 4) 'Drilling Guide' - ensures holes are accurately located. There is at least one other project similar to this on Thingiverse ("Spool drawer organizer" by Tanatof). I discovered it only a few days ago, which is why my project is not a copy of that one, but I am pleased to see that we share some common features. Kudos to Tanatof for a great, attractive design. Print Settings: Printer Brand: Wanhao Printer: Wanhao Duplicator i3 V2 Rafts: No Supports: No Resolution: 0.3 Infill: 20% Notes: Two shells are sufficient, but you can use three for added strength. Post-Printing: Hinges are #8 x 2.5 Drill bit is 5/32 Assembly: The first step is to make a mark on the both edges of the spool to indicate where the first hole on each side will be drilled. Use a square or a suitable object to ensure both marks are aligned with each other. Place the Drilling Guide over the reel with the raised 'shoulder' inserted in the center hole. Align the guide to the mark (as shown), then slowly start drilling. I stress that you should drill slowly because you don't want the drill bit to 'walk'. After the first hole is drilled, simply rotate the Drilling Guide 90 degrees so the pin of the Drilling Guide is over the newly created hole. Repeat for all four holes. Then flip the reel over and repeat, but remember to carefully align the first hole with the mark you made. Each hinge will require a #8 x 2.5" threaded rod, available at most hardware stores. Use a 5/32" acorn nut to simplify driving the threaded rod through the hole in the box. Be cautious to keep the rod square with the box as you begin driving it into the hole. Since it is a snug fit, drive it in slowly so you don't generate too much heat. When the acorn nut bottoms out to the box, remove it and use pliers to turn the screw in the remaining couple turns by hand until there is an even amount protruding for both ends. Fit the protruding threaded rod ends into the new holes in the spool. Repeat for all four boxes. Voila! You have just repurposed your spool to store small items. The parts for the Joiners and Handles are quite simple to figure out. You will discover that the Joiners fit very tightly on the inner lip of the spool hole and must be pressed in with some force. That is by design to keep them from falling out, simplifying the task of stacking the spindles together. Use the male threaded Joiner on the top of the lower spindle so the threads go up. The Handle parts thread onto those exposed threads.
With this file you will be able to print Spool Storage Boxes with your 3D printer. Click on the button and save the file on your computer to work, edit or customize your design. You can also find more 3D designs for printers on Spool Storage Boxes.
