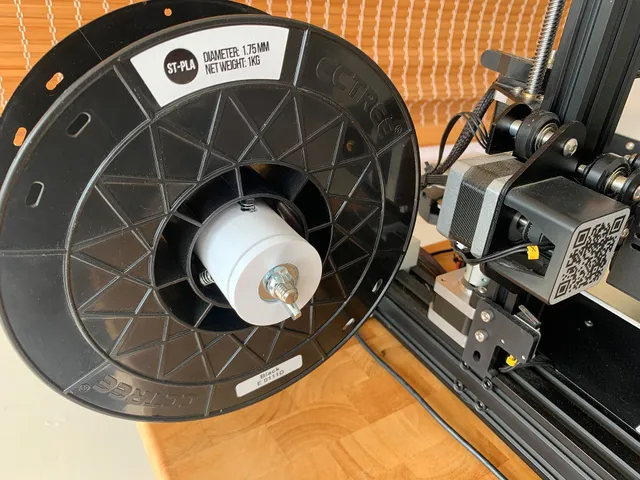
Spool Holder Mk2
prusaprinters
Background Ever since I first got my 3D printer I have wanted to improve on the filament spool holder. I have another thing where I created a spool holder that had a few issues and I stopped using it. The guiding design spec for this spool holder is Create a new spool holder that reduces the friction on the filament being drawn into the machine that is easy to use (not necessarily easy to print) The Spool Holder Mk2, fulfils that requirement, by making use of 3D printed bearings to reduce friction on the filament, and by making it easy to get spools of filament on and off of the holder - no need to screw/unscrew anything - just push the spool over the self-centering Cams. Printing Required You'll need to print the following parts (note quantities): Lower Bearing Outer x1 Upper Bearing Outer x1 Outer x1 Cam x6 Inner x1 Mount Plate x1 End x1 Optional The following parts are optional: Tool - could be used for forcing the balls into the bearing races Bracket - Allows you to side-mount your spool holder on your printer. Tested on Ender 3 Additional Components You'll also need the following additional parts: Compression springs that fit into the hole in the Outer under each Cam. I used a 6x10 mm spring, but you can use whatever you can find that fits 6mm BB Bullets for the bearings Something to use as a shaft for the Cams to rotate on. I used 1.5mm thick panel nails with the heads and points cut off. Some CA / Super Glue 10mm x 20mm Washers 10mm Treaded Rod and 2x Nuts (I used a lock nut and a wing nut) Assembly Instructions Once you've printed out all the parts you need, you'll need to assemble them. By far the hardest part is assembling the bearings. Start with the lower bearing - the part at the bottom of the Inner. Hold the Lower Bearing Outer in position and, one-by-one force BBs into the race. This can be very hard and you may want to try using the Tool or some other device. I ended up using a pair of long-nose pliers. I also found that applying a thin layer of petrolium jelly with a cue tip to the inside of the ball race made the BBs stick a bit and less likely to fall out. Next insert the Outer onto the mounted Lower Bearing Outer. No glue is required. Repeat the process for the Upper Bearing Outer. I found this part even more frustrating than the lower, but got it done in the end. The BBs will go in easily at first and become harder and harder as the bearing begins to be centered around them. Once you have the bearings in place, the hard work is done. Now get your Cams and insert each one into a slot in the Outer. Hold the Cam in place, then slide a pin into the hole for it to hinge on. Once you've made sure everything is correct and working, put a drop of CA glue into the hole to stop the pin from sliding out. Now insert the spring if you haven't done so already. Repeat for the remaining Cams. Finally, you'll have to mount this somewhere. If you have an Ender 3 you can use the stock steel spool holder arm and mounts. Remove the stock spool holder and place the Spool Holder Mk2 in its place. Place the Mount Plate at the back of the arm and the End in the front if the Inner/Upper Bearing Outer, then push the threaded rod through and screw a nut onto each end to hold the whole thing in place. Operation Now that you have the Spool Holder Mk2 assembled, mounted, its ready to use. To mount a spool of filament, slide the spool over the end of the Spool Holder Mk2, depress the outer Cams to allow it to slide over them. The inner Cams will automatically adjust to the filament spool. Once in place center it as required. The Cams will automatically adjust to center the spool around the Spool Holder. The Spool Holder Mk2 easily holds 1kg filament spools and has been tested with CCTree and eSun spools. They have similar inner diameters for their spools of about 55mm. The Spool Holder Mk2 can accommodate a spool with a minimum inner diameter of around 42mm (I think). If your spools have much larger holes you'll have to ensure your springs are longer and stronger. You may also have to modify the Outer and Cams for that. Conclusion I've been using this new Spool Holder Mk2 for a couple months now and am very pleased with it. Things to improve could be the cams, but they aren't giving me any issues yet. I may want to build a dry box with this spool mount inside. Enjoy. Print Settings Printer Brand: Creality Printer: Ender 3 Pro Rafts: No Supports: No Resolution: Standard Infill: 20% Filament: CCTREE PLA / PLA+ Various Notes: No supports are needed if you print in the correct orientation. I printed the Inner vertically without any issues. All other items are obvious. All parts were printed on standard 0.2mm resolution. I did however experiment with printing the Inner on Super at 0.12mm but it didn't really make any real difference. No post processing was necessary. Category: 3D Printer Accessories
With this file you will be able to print Spool Holder Mk2 with your 3D printer. Click on the button and save the file on your computer to work, edit or customize your design. You can also find more 3D designs for printers on Spool Holder Mk2.
