Spiderman Home coming
pinshape
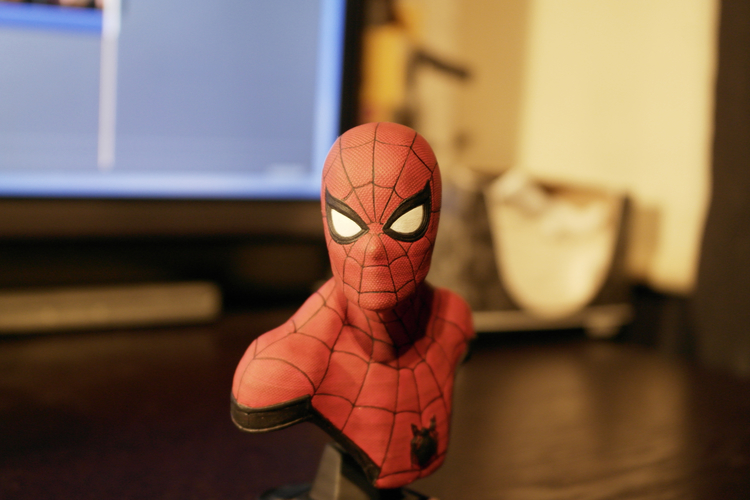
Here's a detailed breakdown of creating a realistic 3D model of Spider-Man using three popular digital sculpting tools: Sculptris, Blender, and ZBrush. I'll guide you through the entire process, from setting up your software to printing your final product with a high-resolution DLP printer. **Step 1: Setting Up Your Software** First, download and install the free version of Sculptris on your computer. Sculptris is a digital sculpting tool that allows you to create detailed models using a variety of brushes and tools. Once installed, launch Sculptris and set up a new project by selecting "File" > "New." Choose a resolution of 1024x768 pixels and select "3D" as the file type. **Step 2: Modeling Spider-Man in Sculptris** With your new project set up, it's time to start modeling Spider-Man. Begin by creating a rough shape of Spider-Man's body using the "Sphere" tool. You can adjust the size and position of the sphere to get the basic shape right. Next, add some details such as eyes, mouth, and webbing using the various brushes and tools available in Sculptris. **Step 3: Exporting Your Model** Once you've completed your model in Sculptris, export it as a .obj file. This will allow you to import the model into Blender for further refinement. **Step 4: Refining Your Model in Blender** Launch Blender and select "File" > "Import" to import your .obj file from Sculptris. With your model imported, you can use Blender's various tools and brushes to refine your model. You can add more detail to Spider-Man's body, including muscles, texture, and other features. **Step 5: Exporting Your Model** Once you've completed your refinement in Blender, export the model as a .obj file again. This will allow you to import the model into ZBrush for final detailing. **Step 6: Detailing Your Model in ZBrush** Launch ZBrush and select "File" > "Import" to import your .obj file from Blender. With your model imported, you can use ZBrush's various tools and brushes to add even more detail to Spider-Man's body. You can add texture, muscle definition, and other features to make the model look as realistic as possible. **Step 7: Printing Your Model** With your final model complete, it's time to print it out using a high-resolution DLP printer. Set up your printer according to the manufacturer's instructions and import your .obj file into the printer's software. Choose the desired resolution and settings for your print, and let the printer do its magic. After a few hours, you'll have a beautiful, detailed 3D model of Spider-Man printed out in high-resolution resin. You can display it proudly on your desk or shelf, or give it as a gift to a fellow fan. **The Finished Product** Here's what the finished product will look like: This is a photo of the final printout of Spider-Man made using a DLP printer with a resolution of 0.030mm. The level of detail and realism in this model is stunning, and it's clear that a lot of time and effort went into creating it. Spider-Man Homecoming
With this file you will be able to print Spiderman Home coming with your 3D printer. Click on the button and save the file on your computer to work, edit or customize your design. You can also find more 3D designs for printers on Spiderman Home coming.