Spent Primer Catch Tray for MEC 600Jr Mark V Mounted on Inline Fabrication Quick Change Plate
prusaprinters
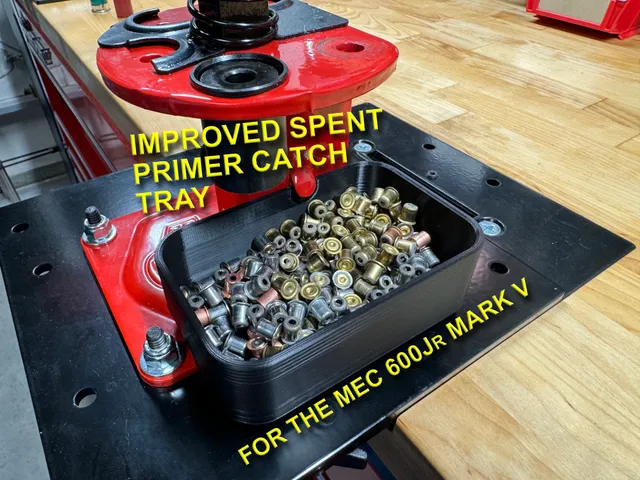
If your MEC 600Jr Mark V is mounted to an Inline Fabrication Quick Change plate, you've probably noticed that the spent primer catch tray that comes with the MEC does not fit properly because the rear-right mounting screw that comes with the IF plate interferes with the stock tray's position.While this probably doesn't bother most people, I'm rather OCD when it comes to these sorts of things, so I designed a custom tray with a better fit.My custom tray is printed in two parts and then glued together. You have the option of embedding a magnet in the base if you're like me and you're obsessed with magnets (or you'd just like the added security the magnet provides when the tray is in position). There is also a version that does not incorporate a magnet.(It's worth noting that because some shotshell primers use a steel battery cup, those primers will be attracted to the embedded magnet. In my testing and continued use of this tray, this did not cause any issues; the primers are easy to dump from the tray once full.) Printing:If you're going to use the magnetic version of the tray, you're going to need one of these magnets and you'll need to set a print pause at the appropriate layer so you can place the magnet inside the base during the print.If you do not want the base to be magnetized, be sure to use/print the “no magnet” version of the model, in which case you do not need to worry about setting a print pause.I would also recommend, for aesthetic purposes, using seam painting to place seams in the locations shown below. This is entirely optional and choosing to forego this step won't affect the function of the tray in any way. Assembly:For assembling the two parts (tray and base), the following are recommended:A bottle or tube of your favorite/go-to superglue.Two clamps of sufficient size to secure the base to the tray while the glue sets up and/or cures.Step One: Test fit the two parts together to make sure there are no print anomalies causing poor fitment of the parts.Step Two: Apply a bead of glue to the recessed oval in the tray (see below). Don't go crazy here; a small bead is sufficient. It's not necessary (and not advised) to completely fill the channel.Step Three: Align the rib on the base with the channel in the tray and press them together. Apply the clamps to the assembled tray so the base is held in position while the glue dries.Step Four: After allowing sufficient time for the glue to dry, remove the clamps and install the spent primer catch tray on your press.Step Five: Get back to reloading those shotshells and enjoy the new spent primer catch tray!
With this file you will be able to print Spent Primer Catch Tray for MEC 600Jr Mark V Mounted on Inline Fabrication Quick Change Plate with your 3D printer. Click on the button and save the file on your computer to work, edit or customize your design. You can also find more 3D designs for printers on Spent Primer Catch Tray for MEC 600Jr Mark V Mounted on Inline Fabrication Quick Change Plate.