Sovol SV01 Pro all metal heatbreak volcano dual 5015 fan upgrade (SV04)
prusaprinters
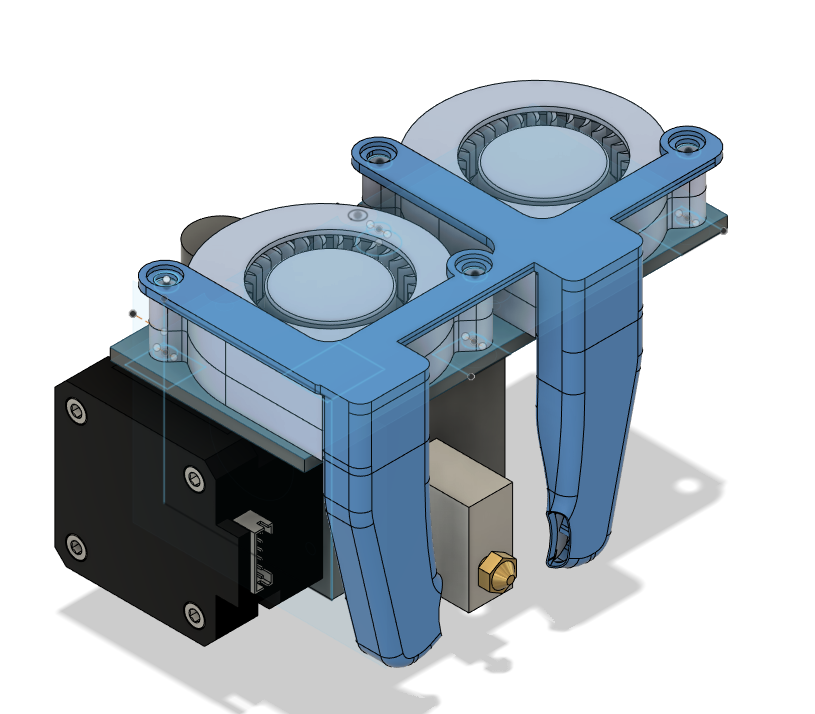
<p>SV01 Pro print head is pretty unique and proprietary but can be upgraded to all metal heatbreak, volcano hotend and dual 5015 fan.</p><p><strong>Will not work on base SV01, this is only for Pro version.</strong></p><p> </p><h3><strong>A. All metal heatbreak</strong></h3><p>This step can be safely done on SV01 Pro and SV04</p><p>There is no ready heatbreaks for this head, closest thing that almost fits is bimetal MK10 heatbreak like this (smooth, MK10), you can get one on amazon or aliexpress pretty cheap:</p><figure class="image"><img src="https://media.printables.com/media/prints/223015/rich_content/39fea753-b44f-48a3-9992-0f84d81f4391/3pw0w5r1.png#%7B%22uuid%22%3A%226a812518-5226-4ea2-82be-a0e669a5e4d4%22%2C%22w%22%3A512%2C%22h%22%3A490%7D"></figure><p><strong>However it is too long and needs to be grinded down until it fits using table grinder.</strong></p><p>Here are the dimensions, needs to be roughly cut down by 3mm. While grinding it down, cool it in water every couple seconds (i cooled it as soon as my fingers felt heat).</p><figure class="image"><img src="https://media.printables.com/media/prints/223015/rich_content/d47ab81d-a9d3-4a07-ab4b-406f9f31400b/lacznik-heatbreak-gardziel-mk10-bimetal-ean-5908233678056.webp#%7B%22uuid%22%3A%224cd94d96-dd41-42b8-a20f-b69327dfd7fe%22%2C%22w%22%3A391%2C%22h%22%3A512%7D"></figure><p>after grinding it down, make sure to smooth the edges and take 3mm drill in your hands (do not use power tools, copper is soft enough to make chamfer just with your fingers), make a small chamfer in the middle. Result should look like this:</p><figure class="image"><img src="https://media.printables.com/media/prints/223015/rich_content/dea9bd3e-53d7-4e07-b275-4ed63ddda750/1654618281752.jpg#%7B%22uuid%22%3A%22789da854-5afa-4c36-80ea-3b2b3326c23f%22%2C%22w%22%3A1800%2C%22h%22%3A4000%7D"></figure><figure class="image"><img src="https://media.printables.com/media/prints/223015/rich_content/d734bc8d-f1f7-440d-957e-dea2d10f89e0/1654623004308.jpg#%7B%22uuid%22%3A%229011a700-a344-4473-8220-d53d1471bcb3%22%2C%22w%22%3A1800%2C%22h%22%3A4000%7D"></figure><p>After that, use some thermal paste on cold side (i used CPU paste that is safe for copper) slide it down to aluminium block on head and screw two screws to keep it in place.</p><p> </p><p> </p><h3><strong>B. Volcano hotend</strong></h3><p>This step can also be done on SV04 but you will need to design your own duct, this step can also be skipped but cooling duct in point C will not fit anymore (as it was designed for volcano and SV01 Pro)</p><p>Buy volcano block, PT100 thermistor and optionally new heating cartridge (24V) as well as some silicone sock. Don't forget to get some volcano nozzles or adapter.</p><p><strong>Keep in mind by doing this, your original cooling duct will be useless</strong></p><p>Assembly is pretty straight forward, just like every other video about volcano assembly, one thing that is different is that thermistor may not fit and you will have to use tweezers to make bit more round to fit it further down the block (because there is little space above the block).</p><figure class="image"><img src="https://media.printables.com/media/prints/223015/rich_content/71f27542-4347-4baf-a258-3c2d01112a8c/20220607_1829451.jpg#%7B%22uuid%22%3A%22425fe932-e641-490e-9db6-c7e443fccbd4%22%2C%22w%22%3A4000%2C%22h%22%3A3000%7D"></figure><p>You may need to unscrew the heatbreak from cooling alu block to fit it then screw it back in, should not be a problem. <strong>Hardest part is rerouting all cabling, common parts should fit nicely without needing to solder or cut anything. It will require disassembling bottom of printer.</strong></p><p>Result should look like this:</p><figure class="image"><img src="https://media.printables.com/media/prints/223015/rich_content/b121da80-9f35-4efc-a89c-b866ba027127/20220607_2011581.jpg#%7B%22uuid%22%3A%2246a40114-dbc7-4832-adbf-cb46ae501ab2%22%2C%22w%22%3A3000%2C%22h%22%3A4000%7D"></figure><h3>C. Dual 5015 fan - New version V4</h3><p>Will not work SV04 as heads would collide.</p><p>Buy 2x 5015 fan 24V and some M3 screws (6mm) and bolts (its good to have various length.</p><p>Design that is attached is not final nor perfect but is good enough for me. New version was split into two and duct itself is a remix of <a href="https://www.thingiverse.com/thing:4855047">https://www.thingiverse.com/thing:4855047</a> . Simply print it (make sure to do some supports) and screw in using SHORTER mk3 screws (6mm long), the ones that were on metal block are too long. I printed it with 100% infill and PETG filament</p><p>Ducts in new design should no longer be too close to nozzle, but because the plate on head is a little skewed it may happen that left side is uneven.</p><p>Assembly is a bit of a pain as you need to put bolts on the other side of backplate before installing it.</p><p>THEN screw it to metal head plate. Then attach the fans and screw the rest of the bolts.</p><p>DO NOT FORGET TO PUT something underneath the CR touch as volcano block is longer, i used three 3mm nuts to make spacer for CR touch and longer screw.</p><p>After all upgrades, head looks like this (this is a result of skewed metal plate underneath):</p><figure class="image"><img src="https://media.printables.com/media/prints/223015/rich_content/7216b503-0c98-4672-811a-60f3205806f8/16549981018101.jpg#%7B%22uuid%22%3A%22e3f5ca98-9c42-4ef8-8b9d-acc2f444ec64%22%2C%22w%22%3A4000%2C%22h%22%3A1800%7D"></figure><figure class="image"><img src="https://media.printables.com/media/prints/223015/rich_content/abadd863-7069-4429-8daa-2b5030585d17/16549981018151.jpg#%7B%22uuid%22%3A%222f43bfaa-6d7e-416a-b27c-6b9b00392a85%22%2C%22w%22%3A4000%2C%22h%22%3A1800%7D"></figure><p>Fan nuts are screwed from the front side using tweezers (that is why i used longer screws there). As for connection i simply cut down original fan cable and soldered the new ones but you can do some connector.</p><p> </p><h3>D. Bonus step: Klipper</h3><p>My printer runs klipper, it has Creality 4.2.2 board with GD32F303RET6 mcu. To compile klipper use these settings:</p><figure class="image"><img src="https://media.printables.com/media/prints/223015/rich_content/a402d6dd-04f5-4623-a61a-e2b18d12cb08/unknown1.png#%7B%22uuid%22%3A%22cdf786cc-745e-461b-90f0-673f3fc64a80%22%2C%22w%22%3A619%2C%22h%22%3A195%7D"></figure><p>Yes it works well on STM32F1 despite having M4 core.</p><p>I have also attached my printer.cfg but you will need to adjust it as I have some experimental settings there. For example bed mesh is my own, extruder PID settings are for 50W cartridge in volcano block with NTC 100K thermistor and you will need to adjust z offset.</p><p>Rest of the setup is like any other klipper.</p><p> </p>
With this file you will be able to print Sovol SV01 Pro all metal heatbreak volcano dual 5015 fan upgrade (SV04) with your 3D printer. Click on the button and save the file on your computer to work, edit or customize your design. You can also find more 3D designs for printers on Sovol SV01 Pro all metal heatbreak volcano dual 5015 fan upgrade (SV04).