Sovol SV-01 BIQU H2 mounting plate w/ dual 5015 fans & BLTouch
prusaprinters
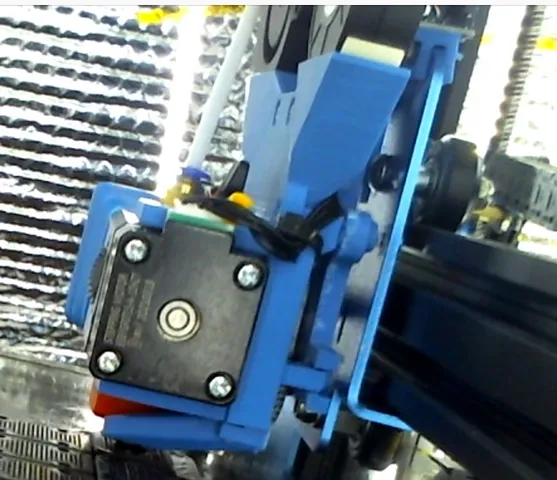
This thing allows mounting a BIQU-H2 extruder to a Sovol SV-01 original gantry plate with dual rear-mounted part cooling fans and an integrated BLTouch mount. I created this because I found when I installed the excellent Hero Yourself kit by FullmoonCat, my PLA curling issues were fixed as if by magic. The extra cooling of two well-targeted 5015 fans fixed my print. Switching to an H2 extruder, I wasn't able to find a dual-fan solution which fit the SV-01.I initially found thro42's adapter for the H2 on an SV-01, and that worked pretty well. Losing the extra cooling however put me back in PLA curling territory. The fan duct blocked a lot of visibility and access for calibration. The BLTouch felt like a sitting duck way out in front.Then I found windischb's H2 mount for the Ender 6, and I started to salivate. Dual fans, mounted up high and ducted down so they don't block visibility, integrated (and I'd dare to call it "armored") BLTouch mounting that was super close to the extruder point and fully protected by plastic on all sides. Only problem is I don't have an Ender 6. What's to do but fire up OpenSCAD and proceed to make a mockery of thro42 & windischb'2 elegant designs...I used OpenSCAD to nip & tuck the original STL's rather than try to get them both functional in FreeCAD or sell my soul to Autodesk. I'm not proud of the process, but the result works... Also used were a dummy model of the BIQU H2 by 3D_LC and the SV-01 gantry plate by MadHatter3D. Those aren't included in the final rendered model, only used for alignment during design.This upload contains only the final STL files for this design. The full "source" including STL's from the several remixed things and OpenSCAD source are available in Github. I didn't include all of that here since Thingiverse's upload format seems to limit what can be included.The rendered pieces include:sovol-biquh2-adapter.stl - A modified version of thro42's mounting platesovol-biquh2-shroud.stl - The fan ducting which attaches between the adapter and the H2sovol-biquh2-nozzle-{left|right}.stl - Left & right ducts which are attached with screws to the main shroud. Printed separately because the thing already needs more than enough supports to print...So why the two-layer adapter plate? I'm lazy & it worked. The duct locations in windischb's Ender mount don't line up well with the original mounting screws on the SV-01 gantry. Using that mount directly would require either re-working the duct locations or driving screws right through the air ducts. The two-piece approach also allows mounting the H2 and zip-tying all the wiring down nice and neat with the shroud as a separate part you can work on more easily. Once everything is in place and bundled up tight, four screws, and you're done. No trying to tuck wiring into the right place as you're contorting yourself around the printer and carefully tightening screws to not pinch anything.The main changes I made to windischb's mount are:Added some zip tie points to cinch down wiring.Thickened some parts for reinforcement. My first print started separating along the thinnest part.Moved the screws around to meet up with exposed spots on the adapter plate.Added sloping ramps up to some of the protrusions on the back so as to print with fewer supports.Designed new fan nozzles that get closer to the part and put more air where it needs to be. I don't have the skill to do any kind of flow analysis on these, so I'm just guessing / making it up. The nozzle mounting didn't change, so you can print and use windischb's originals if you like them better.The changes to thro42's adapter plate were much simpler. I added additional screw holes (and filled some I didn't need) to enable inserting threaded inserts to match the shroud. I also added some forked alignment tabs to the bottom edge of both pieces to keep things a little tighter even with all the screw points relatively high up on the model.All told, this works pretty well. It went together easily, cools my parts, and I'm really happy with it.To Do:I'd like to try integrating the cable guide and fan mounting from Cable Guide for Ender 6 - BIQU H2 Extruder. That original thing doesn't fit with the adapter plate or original SV-01 gantry. Adding at least screw holes for the 5015 fans would be nice, though double-sided tape seems to be working alright so far. The OpenSCAD file contains a start to that adaptation, but I haven't tried it yet.Add a groove for the tabs that protrude from the 5015 fans.Check alignment on bottom BIQU screw. Not sure if my print warped or if it's a little bit off.Hardware:(4x) M4x12 screws (adapter plate to gantry - original M4's on the SV01 extruder probably aren't long enough)(4x) M3 heat set threaded inserts(4x) M3x20 screws (shroud to adapter plate)(3x) M3x8 screws (H2 to shroud - two are usually included with the BIQU kit)(2x) M2x12 screws (fan nozzles to shroud)(2x) M2 nuts (same)(5x) ZIP ties (1mm wide)(2x) 5015 blower fansDouble-sided sticky foam tape (to mount fans)Assembly:Insert the threaded heat sets into the back adapter plate at the points that match up with the screws on the fan shroud. You could optionally leave out the right-most insert and use a longer M3 screw in that hole that would go all the way to the threaded insert on the original SV-01 plate, going through both the shroud and adapter plate.Insert an M2 nut into each of the catches near the bottom of the shroud, line up the two fan nozzles, and screw them in place with M2 screws. Be a little bit careful. They're fragile. Depending on how it printed, you may need to trim out some extra material in the nozzle slots to get them to seat well.Screw the adapter plate onto the SV-01 gantry using the 4 M4 holes that line up with the original extruder stepper mounting holes. You'll probably need to tighten the screws incrementally or risk flexing the plate too much.Insert the BLTouch in the back of the shroud with the plug facing away from the extruder.Insert the two 5015 fans at the top of the shroud. They kind of "pop" in if you line them up then twist them into place. I found putting tape on the inside of the ducts near the top on the outer side allowed lining up the fans, rotating them to pop, and in the process they hit the tape and stick in place. Note you may need to splice the fans together or create a splitter for their power wires.Attach the BIQU-H2 to the front of the shroud with three M3 screws (two top, one bottom). Route the heater and thermistor wires around the back and zip tie them using the provided tiedown points. The wires should fit (mostly) into the grooves to either side of the BLTouch.Wire the extruder stepper and extruder cooling fan, and route the wires around the back of the shroud, zip tying on each side to provided tie-downs.Route the wires for heater, thermistor, BLTouch, extruder fan, extruder stepper, and 5015 fans to the back-center of the shroud and zip tie them all together to the top of the shroud using the provided tie-down between the top two mounting screws.Make sure all wires are clear of screw hold and support pedestals. They should be if they take straight lines between the zip tie points. You may need to be careful about how zip ties are oriented so their "head" doesn't protrude past where the shroud and adapter plate meet.Line up the shroud with the adapter plate already on the gantry, and screw into place with 4 M3 screws.Double check no wiring is pinched, hanging down towards the build plate, etc. There's a hole in the original SV-01 plate near where the wires come up from the shroud. I wrapped my wires in some wire loom to protect them, then zip tied them there. I have a drag chain for the gantry wires that lined up and worked well from that point.Route your hotend wires back to your control module as you like. I've got connector plugs in mine near the gantry which is easy and also looks like hot garbage...Print SettingsPrinter:Sovol SV-01Rafts:NoSupports:YesResolution:200Infill:40 - GyroidFilament: ABSNotes:See Cura screenshots for best orientation. You'll need to rotate the adapter plate and cooling ducts.You'll probably need some support blockers on the bottom of the shroud to prevent the duct mounting & screws from getting filled up. Also on the top of the shroud to prevent generated supports that aren't needed with the sloping build up to the screw pedestals. Tree supports touching build plate only in Cura worked well for me.
With this file you will be able to print Sovol SV-01 BIQU H2 mounting plate w/ dual 5015 fans & BLTouch with your 3D printer. Click on the button and save the file on your computer to work, edit or customize your design. You can also find more 3D designs for printers on Sovol SV-01 BIQU H2 mounting plate w/ dual 5015 fans & BLTouch.