Solor Mendocino Motor
thingiverse
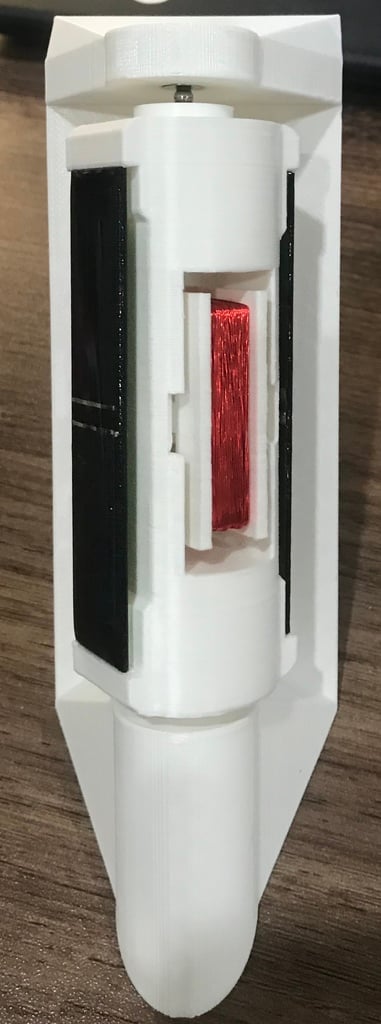
This dynamo motor is an absolute delight to watch in action. I was thoroughly surprised at how swiftly it will spin under full sunlight conditions. The motor performs best when sunlight shines on its side or at a slight angle less than directly onto the front of the model. To build this project, you will need some additional components. Parts List: 1. Solar Panels: Two 3V 50mAh 80X17mm Mini Power Small Solar Cell Panels can be purchased from eBay. I used these panels for my motor and they work well. 2. Magnet Wire: You'll need 31 AWG Gauge Red Enameled Magnet Wire, which I bought in a roll of 1000 feet from eBay for $10.00. This wire is perfect for building the coil. 3. Magnets: To power your dynamo, you'll require strong neodymium magnets. I purchased these from K&J Magnetic's Model number D401. You'll need at least twenty of these stacked five per side of the armature and five per side of the stator and bearing assembly. 4. Super Glue: This is used to install the magnets into place. 5. Sticky Back Tape: I used this tape to attach the solar panels to the armature's ends. 6. Solder and Soldering Iron: You'll need to solder the coil to the solar panels. Refer to the wiring diagram for more details. 7. Stator Magnet: A 1" x 1" x 1/2" thick magnet with a hole to accept #8 screws is needed. I purchased this from K&J Magnetic's, but you can substitute it with any strong neodymium magnet. Instructions: 1. Download and print the STL files for your motor. 2. Gather all necessary materials and tools. 3. Wind 100 turns of magnet wire onto a bobbin. 4. Secure the ends of the wire against each other using superglue to prevent unraveling. 5. Push the bobbin into the armature and glue it in place. 6. Install five magnets at one end of the armature, ensuring North faces outwards. You can use a pole identifier app from K&J Magnetic's to determine North and South poles. 7. Repeat step 6 for the other end of the armature. 8. Attach five magnets to the stator and bearing housing with South facing inwards. 9. Install the stator magnet using a small screw. 10. Make an electrical connection between the coil and solar panels using a soldering iron. 11. Slide a wedge into the stator groove. 12. Place the armature between the ends of the stator, insert a small ball bearing between the magnets, and lubricate it with WD-40. 13. Expose the motor to light, allowing it to rotate on its own. You may need to adjust the angle of the model to optimize speed. The amount of light hitting the armature's side can be adjusted to control the motor's speed.
With this file you will be able to print Solor Mendocino Motor with your 3D printer. Click on the button and save the file on your computer to work, edit or customize your design. You can also find more 3D designs for printers on Solor Mendocino Motor.