Solar Radiation Shield (Stevenson Screen) for Outdoor Thermometer
prusaprinters
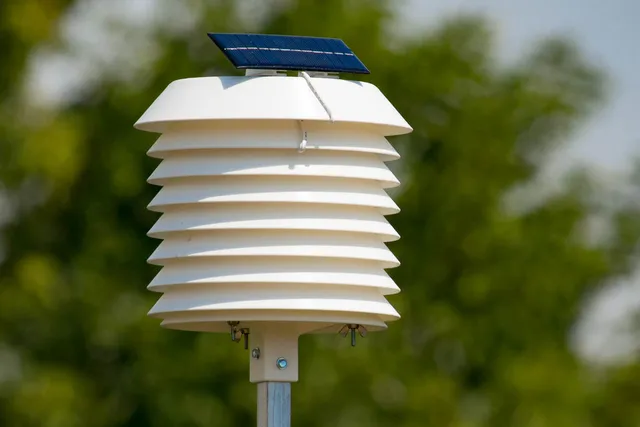
This is a solar radiation shield for mounting a temperature sensor outdoors. The shield allows air to flow through freely, but protects the thermometer from direct and reflected solar radiation. This provides a much more accurate temperature reading during daylight hours.The shield consists of several parts:Several rings that are open in the middle for sensor equipmentSolid plates to shield the top and bottomA larger top plate to provide extra shade and room for batteries or other non-sensor electronicsA small plastic tripod that fits under the top plate to provide locations to zip-tie wires, batteries, chargers, etc.Solar cell mounting bracketsAn internal grid to secure sensorsPole mounting plates for various pole configurationsStuff I used in this build:*This site contains affiliate links for which I may be compensatedeSun White ABS filament (1.75mm): AmazonValspar gloss white plastic spray paint: AmazonWeMos D1 Mini ESP8266 microcontroller: AliExpressSamsung 18650 lithium battery: eBayLithium battery charge controller: eBay1W 6V Solar Panel: eBayDHT22 digital temperature and humidity sensor: eBay6-32 threaded rod: Amazon6-32 wing nuts: AmazonMicro Deans battery connector: eBay3/4" square aluminum tubing: AmazonScotch Extreme Mounting Tape: AmazonMy weather station is on-line and you can view the data on ThingSpeak here: https://thingspeak.com/channels/144231Print SettingsPrinter:MakerFarm Prusa i3vRafts:NoSupports:YesResolution:.2mmInfill:40%Notes:Support material can help with the shallow radii at the edges of the plates, but is not strictly necessary, depending on your printer.Post-PrintingAssemblyTo assemble the screen, I used 6-32 threaded rod. M3 threaded rod will also work. I heat-set threaded inserts into the top plate, screwed in pieces of 6-32 rod, stacked all of the parts on the rods and secured with stainless steel wing nuts. An alternate version of the top plate is provided that can be tapped for M3 (or 6-32) rod if you don't have the inserts. Just drill out the holes, tap and screw the rods into the plastic directly.rnrnThe triangular part with legs is an electronics mount. It fits in the top cover and provides a place to zip-tie the electronics.rnrnThe solar cell mounts are designed so you can mount a solar cell with double-sided foam tape. I recommend Scotch Extreme Mounting Tape.Wire RoutingIf you use this in a wireless solar configuration like I did, you will need to route wires from the solar cell to the charger and batteries under the top and from the batteries to the electronics inside the screen. You can drill holes to pass the wires and seal them with an appropriate sealant, or you can just route the wires over the side and between the layers of the screen.How I Designed ThisFusion 360 ProjectIf you'd like the original Fusion 360 project, you can view and download it here:rnrnhttp://a360.co/2wEZE7DrnCategory: Outdoor & Garden
With this file you will be able to print Solar Radiation Shield (Stevenson Screen) for Outdoor Thermometer with your 3D printer. Click on the button and save the file on your computer to work, edit or customize your design. You can also find more 3D designs for printers on Solar Radiation Shield (Stevenson Screen) for Outdoor Thermometer.