Solar Christmas Pyramid
prusaprinters
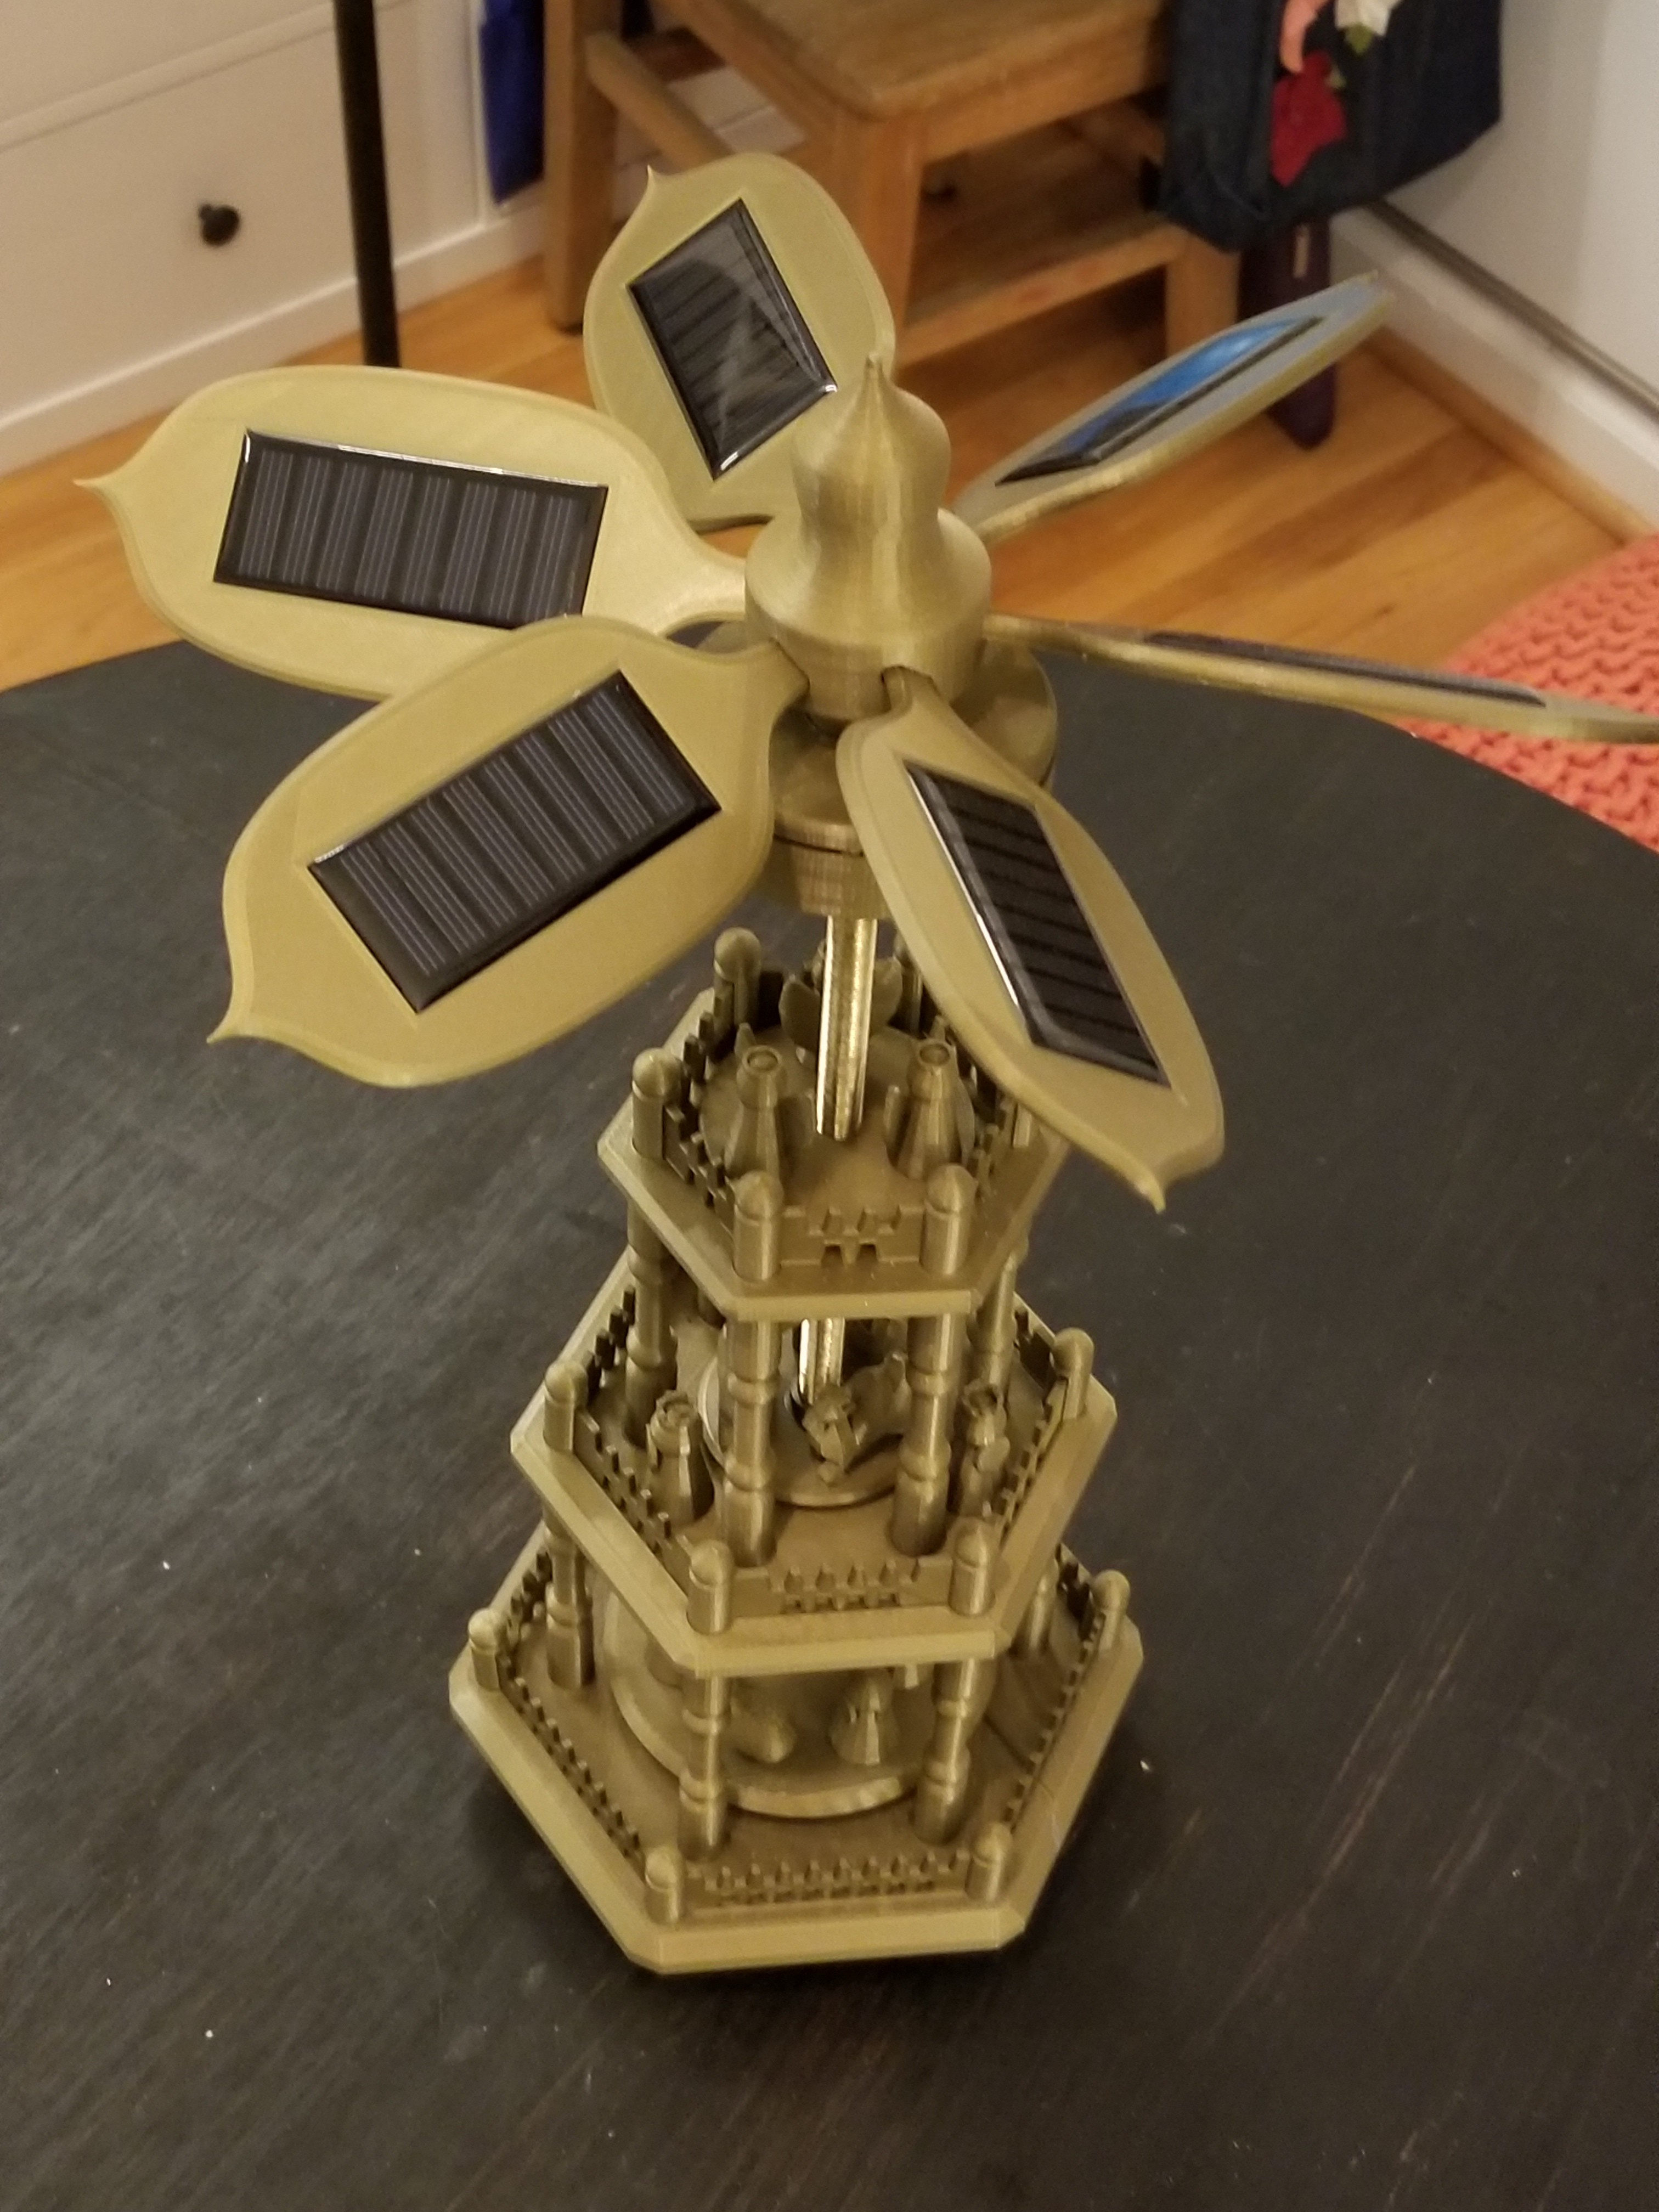
<p>3D Printed Solar Powered Christmas Pyramid ala (<a href="https://www.christkindl-markt.com/pyramids-christmas-c-73.html">https://www.christkindl-markt.com/pyramids-christmas-c-73.html</a>)</p> <p>See it in action here:<br/> <figure class="media"> <oembed url="https://youtu.be/JpVwpq1XYDs"></oembed> </figure> </p> <h3>Print instructions</h3><h3>Category: Sculptures Print Settings</h3> <p><strong>Printer:</strong> Flash Forge Creator Pro</p> <p><strong>Rafts:</strong> Doesn't Matter</p> <p><strong>Supports:</strong> Doesn't Matter</p> <p><strong>Resolution:</strong> .15mm</p> <p><strong>Infill:</strong> Various</p> <p><strong>Notes:</strong></p> <p>Nothing is particularly challenging in this print, obviously some pieces require raft, and or support, others do not. You will need to print a LOT of total pieces:<br/> 12 Columns<br/> 18 Fence Posts<br/> 6 each size of fence<br/> 6 Column Arch Header 54mm<br/> 6 "Squished" 33mm Column Arch headers from the same file<br/> 1 LeafHub<br/> 6 Leaves<br/> 1 Battery Bottom Half (If you want battery power also)<br/> 1 Battery Top Half (If you want battery power also)<br/> 1 Top Patform<br/> 1 Middle Spinning Platform<br/> 1 Middle Platform<br/> 1 Motor Housing Platform<br/> 1 Bottom Platform ( 1ea big and small half)<br/> From nativity set:<br/> 3 angel<br/> 3 wise men<br/> 3 camel<br/> 3 shepard<br/> 3 sheep<br/> 1ea Mary, Joseph, Jesus</p> <h3> Post-Printing</h3> <p><strong>Overview</strong></p> <p>This is NOT simple print, It was probably a week of printing followed by 2 or 3 days of assembly.I found DAP RapidFuse Glue: (<a href="https://www.homedepot.com/p/DAP-RapidFuse-0-85-oz-All-Purpose-Adhesive-6-Pack-7079800155/207193565">https://www.homedepot.com/p/DAP-RapidFuse-0-85-oz-All-Purpose-Adhesive-6-Pack-7079800155/207193565</a>) to be an oustanding glue, It take a bit longer than superglue, so you can make minor mistakes, but once on it holds well, its also a bit gel, so it 3dprinted parts with layer marks, and minor imperfections better.</p> <p>First, Print all the pieces (I used PLA due to the low thermal expansion/contraction) AS I said this will take a LONG while. One intersting thing I probably should have done, is just print the columns on the platforms, would have saved some time, and the hardest assembly step.</p> <p>Next Acquire the Electrical components:</p> <p><strong>Electrical Components</strong></p> <p>Post Printing is very involved, first you will need a number of electrical components:<br/> Low RPM DC Motor: <a href="http://a.co/j0KENpi">http://a.co/j0KENpi</a><br/> 6 Solar Cells (3 packs of 2)[sold out]: <a href="http://a.co/ggAn7fF">http://a.co/ggAn7fF</a></p> <p>For Battery Pack Option:<br/> Clip on Battery terminals:<a href="http://a.co/1iI791W">http://a.co/1iI791W</a> and <a href="http://a.co/4NKSVaJ">http://a.co/4NKSVaJ</a><br/> Some Switches to swap between solar, battery and charging:<a href="http://a.co/a6n5T6z">http://a.co/a6n5T6z</a><br/> 2 Rechargeable AAs: <a href="http://a.co/7VOaEx0">http://a.co/7VOaEx0</a><br/> Threaded Lamp Rod: <a href="https://www.homedepot.com/p/Westinghouse-12-in-All-Thread-Lamp-Pipe-Kit-7027200/204836035">https://www.homedepot.com/p/Westinghouse-12-in-All-Thread-Lamp-Pipe-Kit-7027200/204836035</a> (I think, I just had some laying around, but this looks the same, check sizing against the model dimensions)<br/> Some Black and red wire, solder and soldering iron</p> <p><strong>Build the Top Platform</strong></p> <p>Attach 6 posts, and fence pieces to the top Platform, then glue on 3 angels.</p> <p><strong>Build Leaves and Leaf Hub</strong></p> <p>Run Solar panel wiring through the leaves, and into the hub. I used a crochet hook to fish them down the central column. A tiny bit of glue was enough to adhere the panels, they mostly snapped in place with my print. Again a tiny bit of glue is enough to hold the leaves into the hub. (Honestly friction alone may be enough!)</p> <p><strong>Battery Box (Optional)</strong></p> <p>If you are doing the battery box, apply the switches, and battery clips, solder it all together. (I didn't record my schematic sorry, so its up to you how you want to connect the switches, panels and motor)<br/> screw the bottom battery piece to the top of your rod (use glue if desired) run wire down the length of the rod + enough slack to solder to motor(size by visual inspection) solder at top to switch interconnects.<br/> Glue the top battery assembly to the bottom of the leaf hub.<br/> Solder all the positive solar panel wires together, and all the negative wires together (this was probably the hardest part, as you want them up in the hub so they don't get in the way of closing the battery box, solder some leads onto them that can connect to the appropriate switches. ( Then just pressed the wires around the poles of the switches so I could entirely remove the leafhub assembly later as desired for storrage/maintenance)</p> <p><strong>Assemble the Platform Layers on the Rod</strong></p> <p>Starting with the Top Platform, followed by the middle spinning platform, followed by the middle platform, and lastly the Motor Mount Platform.</p> <p>Feed the wires coming out of the rod through the motor mount, and solder to the motor, which then nestles into the bottom of the motor mount, shaft facing out/down.</p> <p><strong>Assemble the Bottom Platform if not printed as single piece</strong></p> <p>I glued mine together with the flat side down on a granite counter-top to keep it as flat as possible.</p> <p><strong>Assemble the rotary components</strong></p> <p>Place the whole previously assembled rotary components into the motor receiver hole in the Bottom platform, there is a small keyed hole in the bottom that accepts the motor shaft.</p> <p><strong>Glue in place all of the columns and column headers between the levels</strong></p> <p>It can be helpful to hold some components out of the way with clothespins</p> <p><strong>Final decorations</strong></p> <p>Glue Fence Posts, Fences and Nativity creatures.</p> <p><strong>Final Words</strong></p> <p>This ordering may not be exact, and I highly recommend dry fitting things before gluing to ensure the assembly ordering makes sense etc. If you have questions, just let me know and I'll try and help out.</p> <h3> How I Designed This</h3> <p>All of the structural components Were designed in Free Cad.<br/> The Nativity Figures were printed from Thingiverse, not designed by me:<br/> <a href="https://www.thingiverse.com/thing:42032">https://www.thingiverse.com/thing:42032</a> for Camels<br/> <a href="https://www.thingiverse.com/thing:35910">https://www.thingiverse.com/thing:35910</a> for Nativity<br/> <a href="https://www.thingiverse.com/thing:474526">https://www.thingiverse.com/thing:474526</a> for Sheep<br/> They are also included as a zip file for convenience (as long as they don't get pulled for any reason)</p>
With this file you will be able to print Solar Christmas Pyramid with your 3D printer. Click on the button and save the file on your computer to work, edit or customize your design. You can also find more 3D designs for printers on Solar Christmas Pyramid.