Soft Drink Mixer Cap
thingiverse
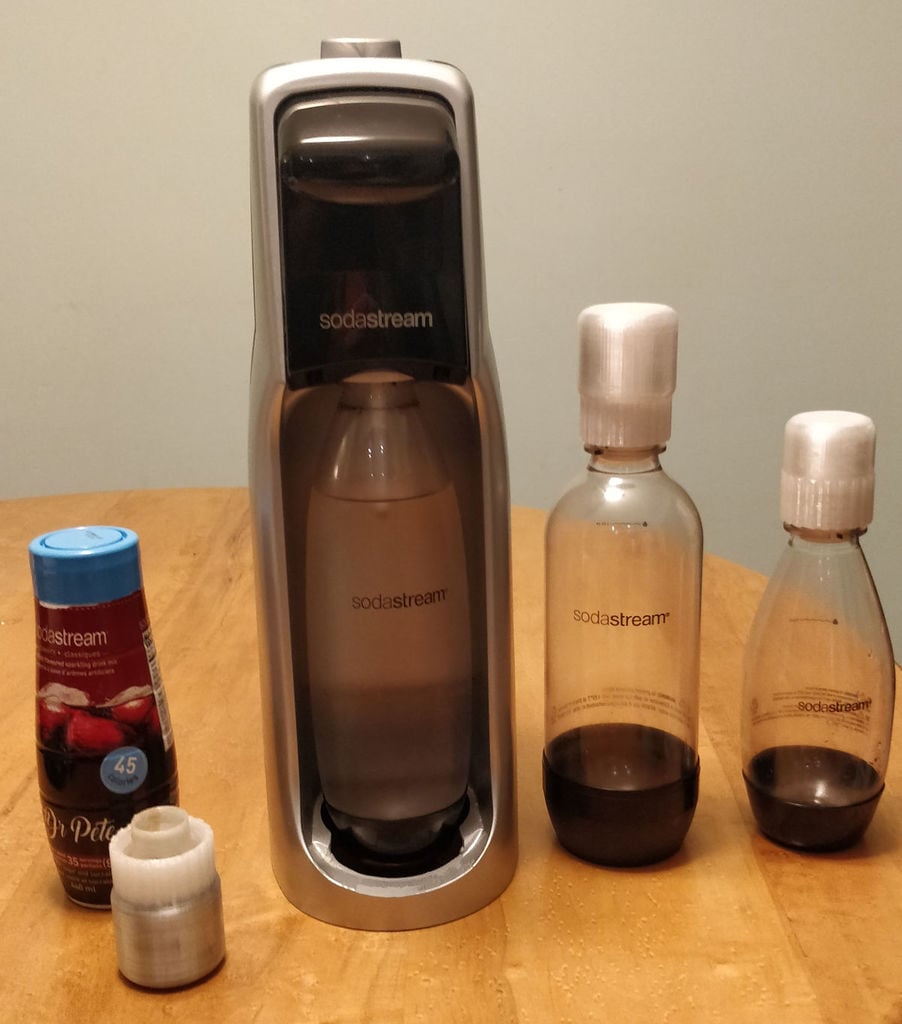
More Fizz! No Mess! Replacement bottle cap with a built in reservoir for holding flavour syrup. One problem with making your own soft drinks using typical consumer grade carbonation appliances is that as soon as you put the flavour syrup into the newly carbonated water, it ellicits vigorous bubbling, letting out a lot of the precious gas you just put into the water and sometimes, creating a mess as the mixture fizzes over. I designed these caps to hold the required quantity of syrup so that as you pour in the syrup, you're already securing the cap on top. As a result, you lose less gas and generally never have the problem of the drink fizzing over and spurting all over your kitchen. The large size holds about 64mL and the smaller one about 34mL as printed, although once you seal it with epoxy, you'll probably lose 1-2 mL. These amounts are about right for the large and small size bottles sold by the maker of my particular carbonation appliance. You can see it in the attached pictures, but the brand name rhymes with coda-team and is commonly available in several countries. I recommend printing these in a food-safe filament with a stainless steel nozzle. I would avoid PLA due to it's tendency toward brittle failure. While not a huge amount of stress, they may have to withstand about 2-3 atmospheres of pressure. It may not be overly important, as you'll want to seal these with epoxy, so as long as you use a food safe epoxy resin, the 3D print may not matter as much, although the outer surface of the collar will still come into contact with the drink, so if you're paranoid about such things, use a food safe filament. I used Form Future HD Glass which is a food-safe PETG. I did make the walls reasonably thick. This was in part to ensure good strength but also to get more chances for the print to be properly gas-tight. After playing around with many settings, I deduced that water-tight and gas-tight are not the same. Functionally water-tight prints are easy. Functionally gas-tight prints are another thing, especially when the gas is pressurized and trying to force its way out. In any case, I still recommend printing the walls solid right through, as even after you seal, there may be small opportunities for gas leaks somewhere and the extra tensile strength against pressurized gas is probably a good thing. You'll need to print in the provided orientation so that the threads print properly and so will need supports for the gnurled and threaded outer portion of the cap. I used tree supports from the build plate only and also added a support blocker to prevent any more support being generated above the based of the gnurled/threaded section of the cap. You definitely don't want internal supports. Breaking them out from inside the reservoir would be difficult to impossible. The top of the cap has some internal structures to reduce some of the messiness that ensues when bridging saggy filaments like PETGs and once you seal the inside with epoxy, it will be fine. I create an instructable for the sealing process at: https://www.instructables.com/id/Soft-Drink-Mixer-Caps/
With this file you will be able to print Soft Drink Mixer Cap with your 3D printer. Click on the button and save the file on your computer to work, edit or customize your design. You can also find more 3D designs for printers on Soft Drink Mixer Cap.
