Sofa CARMEN gray houses of the world 3D model
cgtrader
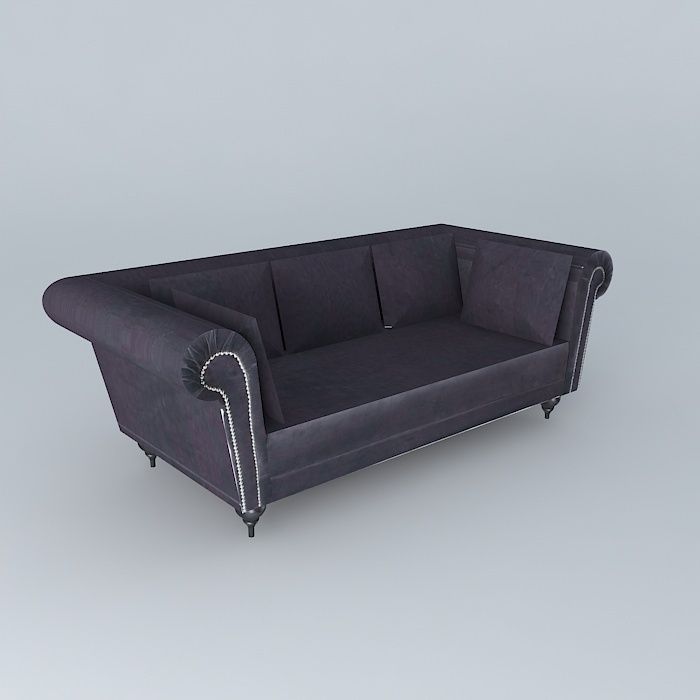
This 3D model was originally created with Sketchup 8 and then converted to other 3D formats seamlessly. Its native format is .skp, while a 3ds Max scene can be exported as a version compatible with 2016. The render engine used for rendering scenes in this context is Vray 3.00. Transform your living room into an elegant world with the addition of a stylish sofa featuring 3 gray velvet seats arranged in fixed positions around Carmen. This magnificent Chesterfield sofa allows you to let your imagination run wild thanks to its flared arms and ornate silver studs, perfectly complemented by its sophisticated design in velvet. To make it even more inviting, the gray sofa comes with 5 comfortable pillows that add a cozy touch. You may also like fixed Scala seats, offered in two-third proportions in a matching gray velvet finish. Dimensions are: Height - 76 cm, Width - 207 cm and Depth - 102 cm, with a total weight of 49 kg. Ref Number: 133111. The price is €799, which includes the impressive number of 5352 polygons used in its creation. Note that all textures can be found within the .skp file itself. For users with any of these compatible software packages, extracting the texture files will become an effortless task as per the following instructions: Users having access to Sketchup (available for free) may simply export the desired 2D file format from File/Export/2d Graphic - and make their preferred choices under the options dropdown. Alternatively, 1) Under the menu File, navigate to Export. 2) In the next window that appears, select a COLLADA File (*.dae) option by checking Export Texture Maps button. To access your textures from here: * Move to the exported file location * Find the directory containing the textures of your .skp file within a folder matching the name given in your exported dae file. Now with regards to Cinema 4D users: 1) Open a new instance by using any version available (including the free trial), or the existing software package you have downloaded. 2) As part of opening an instance, simply navigate and import your chosen .skp file as specified below: C:UsersYourUsernameDocumentsFileSKPSketchupFile.skp * Now you can easily see it from File > Import Once done importing the model with Sketchup software and after having imported in Cinema 4D (in order to create your texture folder for free): 1) You may now go straight back to your 3ds Max window. Here navigate to this: YourSceneFileName3dsMax sceneassetsimages 2) In a different instance using another application - Cinebench (for rendering performance), export the FBX model option along with an option to save all of those materials which had been made within this original .skp file. Once done go back here: C:\DocumentsFileFBXCinebenchSceneFbxExportFBxfilename When exporting you can see, your newly rendered images being embedded right alongside in its designated folder next to the newly exported FBX. For users of Rhino software, * First, let us begin with finding .skp file for which you've saved your imported design into Sketchup and from this particular place, go ahead importing 1) .SKP into Cinebench or 3DS Max - In addition export in fbx and import those into sketch. 2) After loading in new application called Rhino go back in to Panels > Material Editor You may have found by navigating that it’s all set ready, now select from left menu material that is using some texture of any given one (texture applied), then do this with every 1 by selecting texture at bottom right on that image named (see bottom left icon, which might resemble to camera and is used like button click to see all textures located elsewhere - at a different panel section: embedded file button - or use hotkey) Then navigate where those materials reside to your default directory: *C:UsersYourUsernameAppDataRoamingRhinoEmbedded-Files Go straight here now: C:User YourDefaultDir As stated earlier this method, will get your needed texture and once having been found you may simply right click on those folders within Windows file explorer (the icon looking similar to 2 squares in the top right side), then proceed with a simple drag action so as copy each picture, thus it could now paste into some folder of your own.
With this file you will be able to print Sofa CARMEN gray houses of the world 3D model with your 3D printer. Click on the button and save the file on your computer to work, edit or customize your design. You can also find more 3D designs for printers on Sofa CARMEN gray houses of the world 3D model.