Soap mold for Soapflaker / Seifenform für den Soapflaker
prusaprinters
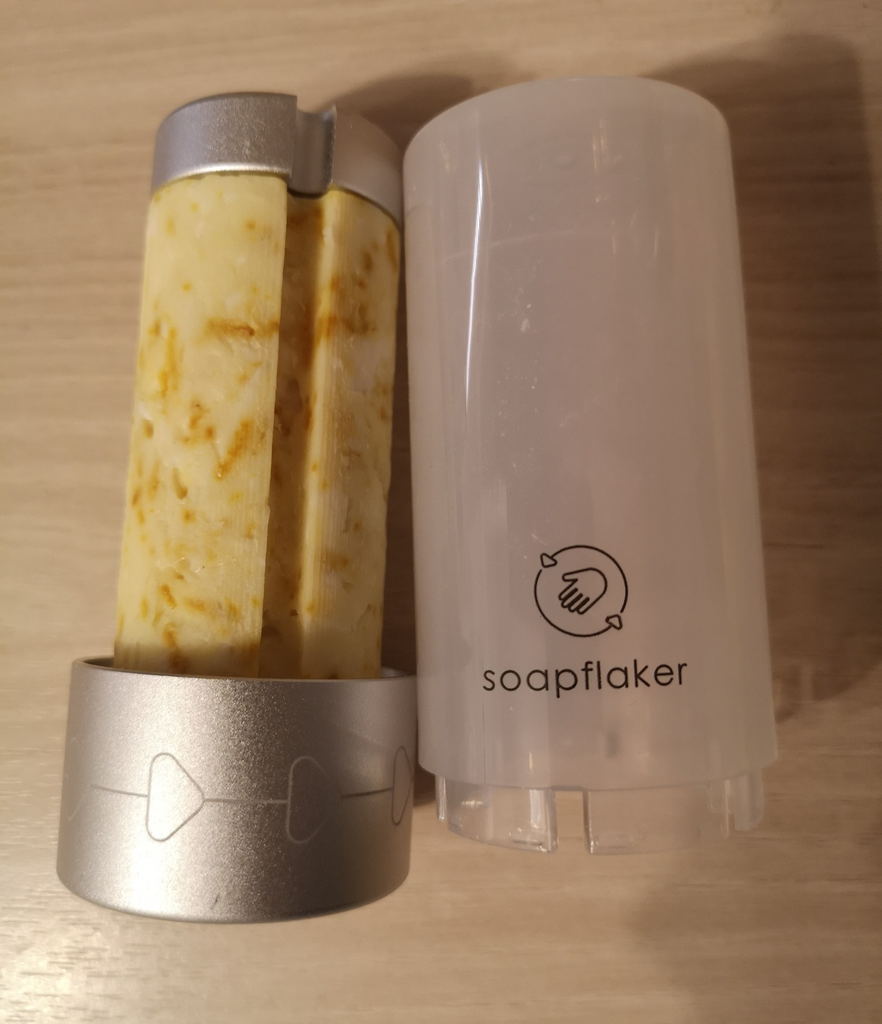
<p>Update 14.09.2022: <br>Second version enlarged by 7% to include the loss through drying<br>(-100 = 100% (scaling), -107 = 107% (scaling))</p><p><br>German:</p><p>Dies ist eine Seifenform zum Erstellen eigener oder dem Umschmelzen alter Seifenstücke zur Verwendung in einem "Soapflaker". Der Soapflaker ist ein Seifenspender für feste Seife und kann in Deutschland in verschiedenen Supermärkten oder auch online bezogen werden.</p><p>Die Form besteht aus drei Teilen. Die Verwendung erfolgt folgendermaßen. Getestet im Kaltrührverfahren. Für das Kaltrührverfahren empfehle ich die Version mit -107, da die zusätzlichen 7% während der Trocknung wieder verloren gehen:</p><p>1. Die Teile "Body1" und "Body2" zusammenstecken und mit dicken Gummibändern oder einer Schraubzwinge fest zusammendrücken<br>2. Geschmolzene Seife in die Form geben<br>3. Die Form mit dem Deckel "Lid" schließen (fest drauf drücken, die Seife wird dabei etwas herausquillen)<br>4. Ein max. 5,75mm dicken Stab gerade durch die Öffnung im Deckel durch die geschmolzene Seife drücken, bis der Stab in der Einkerbung im Boden steckt. Ich habe dafür einen Inbusschlüssel verwendet. Alternativ kann auch das Gewinde eines Soapflakers verwendet werden.<br>5. Seife abkühlen lassen (Am nächsten Tag ließ es sich bei mir bisher am besten ablösen)<br>6. Den Stab aus der nun nicht mehr flüssigen Seife ziehen<br>7. Den Deckel abnehmen und überschüssige Seife mit einem Messer abschneiden<br>8. Die beiden äußeren Formstücke lösen<br>9. Das Seifenstück vollständig trocknen lassen und dann verwenden</p><p>English:</p><p>This is a soap mold for making your own or remelting old bars of soap for use in a "Soapflaker". The Soapflaker is a soap dispenser for solid soap and can be obtained in Germany in various supermarkets or online.</p><p>The form consists of three parts. Usage is as follows. Tested in the cold stirring process. For the cold stir process, I recommend the -107 version, as the additional 7% is lost again during drying</p><p>1. Put the parts "Body1" and "Body2" together and press them together with thick rubber bands or a screw clamp<br>2. Pour melted soap into the mold<br>3. Close the mold with the lid (press firmly, the soap will ooze out a little)<br>4. Push a stick with a max. of 5.75mm diameter straight into the opening of the lid, until it is in the notch in the floor. I used an allen key for this. Alternatively, the threaded rod of a soap flaker can be used.<br>5. Let the soap cool down<br>6. Pull the stick out of the now no longer liquid soap (So far it was best to remove it the next day)<br>7. Remove the lid and cut off any excess soap off with a knife<br>8. Loosen the two outer forms<br>9. Let the soap bar dry completely (cold stirring process) and then use it</p>
With this file you will be able to print Soap mold for Soapflaker / Seifenform für den Soapflaker with your 3D printer. Click on the button and save the file on your computer to work, edit or customize your design. You can also find more 3D designs for printers on Soap mold for Soapflaker / Seifenform für den Soapflaker.