Snapmaker Artisan Modular Side Shelving
prusaprinters
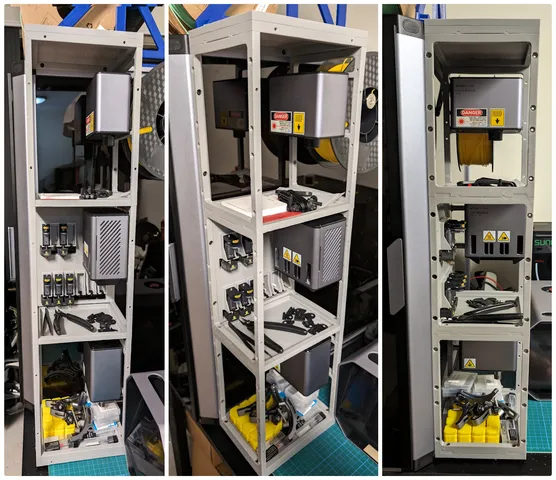
This design adds storage for the three Artisan modules and their accessories. It has been designed so it can be mounted on either the left or the right side of the enclosure.T Nuts are used to secure the shelving to the side of the Artisan Enclosure.Tool Heads are snapped into place by inserting the top of the Tool Head Plate into the mount and then pressing the lower part of the Tool Head Plate into position. The extruders are mounted using the same procedure.Made with Onshape:Source CAD: Snapmaker Artisan Modular Side ShelvingPrint Recommendations:Print in PETG for the increased strength.Rotate the models so they are laying down, bosses facing up.Print with 3 Top, bottom and wall layers for the additional strength.This is a big print, so some glue stick might be required to prevent the print lifting and warping.Required Hardware:M4 Bolts and Nuts - AliExpressMax head size 8mm diameter, 5mm height10x 8mm Bolts12x 20mm Bolts4x 14mm Bolts (If not using a Top Plate) OR4x 25mm Bolts (If using a Top Plate) (Not in the AliExpress link)16x Nuts10x M4 20 Series T-Nuts - AliExpressHardware for per back plate4x M4x5x5.5 Heat Insert (5mm Length, 5.5mm Diameter) - AliExpress4x M4 10mm BoltsRecommended Tools:Driver Bit/Screw Driver/Allen Key for installing Bolts4mm drill bit to ensure that the printed holes are the correct diameterDeburring tool to remove any elephants foot from the print - AliExpressSoldering Iron to press fit Heat Inserts - AliExpressParts To Print:Required Prints:1x Bottom1x Top3x Side Panel - Module Mount3x Side Panel - Blank3x Plate (Your choice of type) (see Note 2)Optional Prints:1x Top Plate (Your choice of type)1x Back Plate - Extruder Hanger - Both Side1x Back Plate - Extruder Hanger (Left or Right Side) (see Note 3)Notes:You can substitute Blank and Module Mount side panels as you see fitWhen choosing the gridfinity plate consider how the the fit will be when gridfinity bins are installed. They could interfere with things like the module or the extruders when they are mounted to a back plate.Choose depending on what what side of the enclosure you are mounting the Shelving to. Ensuring it will clear the Print Module when it is mounted to the Assembly Instructions:For all Parts:Remove Elephants foot using a Deburring toolTip: The tool can skip if you press too hard, so lightly does the job!Use a 4mm drill bit to drill out the holes to ensure they have accurate dimensionsPress fit M4 Nuts into the Side Panels and Bottom by using a M4 bolt to pull the nut into the hexagon holes in the print.For the Bottom Parts:Undo the two Allen keys bolts that fasted the Enclosure to the ArtisanSlide the enclosure forwards to you can get to the Allen key bolts in the underside of the enclosure.Partially disassemble the lower extrusion of the enclosure on the side you are installing the Shelving, Should be just 2 Allen keys bolts.Slightly move the horizontal extrusion away from the rest of the enclosure.Install 2x 8mm M4 bolts and T-Nuts to the side of the partSlide the T-Nuts into the horizontal extrusion.NOTE: Ensure that the part has the rounded bumps facing upwards.Slide the Bottom backwards or forwards so the side panel line up with the vertical slot in the enclosureTighten the part to the enclosure, try to get the part to sit as low as possible.Re-assemble the enclosure and re-attach the enclosure to the Artisan.For each Module Level:Place a Plate (Either the Tray or Gridfinity) on top of the shelving unit, this will be held in place by the Side Panels.Partially disassemble the upper extrusion of the enclosure on the side you are installing the Shelving, Should be just 1 Allen key bolt.Slightly move the vertical extrusion away from the rest of the enclosure.Install 2x 8mm M4 bolt and T-Nut to the side of a Side Panel (Normally this would be a blank panel)Slide the T-Nuts into the vertical extrusion.NOTE: Ensure that the part has the rounded bumps facing upwards and the 8 bolt recesses facing outwards.Fasten the part to the below shelving unitTighten the part to the enclosureUse 4x 20mm M4 bolts to fasten the far Side Panel (Normally this would be a Module Mount) to the below shelving unit.NOTE: Ensure that the part has mounting for the module facing inwards, the rounded bumps facing upwards and the 8 bolt recesses facing outwards.Repeat these steps for each Module LevelFor the Top Parts:Undo the enclosure wires near the top corner of the enclosure to prevent damageUndo the top bolt of the enclosure that secures the top horizontal extrusionSlightly move the horizontal extrusion away from the rest of the enclosure.Install 2x 8mm M4 bolts and T-Nuts to the side of the partSlide the T-Nuts into the horizontal extrusion.NOTE: Ensure that the part has the rounded recesses facing downwards.Re-assemble the enclosureRe-assemble the enclosure wiringTighten the part to the enclosureAdd the Top Plate if you are using oneFasten the part to the below shelving unit using 4x 14mm M4 bolts (Or 25mm if you are using the top plate)Note: This will be a tight fit, but results in a very strong assembly. slightly loosen some of the T-Nut bolts if you need some slack (but not too far or you will lose the T-Nut inside the extrusion).For the Back Plate:Using a Soldering Iron press fit 4x heat inserts into the ends of the Back Plate(Ensure there is no solder of the tip of the soldering iron)Slide the Back Plate into position between the two Side PanelsFasten the Back Plate to the two Side panels using 4x M4 10mm BoltsNote: Some of the above links are affiliate links. Using them costs you nothing and helps support the work I put into developing and testing.
With this file you will be able to print Snapmaker Artisan Modular Side Shelving with your 3D printer. Click on the button and save the file on your computer to work, edit or customize your design. You can also find more 3D designs for printers on Snapmaker Artisan Modular Side Shelving.