Snapmaker 2 Extra Part Cooling Fan
prusaprinters
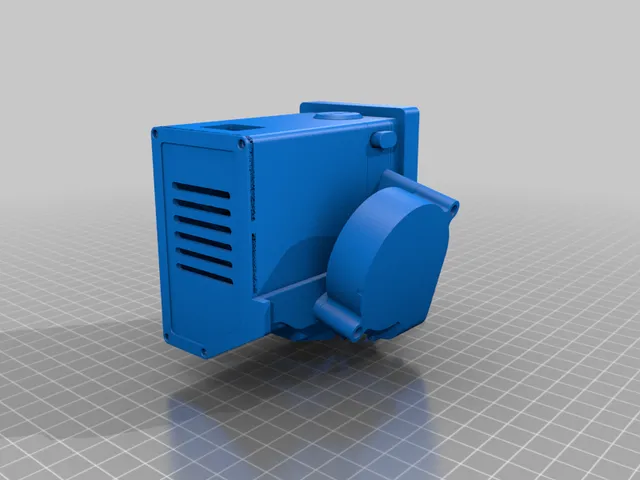
(Hopefully) final revision of the 5015 part cooling fan mount idea from brent113's forum post. Designed with a few goals in mind: extremely easy to print in PETG (you don't want to print the fan mount in PLA if you ever want to print hotter materials), absolutely no supports needed easily removable for servicing the hotend/toolhead/fan mount itself most direct air flow path possible, to avoid turbulent air causing print issues NOTE: It's become apparent that the precision of your slicer in the vent is important, there are lots of very thin walls in it, and you need to check your slicer's output when printing them to make sure that it's actually printing all the walls. See my post in the forum where I was diagnosing this, make sure your slicer is spitting out the correct gcode before printing, or you're probably going to end up with gaps (like moose did). Print Settings Printer: Snapmaker A350 Rafts: No Supports: No Resolution: .2mm Infill: 20 Filament: MatterHackers PETG Translucent Green Notes: Designed to be printed with a .4mm nozzle printing specifically at .2mm (or less) layer height, there are many sections that are only .4 or .8 mm wide. Wiring ====== As discussed in the forum post, you should add a 1N4148 diode between the leads. This can be added between the positive and negative, with the cathode (negative, has the black mark) side connected to the positive (red) wire. It would be a good idea to add this as part of a custom splitter cable to split the part cooling fan power leads for the new fan. (Fan 1 on toolhead 2.0) I got my diode as part of a pack, and used some JST connectors to make the splitter. Solder the diode between the wires when soldering the wires together Make sure you've got some electrical insulation, you don't want shorts in your toolhead mid print. Extra Materials =============== This was designed to be extremely easy to print, and as such comes in a few pieces, to put it together, you'll need some extra materials: 1x M2x16 bolt to connect the 2Fan Duct halves together 1X M3x30 bolt to connect the fan through theFan Mount to theToolhead Mount on the top 1X M3x20 bolt to connect the fan through theFan Mount to theToolhead Mount on the bottom 8x M2x8 bolts to mount theToolhead Interfaces under the toolhead side panels 2x googly eyes to put on the fan after you're done (this is essential) Assembly It should be fairly obvious how to assemble this, but in case it isn't: *Fan Duct Left andFan Duct Right snap together, and are secured together using the M2 bolt. It's probably helpful to first drive the bolt through the halves without snapping them together, to make it go through more fluidly after you snap them together. *Toolhead Mount Back Latch is connected toToolhead Mount by slotting theToolhead Mount Butterfly into the slot between the 2. You might want to use pliers to crimp everything down in after connecting them. You should be able to positionFan Mount against theToolhead Mount with the pins. The fan is then secured to theFan Mount with the M3 bolts, drive them through beforehand to make it easier to screw in. Continue driving the bolts out the back of theFan Mount and into theToolhead Mount to secure the whole thing together. Snap the combinedFan Ducts onto the bottom of theToolhead Mount assembly, the tongues on theFan Ducts should slot into the inside of the fan, and the little buckle connects to the "inside" of theToolhead Mount assembly. *Toolhead Interface Left goes under the left side panel (the original screws won't be long enough with the interface installed). + Make sure you've done the wiring, and have connected the new fan to the splitter before securing the side panel. *Toolhead Interface Right goes under the right side panel, note how left and right will have the slot open to the inside of the toolhead. Pictures Fully assembled and mounted Detached to allow full access to the toolhead door, also so you can get behind the fan and dust it when needed. Category: 3D Printer Accessories
With this file you will be able to print Snapmaker 2 Extra Part Cooling Fan with your 3D printer. Click on the button and save the file on your computer to work, edit or customize your design. You can also find more 3D designs for printers on Snapmaker 2 Extra Part Cooling Fan.