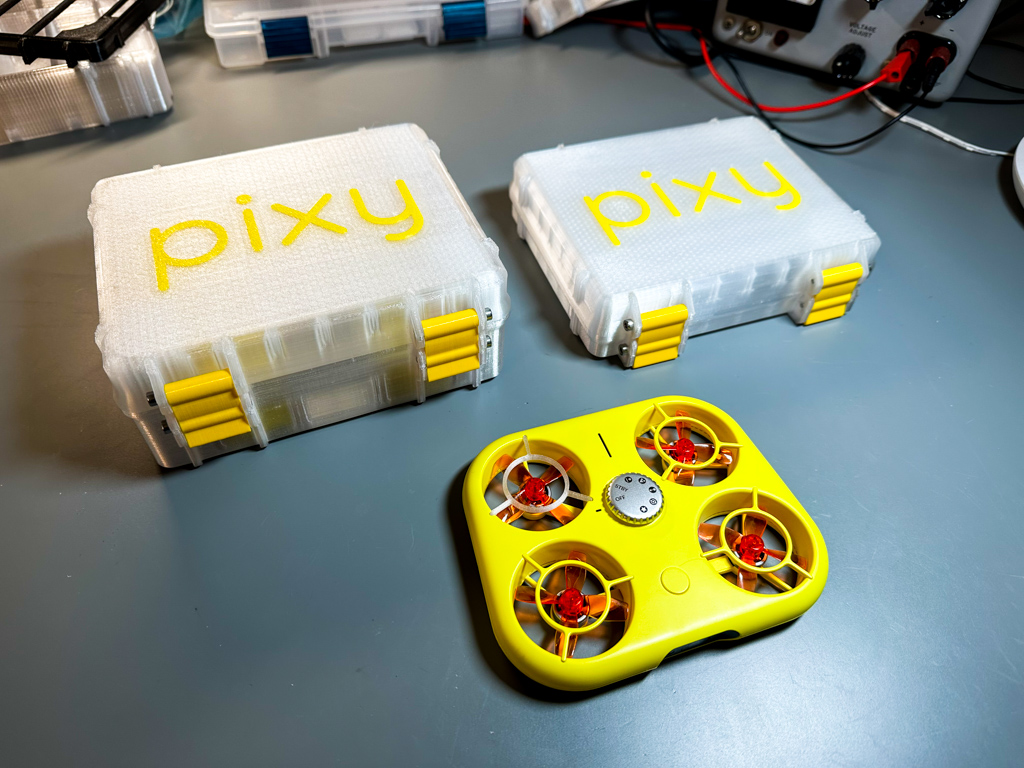
Snapchat Pixy Travel Case
prusaprinters
<p>The <a href="https://www.pixy.com/">Pixy's </a>maker, Snapchat, may have quickly <a href="https://www.theverge.com/2022/8/18/23311542/snap-pixy-drone-giving-up-four-months">abandoned the drone market</a> but that doesn't mean we have to abandon our little drone buddies!</p><p>The Pixy's surprisingly well built but for long trips or throwing into a bag full of other gear its a good idea to give it a safe place to hang out, particularly to keep the blade guards and blades safe. After having a blade guard break on mine while it was in my backpack during some pretty typical traveling I figured it was time to just print up a case.</p><p>The main idea behind this case is to support the drone by its corners and provide rigid top and bottom panels to avoid impact or pressure on the bottom engine mounts or the top blade guards. With the drone's fiddly bits protected the case can safely be tossed into a bag of other gear without worrying about breaking things.</p><h3>Options Available</h3><p>Two options are available - "<strong>full</strong>" with room for batteries and cables and ”<strong>short</strong>" for just the drone - and both are available with and without the Pixy logo inset on the lid.</p><p>If you don't want to deal with printing the fancy inset Pixy logo just use the lid parts labeled “<i>No Logo</i>”.</p><h3>Full Version</h3><p>Can carry the Pixy drone itself along with up to three Pixy "battery charger" packs which hold two batteries each. There's extra some room along the sides for storing power cables, cleaning cloths, or other little things as well.</p><ul><li>Height: 64.8mm</li><li>Width: 158.52mm</li><li>Depth: 152.52mm</li></ul><figure class="image"><img src="https://media.printables.com/media/prints/292277/rich_content/412b0c1d-d720-4e65-8a62-a00ef785c824/full-size-closed-box.png#%7B%22uuid%22%3A%226a286d2b-8d13-4c41-a0a8-180ac9ed95fd%22%2C%22w%22%3A1280%2C%22h%22%3A1024%7D"></figure><figure class="image"><img src="https://media.printables.com/media/prints/292277/rich_content/508c7e68-5532-479f-9f6b-e0c4cad60d85/full-size-open-box-empty.png#%7B%22uuid%22%3A%22a6ce510c-9937-4d14-8852-71b895ba28f8%22%2C%22w%22%3A1280%2C%22h%22%3A1024%7D"></figure><figure class="image"><img src="https://media.printables.com/media/prints/292277/rich_content/c7b96750-c2c3-4fd1-8246-8d42f1160d8c/full-size-cross-section.png#%7B%22uuid%22%3A%227f475b20-32f6-49da-8424-f05b03ceffb6%22%2C%22w%22%3A1287%2C%22h%22%3A743%7D"></figure><h3>Short Version</h3><p>This one just has room for the drone but it offers a bit more support for the corners. As a result its much shorter and takes a bit less time and material to print.</p><ul><li>Height: 39.2mm</li><li>Width: 158.52mm</li><li>Depth: 142.52mm</li></ul><figure class="image"><img src="https://media.printables.com/media/prints/292277/rich_content/380330cd-cf7d-414f-b48f-730166b8e67e/short-size-closed-box.png#%7B%22uuid%22%3A%223a096968-ba53-4d10-b1a5-0bba8b69bc6d%22%2C%22w%22%3A1280%2C%22h%22%3A1024%7D"></figure><figure class="image"><img src="https://media.printables.com/media/prints/292277/rich_content/ce13e6f6-fb95-4508-ac52-0f029cfea356/short-size-open-box-empty.png#%7B%22uuid%22%3A%221564f0f9-03fb-427d-9671-e7f794a01564%22%2C%22w%22%3A1280%2C%22h%22%3A1024%7D"></figure><figure class="image"><img src="https://media.printables.com/media/prints/292277/rich_content/29ec5661-71a7-4ef3-918a-9b575baf5248/short-size-cross-section.png#%7B%22uuid%22%3A%22b14f18b9-43f6-4cd0-a705-86ffe760a5c1%22%2C%22w%22%3A1236%2C%22h%22%3A727%7D"></figure><h3>Assembly Notes</h3><p>For assembly, 6x 30mm M3 screws will be required for the back hinges, the latch hinges, and the latch clasps.</p><ul><li>M3 Screws (30mm)<ul><li>McMaster Carr: <a href="https://www.mcmaster.com/91292A022/"><strong>91292A022</strong></a> (50 for $5.18)</li></ul></li></ul><p>The case leaves a few tenths of a millimeter of clearance around the corners of the drone itself to avoid pinching it too hard so it probably wouldn't hurt to add some small bits of thin padding on the corners if you're looking for a more snug fit.</p><h3>Printing Notes</h3><p>Throughout my testing I tried a bunch of different settings for slicing in PrusaSlicer, but these settings gave me the best results when printing with Prusament PETG on a stock Prusa MINI+. </p><ul><li>Preset: <strong>0.20 QUALITY</strong></li><li>Supports: <strong>Disabled</strong></li><li>Perimeters: <strong>6</strong></li><li>Avoid crossing perimeters: <strong>Enabled</strong></li></ul><p>Some infill settings were set purely for aesthetics when printing with clear PETG filament. For non-transprent filament something like gyroid at 20-30% may work out fine with less filament and time required.</p><ul><li>Fill Pattern: <strong>Honeycomb</strong></li><li>FIll Desnsity: <strong>25%</strong></li><li>Fill Angle: <strong>0%</strong></li><li>Horizontal Shell Layers Top / Bottom: <strong>4 / 4</strong></li><li>Horizontal Shell Min Thickness Top / Bottom: <strong>0.8mm / 0.8mm</strong></li></ul><h3>Printing Notes: Logo on Lid</h3><p>If this is your first time printing a two-color first layer I recommend BV3D's “<a href="https://www.youtube.com/watch?v=t8PpQtInVhE">How to Print Two Colors on the First Layer with a Single Extruder</a>” video which helped me out a bit during my first print. </p><p>Printing the logo inset on the lid can be a bit tricky. I couldn't get the models to export as perfectly aligned, so it'll require manually positioning them in the slicer.</p><p>The “logo layer” model is a STEP model that works fine for recent versions of PrusaSlicer (2.5.0+). I couldn't find an easy way to export a STL or 3MF file for broader compatability, so if you've got a method that works for that please feel free to share it in the comments. :)</p><p>Settings for printing the logo layer:</p><ul><li>Preset: <strong>0.20 QUALITY</strong></li><li>Perimeters: <strong>8</strong></li><li>Skirt distance: <strong>10mm+</strong></li><li>Extrusion Multiplier: <strong>1.09 or 1.10</strong></li></ul><p>The extrusion multiplier helps to make sure that all of the details get filled in on the logo, which I noticed on my first few test prints.</p><p>Increasing the skirt distance (or disabling it altogether) can help with making sure the skirt can be removed before printing the case.</p><p>Settings for printing the box over the logo:</p><ul><li>Preset: <strong>0.20 QUALITY</strong></li><li>Supports: <strong>Disabled</strong></li><li>Custom Start G-Code: <strong>Comment out the G29 line</strong><ul><li>Don't forget to reset this setting when you're done!</li></ul></li></ul><p>I got the best results when there was almost no delay between printing the logo and the case. If the bed has a chance to cool then the logo layer could lose adhesion and get messy when the lid gets printed around and above it.</p><h3>Remix Credits and Thanks</h3><p>Based on <a href="https://www.printables.com/social/3307-whity">Whity</a>'s excellent “<a href="https://www.printables.com/model/258431"><strong>Rugged Box (Parameterizable)</strong></a>” as a base model, which made development of this a lot easier. Thanks, in turn, to <a href="https://www.printables.com/social/76533-yanev/about">Yanev </a>for his “<a href="https://www.printables.com/model/39729"><strong>Tool box parametric</strong></a>” model, which Whity's model was itself a remix of.</p><p>The “<a href="https://www.printables.com/model/204882">Flipper Zero Case</a>” by <a href="https://www.printables.com/social/53700">Ric Tru</a> was an inspriation here as well, particularly the way the logo inset is handled on that case. After successfully printing one of my own with the inset logo it was a no brainer to add one to this case. :)</p><p>Shout out to <a href="https://www.printables.com/social/3814-adafruit/about">Adafruit</a>'s <a href="https://www.youtube.com/playlist?list=PLjF7R1fz_OOVsMp6nKnpjsXSQ45nxfORb"><strong>Layer by Layer video series</strong></a>, which helped me get up to speed with Fusion 360 and build a solid skill set over the last few months.</p>
With this file you will be able to print Snapchat Pixy Travel Case with your 3D printer. Click on the button and save the file on your computer to work, edit or customize your design. You can also find more 3D designs for printers on Snapchat Pixy Travel Case.
