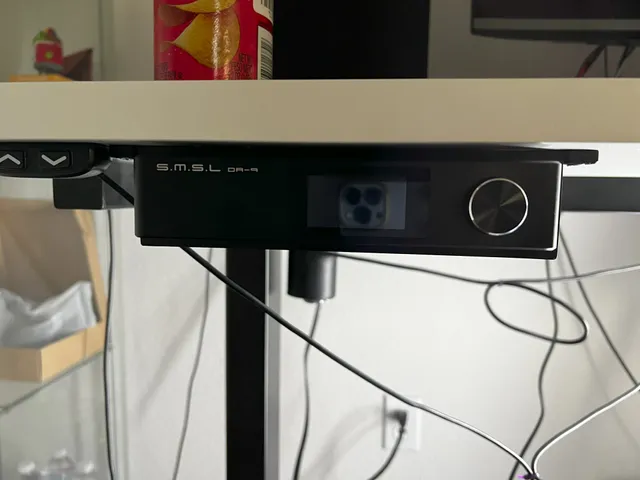
SMSL DA-9 under-desk mounting bracket
prusaprinters
This model is designed to be printed in PLA+ or PETG (really it's up to you). You'll need to print TWO of these (one for the front and one for the back). The included 3MF file includes two copies for your convenience.Use the Fusion360 file to customize the model. Use Modify→Change Parameters and change “screwhole_id” to whatever dimension you might need.As is you'll need M4 countersunk wood screws to mount. It should have plenty of clearance when printed on a Bambu X1C in PLA+.You can get some idea on how this looks like mounted under the desk by looking at the pictures.Printing SettingsIf you're using the 3MF file for Bambu Studio you're good to go.Enable support on build plate only.I used 6 wall layers in case I need to enlarge the holes with a drill.Sparse infill 40%, gyroid.Layer height 0.16mm.Mounting InstructionsI am not responsible for your hardware. Print and mount at your own risk.Remove the rubber legs from the SMSL DA-9.Insert the two brackets - one from the front and one from the back. I would suggest to use a margin of about 2-3cm.Position the device where you want it mounted. Use painter's tape to affix in place. If it looks like it's falling use more tape or use stronger tape. Possibly ask a friend to hold it in place.Use a marker and mark the locations on the desk where the screw holes need to be drilled. Remove the device from the surface.Using a drill, make pilot holes (4 pilot holes).Place back device and use more painters tape to hold it in place.Use wood screws and mount the device. Please don't over tighten as it might break the plastic.
With this file you will be able to print SMSL DA-9 under-desk mounting bracket with your 3D printer. Click on the button and save the file on your computer to work, edit or customize your design. You can also find more 3D designs for printers on SMSL DA-9 under-desk mounting bracket.