Smooth X-axis for Prusa i3 with Leadscrews
thingiverse
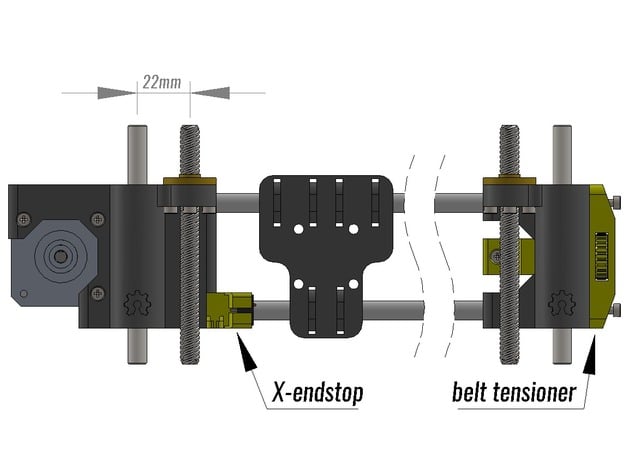
I noticed that you have mentioned using 22mm spacing with the models X-MOTOR.STL and X-IDLER.STL but it has been updated on May 15, 2016 that the mounting point for the stepper motor is moved five millimeters to the left in order to accommodate the newer version which features a wider base. On February 14, 2016, adjustments were made to create versions with a 21mm spacing. The printer was also adapted to fit the Geeetech i3 pro c model during this update. Additionally, some misidentification issues occurred at one point when it was assumed that idler bearings from a different manufacturer were being used. A design fix had to be implemented to resolve this issue as the belt could not move smoothly if F623ZZ was in use rather than F693ZZ. These updated modifications can also be utilized by those who have printed the whole kit beforehand with no changes necessary, thanks to an extra part added to correct clearance for proper movement of parts that originally came from incorrect bearings. I made all necessary modifications after finding out my own idler bearing measurements were wrong so it fits perfectly now. I just like smooth and clean-looking designs so decided to make this a freebie! Also there's no specific endstop trigger point; I personally prefer the inductive proximity switch which comes attached with extruder and is actually much safer too. As most of these details you can easily confirm in my 3d-printer manual but still worth mentioning here anyway. Keep in mind when ordering new parts for Prusa i3 version that some kits might vary due to slight design differences across multiple releases, although this hasn't happened yet so not an issue currently either. X-axis has been designed specifically to accommodate both 21mm and 27mm smooth rod setups with updated spacing included - no longer stuck only using standard setup. Note down if it seems anything is incorrect because help would greatly appreciate these improvements to ensure the print remains solid! The X-motor's mounting point on all my Prusa versions was also changed to be placed left side which helps increase available space needed when adding other stuff or maybe upgrading some future pieces without making unnecessary compromises later down line obviously. Please review my updated parts as you read about here: * Stepper motors should ideally stay where they belong i.e not move from its designated place * Required hardware - check below: * - • F623ZZ, Three by ten times four millimeters flanged bearing(idler)- needed to fix position properly after initial mistakes. - OR alternatively * Four x twenty millimeter M3 recessed screw head for the stepper & idler motors Five millimeters left shift required when working with wider version so ensure not too loose. Here are my suggested Print Settings: • Layer Height * Minimum allowed at:0 point 2 or more of an inch thick per slice; this helps prevent jams often occurring otherwise
With this file you will be able to print Smooth X-axis for Prusa i3 with Leadscrews with your 3D printer. Click on the button and save the file on your computer to work, edit or customize your design. You can also find more 3D designs for printers on Smooth X-axis for Prusa i3 with Leadscrews.