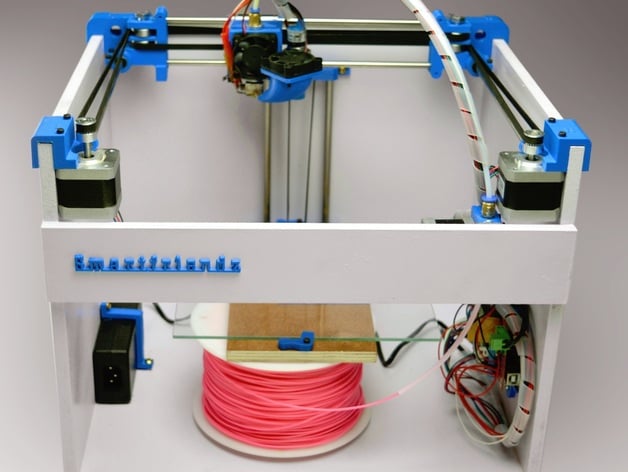
SmartrapCore
thingiverse
Updates 07-12-2017: Long Time Later, New Plates Arrive at Production Site The wait is over; the new plates designed for production are now available. You can find them in our Onshape project: https://cad.onshape.com/documents/086229ea796640d29acd68ff/w/2030a3358fd641da896d20a5/e/1e4ef00263ee4eae9316731a The new plates have undergone changes to address previous issues. The STL files were not manifold in Slic3r, but they have been corrected using Netfabb Basic. Now they can be used universally. Recent Additions: 06-06 Some additional accessories and support components have been added to the design, including ramps and support for endstop Y and some minor debug fixes. As a result, assembling the kit has become even more streamlined. Special Thanks to the Community A big thank you goes out to everyone who provided valuable feedback throughout this process. Your input played a crucial role in shaping the final product. Recent Updates: 05-28 Version 1.2.2 has been released with some debugging fixes and new placement options for endstops X and Y. The extruder has also undergone changes. Update 04-10 A minor update was applied to address an alignment issue between Y-slides and XY bearings. This has made the assembly process smoother and more efficient. Update 04-09 Major Changes in Version 1.2 Significant modifications were made to the design, including: * BearingsXY: Now attached on the side, making it easier to assemble and providing added stability to the Y rod (previously prone to breakage). * Head: A one-piece part has replaced the old assembly, which was plagued by misalignment issues. The new head design has solved these problems. * Inductive Support: The support has been made more solid and lowered for improved performance. * SlideY: Now more stable, X-rods are farther apart, creating an almost-isometric assembly. * ZSlide: Larger and more stable than before, it is now fixed in place with 4 wood screws. Update 03-13 New Plate 2 Issues A problem was discovered on New Plate 2 - the GT2 hole was too small, causing issues with the belt. A solution has been implemented to resolve this issue. Soon to Come: BOM and Assembly Videos We are working on publishing a detailed Bill of Materials (BOM) as well as comprehensive assembly videos. These resources will provide users with an easier understanding of what's needed for a smooth build process. In the near future, we'll also integrate assembly into the OpenJSCAD file. Assembly Guide To assemble this kit successfully, follow these instructions: 1. Wood: You'll need four wooden planks as specified in the output of the OpenJSCAD tool. 2. Printed Parts: Please use the relevant printed parts from OpenJSCAD based on your selected parameters. 3. Screws: * M3x30 (6) * M3x25 (6) * M3x16 (10) * M3x10 (10) * M3 nuts (5) * Wood screws (12 of 3.5 mm, flat head) * M8x25 (5) 4. Rods: * XY rods as per parameters * Z rods as per parameters 5. Stepper Motors: * Four stepper motors (NEMA17), can be 40mm or 48mm in length. 6. Electronics: Compatible with Ramps v1.4, but other electronics can also be used. 7. Inductive Sensor: LJ18A3-8-Z/BX. 8. Hotend: Jhead type. 9. Bearings: * Ten 608ZZ bearings * Four LM8UU bearings * Eight LM6UU (or 12 for XY rods 8mm) 10. Bowden Cable: 70 cm in diameter, 2 mm out, 4 mm. 11. GT2 Belt: Approximately three meters, adjusted based on your OpenJSCAD parameters. 12. Pulleys: * Three pulleys with 20 teeth. All parts and tools mentioned can be customized using the OpenJSCAD file to meet your specific requirements. You're welcome to experiment and adjust these files as you see fit.
With this file you will be able to print SmartrapCore with your 3D printer. Click on the button and save the file on your computer to work, edit or customize your design. You can also find more 3D designs for printers on SmartrapCore.
