Smart Nanoleaf Replica
prusaprinters
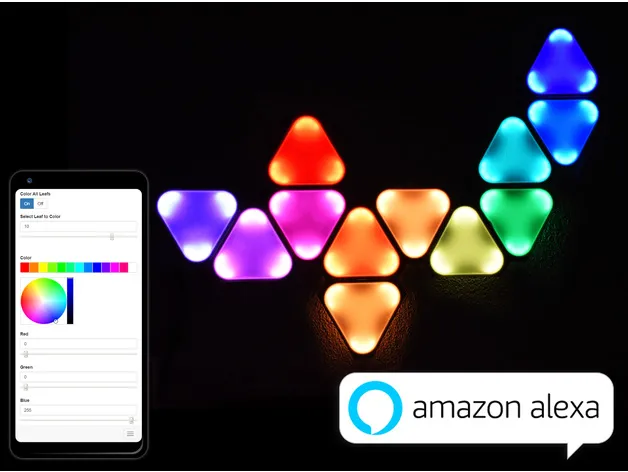
3D-Printable cheap Nanoleaf replica with Webinterface and Alexa support using a WS2812 RGB LED strip, it's easy to print and cheap to build, a must have. Print instructions3D-Printed DIY Nanoleafs (NEW UPDATE) Update 24.02.2019 Node-RED & Alexa Integration (optional) Added Node-RED integration which is fully optional Added Amazon Alexa support in Node-RED Added Function to the webserver to support custom patterns Node-RED setup is instructions are found on GitHub I've designed and built an alternative version of the Nanoleaf Light Panel Replica and forked a good software for controlling WS2812b led-strips to work well with the diy nanoleafs. The software and detailed setup instructions can be found on GitHub and is compatible with Harvahammas Nanoleaf version. The nanoleafs were designed in Fusion 360. Bill of Materials 1x Wemos D1 mini is recommended, but any other ESP8266 variant should work too, but it might require an additional step-down converter. WS2812b led strip, make sure you choose IP30 any other IP rating wouldn't make any sense and might not even fit.I would recommend buying a strip with 60 leds/m or more. 1x 3.3V to 5V Logic Level Shifter (required if LEDs "glitch") 1x Power Jack 1x 3 pin wire 1x 5V 3A Power supply M4*10mm Bolts White PLA is recommended The links above are affiliate links Assembly Step 1, Plan your setup I would recommend making a plan how your leafs should be arranged. Afterwards make a quantity table of all parts that need to be 3D-printed. Choose how many led pixels you will use in the corners. Every corner must have the same amount of leds in each corner. I've used 4x leds in each corner, thats 12 led pixels per leaf → 1m of 60 leds/m = 5 leafs I would not go for more than 5 leds per corner on the 60leds/m led strip, because the strip might interfere with the connector on the side. Step 2, Choose your diffuser variant There are 3 different variants of the diffuser available: PLA diffuser Paper diffuser Edged Paper diffuser PLA diffuser: The PLA diffuser is recommended if you print on a flat print surface and you get a consistant first layer, for instance if you print on a glass plate. Paper diffuser: If you don't get consistant first layers choose the paper diffuser, cut photo paper into pieces using the cutting_tool.stl. Edged Paper diffuser: Choose this one, if you don't like the round edges of the regular paper diffuser. Step 3, Print your parts Make sure you print all diffusers at 100% infill with white PLA, if you don't print at 100% the infill pattern might shine through. The base can be printed in black PLA, but any other color will work too. Choose white PLA for the base if you prefer that the leds should shine through a bit on the sides. The base is also available as an M3 variant. The base can be printed at amount any infill. You can either print the electronics box or just glue the ESP8266 directly onto the first base. Step 4, Assemble the Leafs First remove the tape of the backside of the led strip and put it into the corners. All led strip pieces must have the GND line facing downwards. Cut the wire into pieces. Make sure your wire pieces aren't too long, otherwise they might be visible when they are too close to the diffuser. When soldering, mind the arrow, it must face always in the same direction, the arrow must face away from the ESP8266. Important: All led pieces must be connected in series, no parallel connections! Step 5, Connect the Leafs Connect all leafs together with the M4 bolts together. Leave a 4mm gap between all leaf connections. Afterwards connect the endpoint of the leaf to the starting point of the next leaf. Mind the arrow! Step 6, Connect the electronics box Mount the power jack and the Wemos D1 inside. Connect the start of the strip to the pin D4 of ther ESP8266. Connect the remaining wires as shown below. Use this circuit if the leds 'glitch' Use electrician tape to isolate the logic level shifter. Final Step, Mount the Nanoleafs Make sure you flash the software first and test the leafs. If glitches occur use a logic-level converter. If there are still glitches, check if the data line interferes with other lines. If your leds start to dimm or change color along the strip you might want to connect another power supply at the end of the strip. If everything works fine, push the diffusers from the top in and use an allen key or a screwdriver to tighten the connections between the leafs. You can either mount the 'Nanoleafs' using: Nails (recommended) A rawlplug and a screw double sided tape Software Simple Client The software runs on the ESP8266. The web app is stored in SPIFFS (on-board flash memory). I've forked jasoncoon's esp8266 fastled webserver and adjusted all the patterns to look better on the leafs and implemented a way to color individual leafs. The software and detailed setup instructions can be found on GitHub. Advanced Node-RED & Alexa Integration Node-RED GUI The Node-RED GUI is an addition to the regular UI that is running on the Wemos D1 mini. It allows to create and save custom patterns and also control all regular parameters same as the ESP8266 webserver. It can be accessed by any device. Nanoleaf Designer In the Node-RED GUI you can easily create your nanoleaf setup by using the Nanoleaf Designer. It's easy to use and allows almost any design that is possible. But it might have still some minor bugs. Nanoleaf Custom Pattern Designer With the Nanoleaf Custom Pattern Designer you can create custom patterns with effects. Currently the individual leafs can be set to Static mode and Breathe mode that allows to set a phase shift and lets the leafs breathe. Flow-mode follows in the next update. Additional Hardware required for Node-RED & Alexa Any device that runs Node-RED, examples would be: (recommended) Raspberry Pi Any Linux machine (instructions are provided for linux) Any Windows machine Any Amazon Alexa device for Alexa integration, works on Android and IOS too (OPTIONAL) Alexa Phrases Turn on/off Control Brightness Control Pattern Speed Set Color Set into Rainbow mode Enable Autoplay and set Duration Activate custom activities Alexa, turn Nanoleafs on/off Alexa, set Nanoleafs 70% Alexa, dim Nanoleafs Alexa, Nanoleaf speed 20% Alexa, set Nanoleafs pink Alexa, turn Nanoleaf rainbow on Alexa, turn Nanoleaf Autoplay on Alexa, set Nanoleaf Autoplay 40 Alexa, Nanoleaf Default Alexa, Nanoleaf Mode 1 Alexa, Nanoleaf Mode 2 Alexa, Nanoleaf Mode 3 Creating Designs and Patterns First click Open Designer. Then choose a starting tile by either using Add Position A or Add Position B, you can always reset the whole config. When you add a starting tile a triangle should pop up at the canvas, the letters present the position where the next leaf is added corresponding to the buttons. With the arrow buttons you can go back and continue your leafs on another location, but keep in mind that it has to be wiried all in order, the numbers represent the wiring order of your leafs. When you are done click save design. My Setup I've built my Nanoleafs using 12 leafs with 4 leds in each corner. Thats a total of 144 leds (~2.5m of 60leds/m). I've tested the setup using my lab bench power supply and came to the conclusion that even a 2 amp power supply would be enough. But I went on the safe side with the 3 amp one. Preview videos can be found here and here
With this file you will be able to print Smart Nanoleaf Replica with your 3D printer. Click on the button and save the file on your computer to work, edit or customize your design. You can also find more 3D designs for printers on Smart Nanoleaf Replica.