Smart Filament Buffer 2
prusaprinters
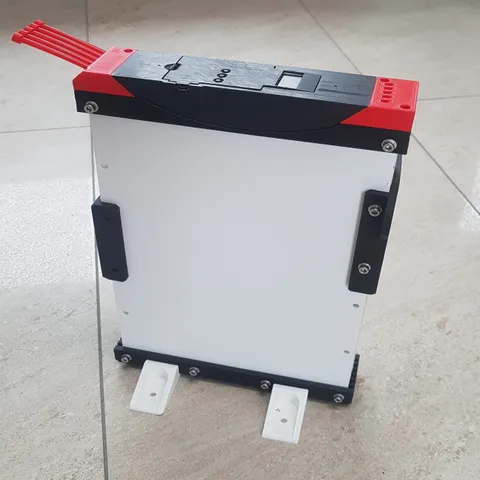
IntroductionThis model is yet another supplement to the SMuFF project published here, but can also be used with any other MMU.Please notice that pictures and videos show V1, which is mostly similar to the here published V2.If you've watched my videos of the SMuFF, you might have spotted the "Filamess" in one of them.To get rid of this problem I came up with yet another filament buffer which isn't just a ordinary filament buffer, but comes with features:small footprint (~300 x 210 x 55 mm)integrated unique filament runout sensorup to 1000 mm buffering capacity per filament bayeasy to load / unloadhinged or non-hingeddifferent mounting optionsHere are two short videos of the V1 in action: OptionsYou can build this device either with or without the filament run-out sensor. I've made mine to attach it perpendicular to a cupboard (M02.stl/M03.stl). In order to mount it flat to the wall or a cupboard, you'll need M03a.stl printed twice, one of them mirrored.If you rather prefer not to mount it somewhere, please use the S01.stl (printed twice) and M02.stl printed twice instead of M02.stl/M03.stl.As for the hinge (parts H01, H02, H03): You don't have to assemble it if you don't feel like, since the top lid is being held in place by the Neodymium magnets anyways. BOMBeside the printed parts above, you'll need the following items:6 PVA sheets, A4 (210 x 297 mm) , 3 mm thick(up to) 14 M4 x 50 mm screws (depending on the mounting option)(up to) 14 M4 nuts(up to) 14 M4 washers4 heat set inserts M3 x 6 mm (inlet & outlet)4 M3 x 12 mm screws (inlet & outlet)1 Threaded rod M4 x 125 mm (Hinge)2 Self-tapping screws 2.9 x 6.5 mm (Hinge)8 Self-tapping screws 2.9 x 9.5 mm (Hinge)2 Self-tapping screws 2.2 x 6.5 mm (Prototype board)2 Neodymium cylindrical magnets 10 x 10 mm2 Neodymium cylindrical magnets 10 x 1 mm5 Steel balls 8 mm1 Piece of ferromagnetic tape or 5 Neodymium magnets 5x1 mm1 Sensor PCB1 Arduino Nano V31 0.96" OLED (128x64 pixel, monochrome, SSD1306)5 Linear Hall-Sensors A1326 LUA-T or SS495A3 Micro push buttons 6 x 6 x 10 mm1 JST-XH male/female connector 5 pinand of course some wires and cablesIt's easiest if you use the applied STEP file to see how it all fits together, which isn't that complicated anyways.The firmware code for the SFB (Arduino Nano) can be found on my Github repository. The V2 of the Smart Filament Buffer uses 3mm thick A4 panels/sheets, which can be cut out with a knife from PVA using the supplied cutting stencils. The Lid has been modified to take the new PCB, which you'll get here from PCBWay or (if you're located in the EU) from AISLER.
With this file you will be able to print Smart Filament Buffer 2 with your 3D printer. Click on the button and save the file on your computer to work, edit or customize your design. You can also find more 3D designs for printers on Smart Filament Buffer 2.
