Sleigh Lantern
prusaprinters
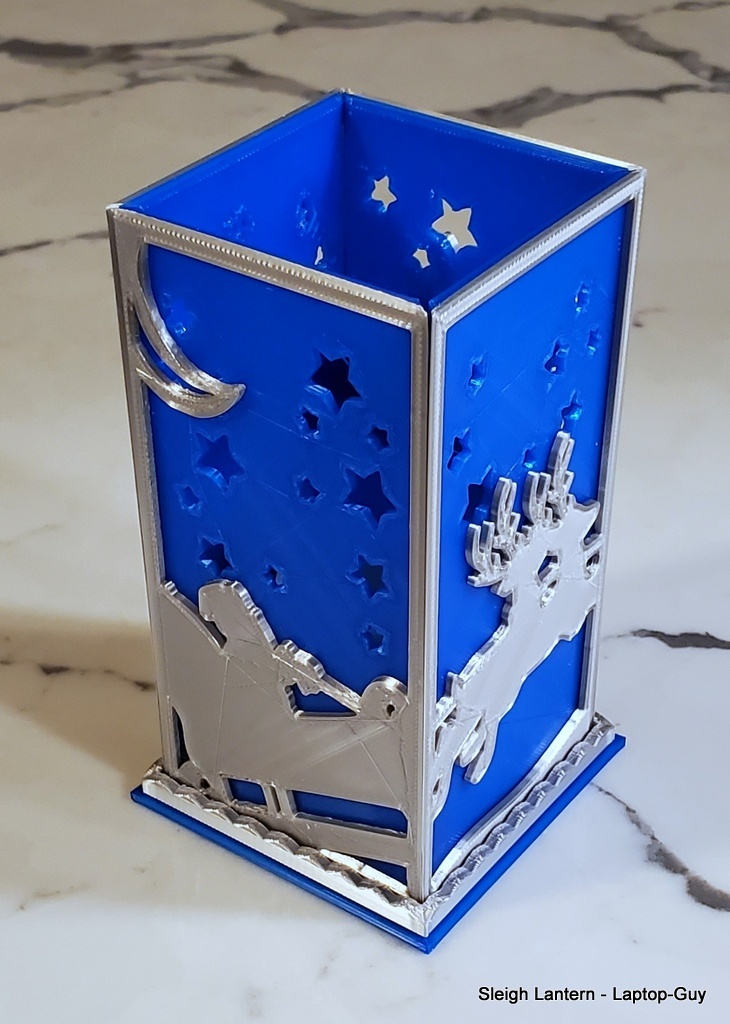
<h3><strong>Sleigh Lantern</strong></h3> <h3>LED Tea-Light or Votive Candle Holder</h3> <p>A led votive candle holder / lantern with Santa in his sleigh and the reindeer flying off around the sides of this little holiday lantern. The wrap around design makes this a great piece for coffee or dining table where a 360º view is available</p> <p>Designed for a filament color swap in the middle of each print this lantern glows with a LED votive inside. A silhouette of Santa's Sleigh flying over the rooftops on a starring Christmas Eve.</p> <p>Each of the 4 panels is 140mm x 70mm with a 80 x 80mm base to help hold the panels square. The left and right edges are set to a 45º angle to create clean mitered corners.</p> <h3>Happy Holidays</h3> <p>Other lantern designs include</p> <p>Holiday <strong><a href="https://www.thingiverse.com/thing:5155541">Snowflake Lamp</a></strong> <strong><a href="https://www.thingiverse.com/thing:4978785">Fall Leaves Lantern</a></strong></p> <p>Halloween <strong><a href="https://www.thingiverse.com/thing:4972836">Stacked Pumpkin Lantern</a></strong> <strong><a href="https://www.thingiverse.com/thing:4975473">Stacked Bat Lantern</a></strong> <strong><a href="https://www.thingiverse.com/thing:5023087">Spider Web Lantern</a></strong></p> <h3>404 Error on the package download?</h3> <p><strong>thingiverse is broke</strong> <strong>Please download the individual .stl or .obj files depending on your preference.</strong></p> <p>5 files needed for complete model, 3 if choosing the two panel side by side files.</p> <h3>Print Settings</h3> <p><strong>Printer Brand:</strong></p> <p>FlashForge</p> <p class="detail-setting printer"><strong>Printer: </strong> <div><p>Adventurer 3</p></div> <p><strong>Rafts:</strong></p> <p>Yes</p> <p class="detail-setting supports"><strong>Supports: </strong> <div><p>No</p></div> <p><strong>Resolution:</strong></p> <p>.2</p> <p class="detail-setting infill"><strong>Infill: </strong> <div><p>100%</p></div> <p><strong>Filament:</strong> 3D Solutions, Greentech PLA See Through Blue, SIlk Silver</p> <p><br/> <p class="detail-setting notes"><strong>Notes: </strong></p> </p><div><p>Printed at .2 layer height, 4mm nozzle and using a raft to assist in preventing warping on this thin flat print.<br/> For my printer, [Flashforge](https://www.amazon.com/s?k=flashforge&linkCode=ll2&tag=thingiverse09-20&linkId=cf260a0cab2d6b7df5aadcf730b98ad6&language=en_US&ref_=as_li_ss_tl) Adventurer 3 Pro I have to turn of Raft, slice and review layers to identify the color change layer between sky and sleigh. For mine at .2 the layer pause for filament change was at layer 11. After setting the pause I turn back on the raft and reslice it using the non-raft layer pause. Worked out great. <p>I was able to fit 2 panels side by side on my small 150mm print bed.</p> <p>This was designed with navy blue and silver as the color scheme. Instead of navy I used transparent blue for my first print of this to see if the candle light would glow through well.</p> <p>Note that my first two panels had some nozzle drag marks as I used default settings and did not set retraction over edges only to "no" and did not "always enable Z-Hop" at .24mm.</p> <p>For the second set of panels and the base these slicer options were corrected. I may reprint the front and left side panel to correct the marks on my model which are noticeable close up.</p> <h3>Post-Printing</h3> <p><strong>Assembly required</strong></p> <div><p>Putting together this lantern is as simple as glueing each edge of the panels to the adjacent ones. These are a 45 degree angle mitered joint and fit tightly together edge to edge. Personally I used a glue strip to stick them together as it was less messy or risk of glue seeping out. It also allows the lantern to be disassembled for flat storage after the holidays.<br/> If I was to glue this together I would use the raft as a pallet, draw out a line of gel type super glue then tap a panel edge in the glue to get a very thin amount on one edge before sticking it together a panel at a time. <p>The base is a tight hold but should fit the panels nicely without any fuss when using a .2 layer height for everything..</p> <h3>How I Designed This</h3> <p><strong>Inkscape and TickerCad</strong></p> <div><p>I collected a Santa Sleigh free clipart PNG from the internet. Brought that into Inkscape where I drew and replicated a rectangle 4 times, lined up the boxes over the sleigh clipart, resized and clipped to create 4 separate panels that I then saved as individual SVG files and imported into Tinkercad.<br/> In Tinkercad I created the background as 1.5mm flat rectangles with a 3mm border, and random stars I replicated and cut out. I imported each of the 4 sleigh pieces, resized and set height to 1.5mm, lining each up in one of the "frames". I then created a 45 degree angle cut out for each of the long edges. <p>The base was simple squares stacked with a repeating half circle stood up around the edge to give the panels a "trench" to stand up in.</p> </p></div></p></div></p></div></p></p></p> Category: Decor
With this file you will be able to print Sleigh Lantern with your 3D printer. Click on the button and save the file on your computer to work, edit or customize your design. You can also find more 3D designs for printers on Sleigh Lantern.