Sk8ter Dolly
prusaprinters
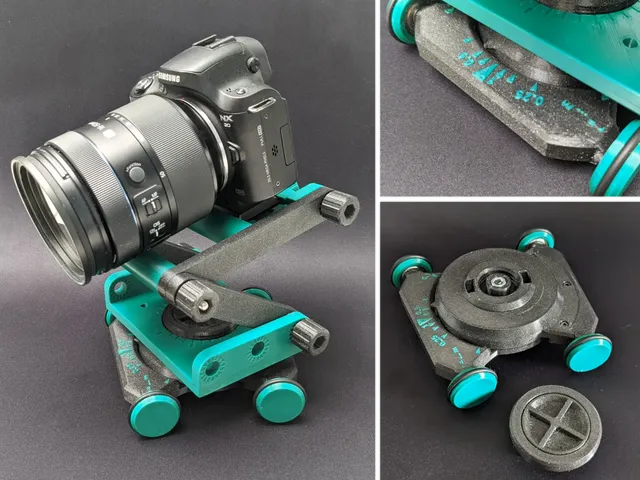
The Sk8er Dolly is a small camera dolly. It is very convenient for shooting videos on your table.Here are some nice examples: The features An integrated o-ring allows the dolly to be adjusted very smoothly. The necessary force can be adjusted using the screw on the underside. The screw has an anti-rotation device so that it cannot be loosened by movement. On the dolly is an adjustment scale that indicates the radius that the dolly will travel.The arrows have different shapes to make it easier to see the right and left counterparts. Let's get started I printed everything in PETG. I've tested the LiftPod in PLA and it was not as good as PETG.At first you need the LiftPod with the Rotate Base, but from the second link you only need the “Base_Rotate_Plate.stl”For the dolly itself you need some extra parts aside from the printed ones.For a better overview, see this picture: Purchased parts4x Bearing 608 ( 608-2RS recommended)5x O-ring 28 - 3 (4 for the wheels and one inside the dolly)1x O-ring 44 - 41x Socket head screw M6 x 20 (ISO 4762)1x Hex nut M6 (ISO 4032)3x Socket head screw M3 x 8 (ISO 4762)3x Hex nut M3 (ISO 4032)Printed Parts1x Dolly 11x Dolly 21x Dolly 31x Bush4x Wheel1x O-ring screw (two-piece printed in one go) Print Settings I have used painted-on supports. For "Dolly 1", make sure that the hole in the bottom has support, but there should be no support structure in the cutout for the bush. If you want, you can print the scale on the "Dolly 2" in a different color. To do this, simply change the color in the slicer at the required height. The arrows and numbers are 0.4 mm high.The "Dolly 3" needs support in the holes for the M3 nuts. You can simply push these out from above with the screws after printing.The "O-ring screw" must be printed with the top side on the print bed. Support may only be printed in the grip area. The rest of the screw must be free from support.Same as the wheels, the bush has to be printed lying on the large surface. Both do not need support. It is recommended to first print a wheel and press a ball bearing into it. If the bearing is loose and the outer ring rotates with it, the wheel must be scaled. The height should not be changed here. If the bearing cannot be pressed into the printed wheel, it should be printed slightly larger. Assembly First remove the support.The "O-ring screw" must turn smoothly in itself. If this is not the case, it is helpful to spray WD-40 into the gap and turn the outer ring. After a few turns, it should turn easily. The large O-ring (44 - 4) can be pressed into the slot. To mount the wheels, the bearing should first be pressed into the wheel, then the O-ring can be fitted and the wheel pressed onto the shaft. The M3 nuts should be pressed into the hexagonal holes. It is not necessary to press the nuts all the way into the holes, as the screw will pull them down during assembly. The fifth O-ring with diameter 28 - 3 must be pressed into the groove of "Dolly 1". The M6 nut is pressed into the hexagonal hole of "Dolly 1". When mounting the bush, make sure that the pins are correctly inserted into the holes provided for this. Tighten the screw loosely at first and check how much force is needed to adjust the driving radius. Adjust this if necessary. Now you can place the LiftPod on the dolly and secure it with the O-ring screw. Have fun with your Sk8er Dolly.
With this file you will be able to print Sk8ter Dolly with your 3D printer. Click on the button and save the file on your computer to work, edit or customize your design. You can also find more 3D designs for printers on Sk8ter Dolly.
