Simple wall light from Tween Light RGB LED strips
prusaprinters
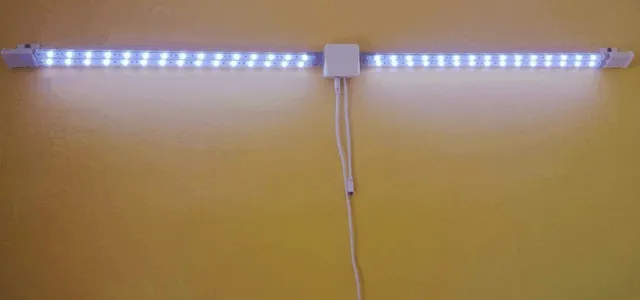
A simple minimalist wall light made of Tween Light RGB LED strips. These strips are normally made for backlighting TVs and have a handy remote so you don't need to install a switch. The strips make for a nice reading light with almost no shadows. When you need to be awake, use the white light, but if you are going to bed, you can switch off the blue light to help you get sleepy. Of course, mood lighting is also a possibility :) I bought these strips in Bauhaus, you can see the packaging in the third picture, but they are also available unbranded and cheaper in webstores. Print Settings Printer: Heavily modded Craftbot Rafts: No Supports: No Resolution: 0.2 mm or less Infill: 20% or less Notes: Any 3D-printer should work, this is an easy print. Print one of each model. If you orient the models properly (largest holes upwards), no supports are needed. Print using any material that works for you, I did it in PLA. The prints do not need to be strong, the strips are quite light. Post-Printing You will need a hot glue gun or some superglue. Take two strips and a short connector lead, assemble them into the left holder, taking care that the ends of strips are aligned, but the strips are facing in opposite directions. Glue the cover on the left holder above the connector lead. Do the same for the right holder. Disassemble the controller box in the Tween Light package and take out the controller PCB. Screw the middle holder box on the wall. Put the connectors in the holes in the left side of the box so they will be supported by the box and properly connected to the strips, but will not take up space inside the box. Screw the left holder with the two strips on the wall in the right place. Do the same for the right holder. You should have the light already mostly built now. Solder or otherwise connect the connectors to the PCB, the wires are clearly marked. Since you already have the connector lead in the side holders, you only need to connect one strip on each side. Position the PCB with the power supply receptacle above the hole for the power supply plug, threading the remote receiver out of the larger hole. Glue the PCB in place. Glue on the box cover. Connect the power supply. Category: DIY
With this file you will be able to print Simple wall light from Tween Light RGB LED strips with your 3D printer. Click on the button and save the file on your computer to work, edit or customize your design. You can also find more 3D designs for printers on Simple wall light from Tween Light RGB LED strips.