Simple Automatic Nozzle Cleaner for remote control (Octoprint)
prusaprinters
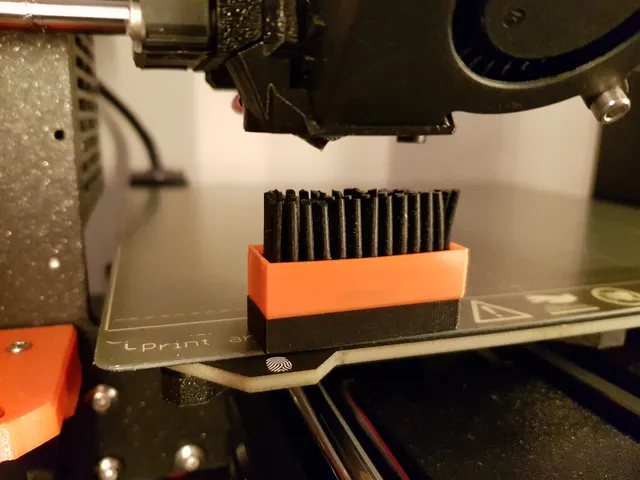
Simple Automatic Nozzle CleanerIf you have some out-of-print area on your print-bed then a very simple automatic Nozzle Cleaner solution is presented here for you. An out-of-print area, is an area, which normally will not be visited by your printer-head including all it's attributes (fans, PINDA sensor etc.), but the printer-head can be positioned to, if necessary. Some G-codes to execute a cleaning sequence can be integrated in your printers G-code start script to operate the Nozzle Cleaner each time your print starts.Be aware that your printer-head should, when normally printing, not be able to touch the Nozzle Cleaner and also not under other circumstances like: bed-leveling, homing, calibration-sequences etc.The bad news is that this Nozzle Cleaner will therefore (bed-leveling) not work for the Prusa MK-series, the good news is that there is also a solution for those printers: Prusa Automatic Nozzle Cleaner for remote control (Octoprint)This Nozzle Cleaner consists of a silicone brush and sticks to the printer-bed by embedded magnets. Features:Using a silicone brush that is able to withstand up to 300 °C when engaged for short periods.The type of brush used works well for residues and oozes on the nozzle and will hardly wear out.The Nozzle Cleaner is easily attached by the embedded magnets and can also be simply removed.If somehow, your print-head accidentally touches the Nozzle Cleaner, it will move out of the way. The magnets are dimension-ed that they don't resist the force of the printer-head but do not move while brushing.Simple Automatic Nozzle Cleaner G-codeExample G-code fragment of cleaning sequence (you will have to adjust for your specific situation, do not use the below code as it is) assuming the example Nozzle Cleaner is located at x-y points [(120,-20);(170,-20);(170,-10);(120,-10)]:;//Nozzle Clean Mode StartG28 W ; home all without mesh bed levelG1 Z23 F720 ;move head into Z-positionG1 Y-15 F1000;move head into Y-positionG1 X105 F1000 ;move head into X-positionG1 X179 F500 ;move head over brush in X-directionG1 X105 F500 ;move head over brush in X-directionG1 X179 F500 ;move head over brush in X-directionG1 X105 F500 ;move head over brush in X-directionG1 X0 F1000 ;move head into X-positionG1 Y0 F1000 ;move head into Y-positionG1 Z0.2 F1000 ;move head into Z-position;//Nozzle Clean Mode EndYou will have to insert your modified G-code cleaning sequence into the printers G-code print start script.Tip: for testing your modified G-code lines, execute them manually first, by using your printers manual X-, Y- and Z-position “Settings” menu. Always “Auto-home” first in the “Calibrate” menu before starting to (re-)test, to prevent that your settings are influenced by skipped steps during the testing.Simple Automatic Nozzle Cleaner parts-list1x Silicone Basting Brush (only brush part needed), e.g. amazon.nl, amazon.com, amazon.de or on AliExpress (app. 55 x 40 x 15 mm)2x N35 Neodymium 20 x 10 x 6 mm magnet, e.g. AliExpress1x 3D-printed Nozzle Cleaner housingPrinting the Simple Automatic Nozzle CleanerThe 3D-print of the Nozzle Cleaner is performed with 0.1 mm PLA layers to have the correct definition for the snap-in brush container. At 6.9 mm height a color change is programmed and at that time you need to insert the two magnets into the print then they will be fully embedded in the Nozzle Cleaner housing. The first layer after inserting the magnets might look a bit messy, but that will be resolved during the following layers.The total print takes approximately 50 minutes the magnet insertion/color change is at 29 minutes.Preparing the Simple Automatic Nozzle Cleaner brushCut three slices (a narrower, a thicker and again a narrower slice) from the bottom of the brush (see one of the pictures) which should leave a solid bottom part of app. 8.5 mm with a Stanley knife.Cut the "hairs" of the brush to app. 12 mm with a pair of scissors.Assembly of the Simple Automatic Nozzle CleanerPush the brush fully into the housing so that it "snaps" under the printed border. If you find the brush too thick, you can slice of a little bit of the sides of the brush, be careful to cut very thin slices. If the brush comes too easily out of the housing, because of tolerances, you can glue the brush into the housing with a few dots of glue, so that it can still be exchanged when needed.Warning: be very cautious when testing this solution. The author knows, out of experience, that the printer sometimes might make different moves then you envisioned it would make before.
With this file you will be able to print Simple Automatic Nozzle Cleaner for remote control (Octoprint) with your 3D printer. Click on the button and save the file on your computer to work, edit or customize your design. You can also find more 3D designs for printers on Simple Automatic Nozzle Cleaner for remote control (Octoprint).
