
Sim Racing Handbrake - Easy Hall Sensor Analog Setup
thingiverse
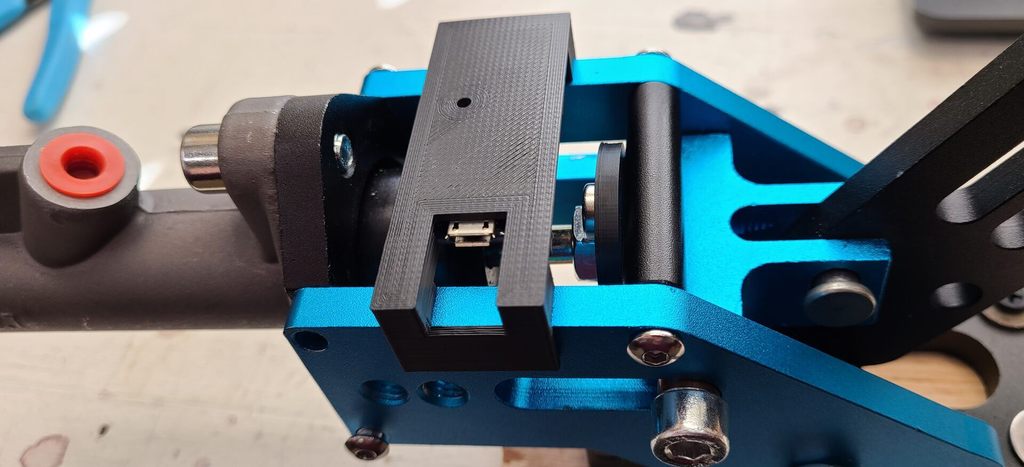
This is a very simple setup to add a Hall Sensor to the generic handbrakes being sold for cheap, for SimRacing use. You need: 1) Generic handbrake like the one in the photos, available from the usual sources. (~$23). 2) One Leonardo Pro Micro (~$5) 3) One Hall Effect Sensor - Honeywell SS49E (~$1) 4) One 10mm x 5mm circular neo magnet (~$1) 5) Prints of the two included STL files Instructions: 1) Solder the Hall Sensor directly to the Leonardo as shown. The sensor should stick up at a 90 degree angle from the circuit board. The larger face of the sensor package should be oriented to face the magnet when assembled. 2) Snap the Leonardo into the printed bracket. No glue is necessary if the print's tolerances are reasonably tight. The little hole in the bracket should be directly lined up with the Leonardo's red LED. 3) Install the magnet into the other printed piece. It's a tight fit and you may need to warm up the PLA with a heatgun or flame. You can put a drop of superglue in there but I didn't. 4) On the brake, undo the two hex screws holding the thin aluminum cylinder crosspiece, and reinstall the crosspiece in the alternate holes to provide a hard stop to the brake lever (see photo - it's the slim black cylinder next to the magnet-holding bracket). 5) On the brake, liberate the master cylinder from the rest of the assembly by removing the four hex-head screws securing it to the brake's frame. Then unscrew the shaft from the aluminum receiver on the sliding portion of the mechanism. You can then slip the printed magnet bracket over the shaft as shown, and reassemble the master cylinder. 6) Install the bracket containing the Leonardo onto the brake assembly as shown. It just snaps on and uses the two holes in the top of the aluminum brake frame to stay positioned. 7) Open up Arduino IDE and make sure you have the Joystick Library available: https://github.com/MHeironimus/ArduinoJoystickLibrary 8) Load the included code in the ZIP file onto the Leonardo. It was revised on 2/5/2021 to include self-calibration at power-on, to account for variances in sensors and magnets. 9) Now you have a new single-axis joystick in Windows that you can map to a handbrake in your games. If your output seems inverted, you can flip the magnet over and reinstall it in the bracket to reverse output. Good Luck, and I'd love to see any builds!

With this file you will be able to print Sim Racing Handbrake - Easy Hall Sensor Analog Setup with your 3D printer. Click on the button and save the file on your computer to work, edit or customize your design. You can also find more 3D designs for printers on Sim Racing Handbrake - Easy Hall Sensor Analog Setup.
