Silica Gel Tower
prusaprinters
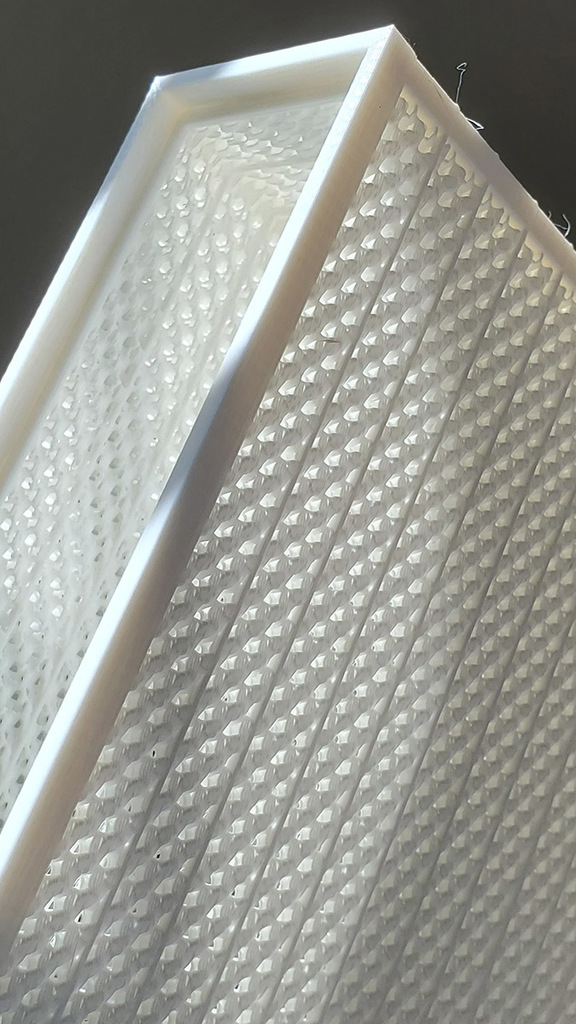
<p>Note: Much stronger v2 version included 2021-05-05, See section below.</p> <p>An upgrade from using upcycled gelato tubs to hold silica beads in the upper deck of my lack printer enclosure where the open spools live. This container lets the air pass through, and can withstand the re-charge temperatures of my filament dehydrator which means less lost beads & mess.</p> <p>This is for advanced users only as it requires the use of (provided) slicer modifiers to make some of the model air-permeable. This technique makes the object very printable without thousands of retractions that the alternative slot-based design would require. It was also trivial to model, and the included OpenSCAD file allows you to create one in any dimensions you require.</p> <p>For the container to withstand re-charge temperatures, it needs to be printed in ABS or other high glass-transition-temperature filament (PETG, ASA, PC etc.). If you recharge silica using an oven and a baking tray or something else not involving the container, then any filament works - clear transparent would be appropriate, so you can see the bead color change.</p> <p>For the lid, get your first layer bed adhesion sorted out, the infill goes directly on the bed and will make a mess if you aren't calibrated when those lines don't stick. Print slooooow for that first layer, 10mm/s, and with ABS I found increasing the flow to 120% helped.</p> <p>Recommended infill for the modifiers on the box is: 30% rectilinear at 0 degree rotation.</p> <p>Recommended infill for the modifiers on the lid is: 30% gyroid at 0 degree rotation.</p> <p>See screenshots of slicer for what 'works' looks like.</p> <p>V2 UPDATE:</p> <p>The original files produced a faster print, but I always thought if I pressed hard enough, my fingers would go through the mesh, and spill beads everywhere. This version is much stronger, and the mesh is the same now as used on the original lid. I also re-designed the lid to add a window. Note, old v1 lid also fits v2 box, and new lid modifiers are to be used against the original v1 lid.</p> <p>New files:</p> <p>Silica Bead Tower (ABS)-Box v2.stl - the main box printable object (it's thicker)</p> <p>Silica Bead Tower (ABS)-Box-InfillModifiers v2.stl - the infill modifiers for the box</p> <p>Silica Bead Tower (ABS)-Lid-InfillModifierWindow.stl - Lid infill modifier to 0% the space for the window.</p> <p>Silica Bead Tower (ABS)-Lid-InfillModifierWithWindow.stl - Lid infill modifier for the rest of the mesh (excluding window) on the lid.</p> <p>Updated instructions:</p> <p>The infill for the v2 box modifiers is now: 30% Gyroid, and fill angle 0.</p> <h3>Print Settings</h3> <p><strong>Printer Brand:</strong></p> <p>Prusa</p> <p class="detail-setting printer"><strong>Printer: </strong> <div><p>i3 MK2.5</p></div> <p><strong>Rafts:</strong></p> <p>No</p> <p class="detail-setting supports"><strong>Supports: </strong> <div><p>No</p></div> <p><strong>Resolution:</strong></p> <p>0.32</p> <p class="detail-setting infill"><strong>Infill: </strong> <div><p>Mixed</p></div> <p><strong>Filament:</strong> Hatchbox ABS White</p> <p><br/> <p class="detail-setting notes"><strong>Notes: </strong></p> </p><div><p>PrusaSlicer, variants, or other slicer that supports modifier STLs is required</p></div> </p></p></p> Category: 3D Printer Accessories
With this file you will be able to print Silica Gel Tower with your 3D printer. Click on the button and save the file on your computer to work, edit or customize your design. You can also find more 3D designs for printers on Silica Gel Tower.