 cults3d
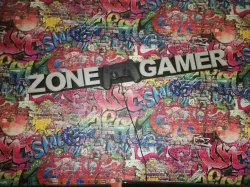
sign
To make this project, you will need a spool of filament in the color of your choice. For the letters and another translucent spool for the windows, an LED strip with its power supply, a 5 mm thick wooden board of 110x12 cm where we will glue the letters and super glue.
Once everything printed, we arrange the letters on the board.
The use of a ruler will be useful to align them. I recommend a spacing of the letters of 10 mm to facilitate the passage of the LED strip. Once everything is placed the way you want it, you can glue the letters and the handle.
Now, we pass the LED strip through the holes provided for this purpose starting from the left, right or in the middle to make it run taking care to make the outline of each letter, this is the most delicate part so that the rendering
final is Tip top. Once all finished and that we have controlled that everything works, we glue the glass of each LED using two to three drops of glue. There will be to drill two holes in the board to fix it to the walls.
And there you have it, a decoration that will please the gamer.
I had a lot of fun creating this sign, I hope you will have as much fun as I did.
Direct link to the original creator's page
More from davlebon
Similar Models




Model Specifications
Frequently Asked Questions
How do I download sign?
Click the "View on cults3d" button above to visit the original model page on cults3d. You can download the STL file directly from the creator's page.
What 3D printer can I use for this model?
This STL file is compatible with most FDM 3D printers (Creality Ender 3, Prusa MK3S+, Bambu Lab, etc.) and resin printers (Elegoo, Anycubic). Check the original page for recommended print settings and materials.
Is this 3D model free to download?
This is a premium model priced at on cults3d. Premium models often include higher detail, multiple parts, and print-tested files.
Can I modify this STL file?
Most STL files can be modified using free software like Blender, TinkerCAD, or Meshmixer. Check the license on the original cults3d page to see if modifications are permitted by the creator.