Siemens hand mixer MQ 90001 repair: broken slider-tab
prusaprinters
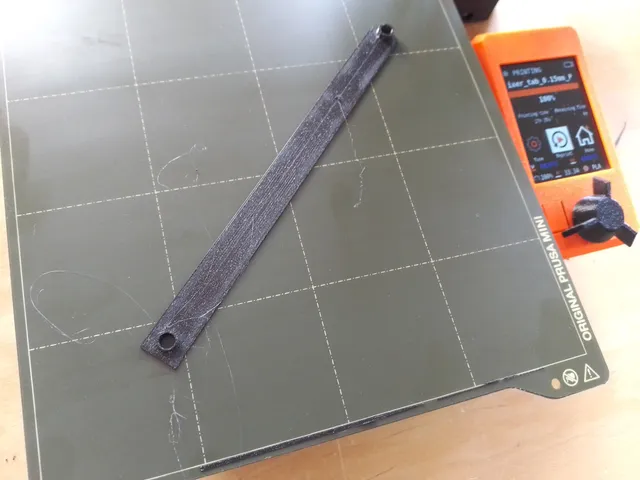
TL;DRA broken plastic part with less than 1 g has been redesigned and 3D-printed, thus avoiding 975g of garbage in the form of a defunct mixer.Machine to repairOur Siemens hand mixer MQ90001/02 broke about 3 years ago. Thanks to the repair contest I finally got my act together to repair it with a printed part.When I presented the repair to my wife, I expected an enthusiastic response (along the lines of "Wow, marvelous, what a repair hero! Hubby did it again!!"). Sadly, she had forgotten by this time that we ever had a hand mixer in the first place…The mixer's FD (Factory Date) reads 8407 , which means it was produced July 2004. MQ90001/02 makes it Version V09 of the mixer according to an explosion view that I found on the Internet.The design of its innards is ingenious – and diabolic. German engineering competing against cheap Chinese competition.The motor looks sturdy and solid such that it might run for a 100 years. Attached to the motor is a plastic slider mechanism that adjusts 3 speeds (3-2-1) and off. (It seems there is a “hidden” position for very high speed.) The carriage slides on plastic rails that are a bit on the wobbly side – this will not last 100 years. The slider has metal tabs with holes that protrude from the back of the plastic slider. These tabs are used to mount electronic components: an inductor, X2 and Y2 capacitors (for AC line filtering), and a diode. No PCB needed, but more manual soldering.Broken part: plastic tongueThe broken part is a flimsy plastic tongue: 1.3. cm wide, 16.1 cm long, but only 0.7 mm to 1.1 mm thick! (The thickness increases/decreases along the part's length.) This tongue translates the sliding motion of the slider that is located at the top of the mixer to the motor's slider mechanism. This plastic tongue has an aggressive bend – and is quite long: 16cm – because it has to go around the grip hole located in the mixer's center.The plastic tongue has a POM recycling mark. According to Wikipedia, POM stands for Polyoxymethylene and is widely used in consumer electronics "in precision parts requiring high stiffness, low friction, and excellent dimensional stability." From this perspective, the choice of the material seems appropriate. The part perhaps can handle the wear and tear in a reasonable manner – reasonable in the sense that it may be not much better or worse compared to the other plastic parts.Failure due to degradation of material?Since we did not use the mixer much, I believe the POM-tongue probably failed because the plastic degradated/deteriorated over time, getting brittle, just by sitting mostly unused on the shelf. Since the tongue is designed on the flimsy side, it does not counteract/prolong failing of the part due to material degradation.As a secondary cause, the tongue is constantly stressed by its (rather extreme) bend. The bend stays mostly the same, regardless of the position of the speed slider. Replacing the plastic tongueOfficial replacement part: slider assemblyAmazingly, it is still possibly to buy the whole slider assembly as a replacement part. As of this writing, you can buy it for EUR 11.10 or EUR 12.99 from German sources.(The image above may be copyrighted. Its use is believed to be under fair use for educational purposes.)“Reverse engineering” and redesign (with FreeCAD)I did measure the key dimensions with caliper and rule, recreating the part with FreeCAD.The original part is produced with injection molding (which is apparent by 3 round injector pin marks). Perhaps to ease injection of the part the round “towers” on both sides are slightly tapered – meaning, the top of the tower is narrower than its base.I did not strive to exactly copy the shape of the part, only keeping the shape/dimensions that are needed to ensure its proper functioning. Especially,the tapering along the tongue was not replicated, the redesigned tongue has equal thickness.the tapering of the tower was not replicated, their rims have equal thickness.the towers of the original part protrude equally from both sides, whereas in the redesigned part it protrudes only from one side. Otherwise, printing would required support – rather extensive support along the length of the whole tongue.FreeCAD 0.21 has been used for the design using the PartDesign and Sketcher workbenches.The simplified shape of the tongue is fairly simple to model. The pointy tip of one end of the tongue is the most complex geometry. (The circle in the Sketcher drawing shown above models the inner diameter of the tower, which is 5mm. The tower's outer diameter (7mm) is modeled with another sketch.)In the spirit of sharing within the repair commons, the FreeCAD source (.FCStd) file is available with an open share-alike license.To transform the part from FreeCAD's internal representation to a mesh model, the Mesh workbench is used. From the mesh model, an STL file is exported.Slicing and Printing (with PrusaSlicer)Since the the tongue is long and thing an experiences mechanical stress, the slicing strategy will have an effect on the mechanical properties of the part. I don't have expertise in this area.I decided slice with 0.15 mm, which results in 5 layers for the tongue, which is 0.8 mm thick. I oriented the part in PrusaSlicer 2.6.0 in such a way that with the standard settingsall layers are solid (no infill)the first, middle and last layers run parallel to the tongue's length (see screenshot above, which shows the first layer).the 2nd and 4th layer runs perpendicular to the other layers.Test print with short tongue (v1)Before running the full print, I printed out a a short tongue with identical end pieces as the long tongue. With the short tongue, I made sure that I could attach both ends to the corresponding pins on the slider and motor sides. This test revealed that the holes were too tight for the pins.Second and final print (v2)The resulting print of the final design feels less strong/sturdy than the original part, but also more flexible in a good way. It seemed a worthy candidate for assembly.This design could be most definitely further improved. Different tongue with could be printed and judged based on their feel of strength versus flexibility. Different layer orientations/patterns and infills could be tested.I did stick to PLA because I have no experience printing other materials yet.Assembly and testingIn order to test the replacement part, the mixer has to be re-assembled, which means closing both shells by squeezing them together. This is a problem in the sense that both closing and opening is a fidgety endeavor. Doing this too often will probably weaken the plastic hooks to the point where they will start to break!Addendum: Alternative print with honeycomb infillAn interesting alternative to printing the part solid, might be to use an infill pattern without solid layers at all. I did a test print with 40% honeycomb infill and a perimeter of 2.Addemdum: Video discussion of printed partsAddendum: Video tour of the innards of the mixer
With this file you will be able to print Siemens hand mixer MQ 90001 repair: broken slider-tab with your 3D printer. Click on the button and save the file on your computer to work, edit or customize your design. You can also find more 3D designs for printers on Siemens hand mixer MQ 90001 repair: broken slider-tab.