Side mount LCD Display - Prusa i3 MK3S+ - Left or Right - with adjustment
prusaprinters
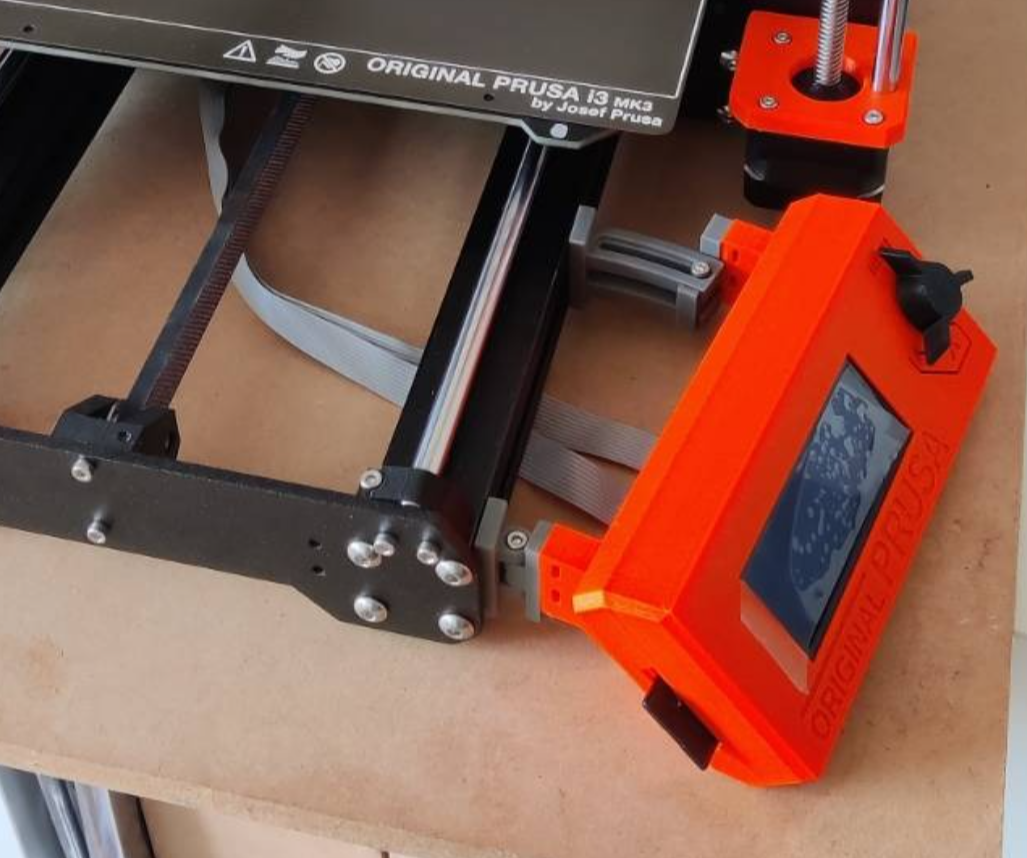
<p>Side mount LCD Display on your Prusa i3 MK3S - (left and right) with adjustment.</p><p>The design allows you to position the LCD display on the left OR right hand side of your printer frame and gives a reasonable amount of swivel adjustment when mounted.</p><p><strong>There are no specific right or left sets of parts - just one set for either side. </strong>With the added benefit of being able to change the location of the display in the future with no extra printing.</p><p><br><strong>Print tip</strong><br>Recommended PETG <br>Layer height 0.2<br>30% infill<br>Vertical shells perimeters 3</p><p>No supports needed.<br><br><strong>Parts required</strong><br>Print all 4 model parts.</p><p><strong>Additional parts not in this model</strong><br>2 x T-slot nuts.</p><p>Link to my version: <a href="https://www.printables.com/model/232808-t-slot-nut-for-prusa-i3-mk3s-30x30-profile">T-slot nuts</a></p><p> </p><p><strong>Additional hardware required</strong><br>2 x M3 10mm hex-bolt<br>2 x M3 20mm hex-bolt<br>2 x M3 Nut<br> </p><p><br><strong>Assembly - instructions. (Images also help)</strong></p><ol><li>Turn off printer<br> </li><li>Move the heat bed back to give access.<br> </li><li>T-slot nuts<br><br>Add the M3 nut and use a 10mm bolt to check it is aligned correctly, tighten to seat the nut into its slot. (So much easier than shouting at them once they are in the track and you have to remove them to seat the nut properly!)<br> </li><li>Insert the T-slot nuts into the side of the T-frame<br><br>I slide them in on their sides and flatten before twisting vertical with a small set of tweezers.<br> </li><li>Attach part "Hinge to frame" at the front of the printer (nut at bottom) to the t-slot nut using an M3 10mm hex-bolt.<br> </li><li><strong>Loosely attach part "Slider to frame"</strong> (to allow for alignment later) to the t-slot nut using an M3 10mm hex-bolt.<br> </li><li>Unscrew the LCD display from the frame front (bolts will be used to attach the new connectors).<br> </li><li>Attach part "Hinge to LCD" and part "Slider to LCD" to the display mounts on the LCD display.<br><br>Use existing M3 bolts (from the original connection to the frame). <br><br><strong>Take care to match the connector position and orientation to the Display side (Left side or Right)</strong> <br><br><strong>Note: the position of the holes on the connectors - the empty hole is always below the LCD Display mount arm.</strong><br> </li><li>Attach part "Hinge to LCD" to part "Hinge to Frame" <br><br>Use M3 20mm bolts and M3 nuts.<br> </li><li>Insert part "Slider to LCD" between the slider bars on part "Slider to Frame"<br><br>If part "Slider to frame" is not aligned - slide to adjust. The motion should be smooth if the part is the correct distance from the hinge.<br><br>When you have the slider working nicely - tighten part "Slider to frame" onto the printer frame.<br> </li><li> Insert an M3 20mm bolt to the part “Slider to LCD” and secure with a bolt on the under section of the bottom bar. <br><br>Tighten the slider bolt to position the display.</li></ol><p><br>You are all done! Now you have a swivel display on the side of your Prusa I3 MK3S printer.</p>
With this file you will be able to print Side mount LCD Display - Prusa i3 MK3S+ - Left or Right - with adjustment with your 3D printer. Click on the button and save the file on your computer to work, edit or customize your design. You can also find more 3D designs for printers on Side mount LCD Display - Prusa i3 MK3S+ - Left or Right - with adjustment.