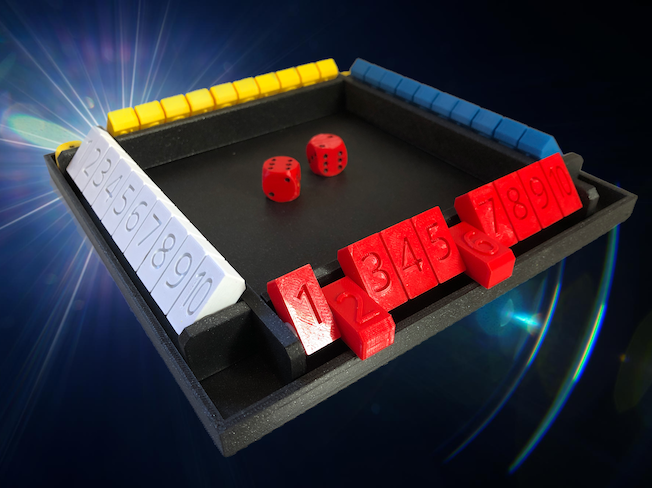
Shut The Box - Family Math Game
prusaprinters
<p>This 3D printed game is a family mathematic game, a tool for children to learn basic mathematic functions through play. It also encourages children's interest in learning! It can likewise improve memory of the elderly.</p><p>I had originally intended to build this game (much bigger) entirely in wood. But since our DIY stores are still closed at the moment (2021-02-27), it was not possible to get the necessary materials. So I designed this game for 3D printing.</p><p><strong>All</strong> parts of this game can be printed (... without support)!</p><p>Dimensions of the game board: </p><p>197x197mm </p><p>213x213mm (when the number tiles are down)</p><p>hight: 24mm (34.5mm - when the number tiles are erected to start the game). </p><p> </p><p>Here you get inspiration for the color design of your game:</p><p>https://youtu.be/mTSg5nc4AYA</p><p> </p><p><strong>Materials needed</strong>:</p><p>Different filament colors (not obligatory) for the 4 rows of number tiles. Different colors can make the game more attractive, especially for children.</p><p>4 metal rods: length 147-148mm (<strong>max.</strong>). Optimal Ø 3mm <strong>(max.</strong>). The edges of the ends should be chamfered a little bit to make them easier to fit into the holes of the mounting bars. Rods can also be made from wire hangers (but with a smaller diameter) or from wooden shish kebab skewers. The rods can also be printed! I recommend Ø 3mm metal rods, as they give the game board a little more weight.</p><p>44 washers Ø 9 x Ø 4 x 0.8 mm (metal, plastic or self-printed).<strong> </strong>It is important that the<strong> washers </strong>are<strong> not thicker than 0.8 mm, </strong>otherwise the spaces will be too narrow and the mobility of the number tiles will be affected!</p><p>Superglue</p><p>Scotch tape</p><p>Sandpaper</p><p>Cutter</p><p>Ø 3mm drill</p><p> </p><p><strong>Note:</strong></p><p>Before you start printing, you have to decide which of the following three <strong>tile back</strong> options you prefer! </p><p>You have the choice between 3 different <strong>tile back</strong>s (when the tiles are down): </p><p>Numbers 1-10 </p><p>Text "ShutTheBox"</p><p>Plain </p><p>The backs of the tile rows should be the same for all 4!</p><p> </p><p><strong>Assembly:</strong></p><p>Note:<strong> </strong>Meaning of<strong> LOWER</strong> and <strong>UPPER</strong> mounting bars:</p><p>Lower<i>:</i> Recesses must form a U. Holes on top, facing each other.</p><p>Upper<strong>:</strong> Recesses must form a tunnel. Holes at the top, facing each other.</p><p>After printing the number tiles (4x10 number tiles), the holes should be cleared of any filament deposits inside with a Ø 3mm drill!</p><p>First, prepare the 10 number tiles for the two <strong>lower</strong> mounting bars and separate each by a washer. Also put a washer on the rod at the beginning and at the end (before the 1 and after the 10). To facilitate the later insertion of the number rows into the base, it is very helpful to<strong> fix the 10 number tiles with scotch tape</strong>. Then insert the rods with the number tiles lined up into the holes of the<strong> lower</strong> mounting bars.</p><p>Proceed in the same way with the two <strong>upper</strong> mounting bars.</p><p>Then put the two finished <strong>lower </strong>bars into the base first. The number tiles should lie flat on the base border. Then insert the finished <strong>upper </strong>bars as a test. Now, with a pencil - along the upper (!) bars - set short marking lines for two glue dots each. Remove the <strong>uppe</strong>r bars again ... apply small drops of super glue to the bottom of the base at each of the markings. The<strong> lowe</strong>r bars do not need to be glued, as they are held to the base by the <strong>upper</strong> ones! Insert both <strong>uppe</strong>r bars, lay all tiles flat and press firmly for a few minutes (e.g. by placing heavy books on top). Later the scotch tape can be removed!</p><p><strong>Remark:</strong></p><p>As all parts are designed to fit very precisely, it may happen that you have to rework one or the other part a bit with sandpaper and/or cutter due to different dimensional accuracy of the printers and the different behavior of the filaments.</p><p><strong>Required stl files:</strong></p><p>1x ShutTheBox_base.stl</p><p>4x ShutTheBox_tiles_1-10_numbers.stl / 4x ShutTheBox_tiles_1-10_plain.stl / 4x ShutTheBox_tiles_1-10_text.stl</p><p>2x ShutTheBox_lower bar.stl</p><p>2x ShutTheBox_upper bar.stl</p><p>4x ShutTheBox_washers_(11).stl</p><p>4x ShutTheBox_rod.stl</p><p>2x ShutTheBox_dice.stl</p><p> </p><p>Have fun printing and assembling! ... and playing!</p><p>I would be happy about the publication or remixes of your prints!</p><p>Stay healthy!</p><p> </p><figure class="media"><oembed url="https://www.youtube.com/watch?v=TVF2WC_iVGo&t=10s"></oembed></figure><p> </p><p><strong>How to Play Shut the Box </strong>(Rules, Tips and Guidelines):</p><p>https://groupgames101.com/shut-the-box-rules/</p>
With this file you will be able to print Shut The Box - Family Math Game with your 3D printer. Click on the button and save the file on your computer to work, edit or customize your design. You can also find more 3D designs for printers on Shut The Box - Family Math Game.
