Sherpa Mini Dragon
prusaprinters
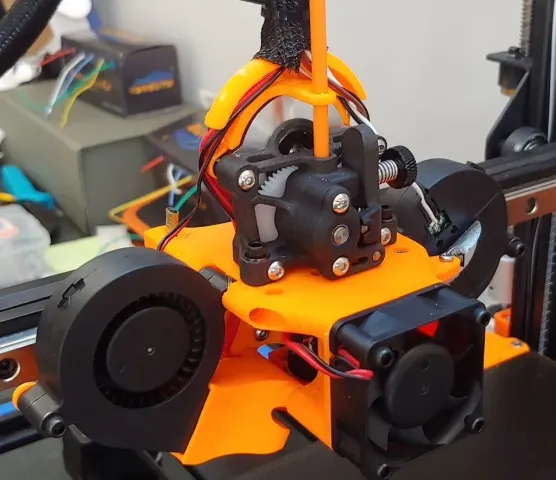
Built this Toolhead to meet my requirements of using a Sherpa Mini Extruder with a solid mounted Dragon Hot End, Dual 5015 blowers and a linear rail. Wanted to have it easily printable and keep the weight as close to the linear rail as possible. My setup has nothing blocked the left and right side of the printer...so decide to mount the blower low and parallel to the rail (bonus, looks like eyes of a Dragon head). I also wanted to keep the direct drive extruder close to the hot end. Machine parts. Dragon HotEnd (SF or HF) Sherpa Mini Extruder 2 x 5015 Blower Fan 1 x 4010, 4015 or 4020 Fan Hardware 1 x 17mm cut PTFE Tube for between extruder and hotend 1 x 35mm or longer cut PTFE Tube for between extruder and cable management 4 x M3 6mm for mounting to linear rail 2 x M3 20mm for 5015 blower mount main body 2 x M3 16mm for 5015 blower mount fan duct 2 x M3 16mm with washer and nuts for mounting Sherpa to main body. 2 x M3 16mm that came with the Sherpa Mini for mounting Stepper motor and Cable management 2 x M2.5 16mm with nuts that came with BL Touch for mount touch sensor. 4 x M2.5 8mm that came with Dragon HotEnd for mounting the hotend to the body. 2 x M3 16-24mm for mount fan depending on depth (top screws) Fan Duct mount. Option 1 2 x M3 16-24mm for mount fan depending on depth (top screws) 2 x M3 12mm for mounting Fan duct to main body 2-2.5mm solid wire approx 40-45mm long (used old coat hanger) for aligning fan mounts to main body Option 2 + 2 x M3 or M2.5 70mm bolts with nuts, you can mount the fan ducts all the way without the coat hanger. Print Settings Printer: Eryone Thinker S Rafts: No Supports: Yes Resolution: 0.1-0.3 Infill: 20 Filament: Eryone PETG Orange Post-Printing ============= Install setup order. Clean up and test fit all screws before mounting, use drill bit to clean up if fitting are too tight, each print has different tolerances Mount Main Body to Linear rail (4 x M3 6mm) Mount Dragon ToolHead to Main Body (2 x M2.5 8mm) Place 17mm PTFE tube in place on top of ToolHead Mount BL Touch to Main Body, 1 M2.5mm x 16mm through Main body, BL Touch mount and BL Touch Sensor, 1 M2.5mm x 16mm for Mount with sensor. Run wires for BL Touch, HotEnd cartridge & thermistor, front fan and optionally side blower fans through Main body top opening. Mount Sherpa Stepper with extruder chase and cable management (2 x M3 16mm) Mount Sherpa Mini Extruder to main body. (2 x M3 16mm, washer and nuts) Mount Front Fan top screws only (2 x M3 16-24mm) Mount Fan Duct to main body with either option. Option 1. M2.5-3 70mm bolt from front fan through fan duct and out the back side of the main body and use nut to secure. Option 2. Use 2-25mm wire to align front of fan duct and use 2 x M3 12mm to attach to back of main body and 2 x M3 16-24mm to secure bottom of from mounted fan. Run HotEnd cartridge & thermistor wires around back outside of the fan ducks and secure to Hotend. Mount both blower fans to Fan Duct and main body use 2 x M3 20mm for main body mount and 2 x M3 16mm for fan duct mount. Category: 3D Printer Parts
With this file you will be able to print Sherpa Mini Dragon with your 3D printer. Click on the button and save the file on your computer to work, edit or customize your design. You can also find more 3D designs for printers on Sherpa Mini Dragon.
