Servo Hinge for Iron Man Helmet
prusaprinters
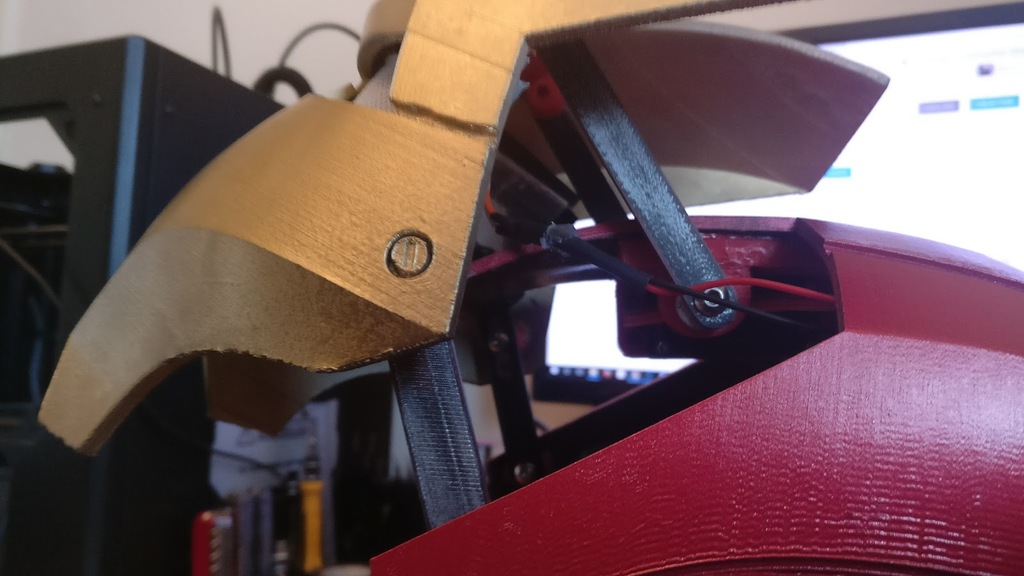
<p>This is a servo hinge setup for use with MIPRESIDENT's Iron Man Mark III helmet (<a href="https://www.thingiverse.com/thing:260152">http://www.thingiverse.com/thing:260152</a>).</p> <p>You can see my final build here: <a href="/make:286759">http://www.thingiverse.com/make:286759</a></p> <p>And a video of it in use here: <a href="https://youtu.be/q4N2HxEN5ng">https://youtu.be/q4N2HxEN5ng</a></p> <p>You can follow me as I print and build the full suit on my channel here: <a href="https://youtu.be/aBibldoc0sg">https://youtu.be/aBibldoc0sg</a></p> <p>This hinge setup requires no modification of the existing model and doesn't involve drilling/screwing through the sides.</p> <p>You will need to print:</p> <ul> <li>1x Face Mount</li> <li>1x Flat Top</li> <li>1x Hinge Arm</li> <li>1x Hinge Brackets</li> <li>1x Second Hinge</li> <li>1x Second Hinge Mount</li> <li>1x Servo Mounts</li> <li>2x Small Arms</li> <li>1x Hinge Limiter (Optional)</li> <li>1/2x Small Arm V2 (Optional)</li> </ul> <p>For this you will also require:</p> <ul> <li>1x MG995 servo</li> <li>1x servo micro controller (eg. Arduino Nano)</li> <li>11x M4x10 Bolts</li> <li>7/14 M4 Washers</li> <li>Extreme hold adhesive (Loctite 401 is an ideal adhesive for plastic to plastic, including PLA)</li> </ul> <p>I hope you enjoy printing and using my design. To help me keep designing and uploading more things, you can tip me via '<strong>Buy Me a Coffee</strong>' here: <a href="https://www.buymeacoffee.com/JoshForwood">https://www.buymeacoffee.com/JoshForwood</a></p> <p>Thank you!</p> <h3>Print Settings</h3> <p><strong>Printer:</strong></p> <p>Flashforge Creator Pro</p> <p><strong>Rafts:</strong></p> <p>No</p> <p><strong>Supports:</strong></p> <p>No</p> <p><strong>Resolution:</strong></p> <p>0.2 LH / 0.4 Nozzle</p> <p><strong>Infill:</strong></p> <p>35-50%</p> <p><strong>Notes:</strong></p> <p>If you can spare the time, use a slightly higher resolution but 0.2mm Layer Height is fine</p> <h3>Post-Printing</h3> <p><strong>Fit Top Block and Servo Mount</strong></p> <p>Screw Servo into the two servo mount blocks as pictured (ensuring you get these the right way around), then use your adhesive to fix in the correct place (as pictured) on the flat side of the 'FlatTop' part. Do not glue the servo itself!</p> <p>This part has been designed to perfectly fit over the curved ridge inside the top of the helmet to provide a flat surface for the servo to sit on. If printed correctly this piece should actually clip in place and hold it's position on it's own, but as it will have pressure put on it by the servo, you will want to still use adhesive (and quite a lot) to ensure it stays strong.</p> <p>However, don't fix this to the helmet just yet!</p> <p><strong>Fitting Hinges</strong></p> <p>Once your hinge mounts are dried, you can then attach the 'HingeArm' part to the servo and using one of the bolts and the washers, the 'FaceMount' piece to the other end.</p> <p>Once that is successfully fitted, you can then fit the 'SecondHinge' to the other side of the FaceMount in the same manner. Now Attach the 'SecondHingeMount' to the other end of that second arm. This should allow you to position the SecondHingeMount so that the two arms are perfectly parallel. Once you are happy with the positioning, you can glue the SecondHingeMount to the FlatTop as well.</p> <p><strong>Fitting Flat Top</strong></p> <p>You can now fit this to the inside of your helmet. Ensure both surfaces are clean and dry then apply your adhesive and fit into place.</p> <p><strong>Attaching to face plate</strong></p> <p>Once the Flat Top has dried, place your faceplate into position on your helmet, tape in place using masking tape (this should ensure it doesn't damage your beautiful paint work), then turn it upside down so you can see inside.</p> <p>Gently, move the hinge arms until the Face Mount is flush against the inside of the mask front. It should fit it nice and snug. Once you have got the right angle, you can glue this on as well.</p> <p><strong>Fitting Side Hinges</strong></p> <p>In addition to your servo controlled arms, there are also two small slave hinges which help keep the mask pulled in the right angle.</p> <p>Each of these small arms are screwed into two of the 4 HingeBrackets, again, using a screw and one or two washers.</p> <p>Once they are both assembled, spend a good time experimenting with making sure you have the right position. If these are placed even slightly out, your mask may not open. (If you do end up gluing these irreversibly, fear not, providing you are only a bit out, there is a solution so skip to the last section)</p> <p>Once you are happy with your positioning, glue these down.</p> <p><strong>Hinge Limmiter</strong></p> <p>Your mask should now be ready to run. Once you are happy with your coding and motion, you may find that the short hinges move to far when the mask moves up and prevents it moving down again.</p> <p>If you are finding this is an issue, print out the 'Hinge Limiter'. You should only need one of these. Move your mask to the position it opens to, then manually move your short hinges to the highest they should go before it becomes an issue. Now, glue the curve of the hinge limiter to one of the upper hinge mounts, ensuring that the extended bit will prevent further high extension but that it doesn't interfere with it's full motion downwards.</p> <p><strong>HELP! I've fitted my small hinges incorrectly!</strong></p> <p>Fear not, there may still be a solution.</p> <p>If your small hinges seem to restrict your mask from opening, try printing out one of the "ShortArmV2" hinges. Replace one or both of your small arms with this and this should allow your helmet to open and close (I personally ended up having to use this on one side of my helmet).</p> Category: Costume
With this file you will be able to print Servo Hinge for Iron Man Helmet with your 3D printer. Click on the button and save the file on your computer to work, edit or customize your design. You can also find more 3D designs for printers on Servo Hinge for Iron Man Helmet.